This article was prepared with AI assistance based on an analysis of the current Lumina Studio source code, existing Wiki content, and relevant workflows. It has been checked against the current version, but omissions or details that become outdated may remain as the software evolves. If you find an error or have a clearer explanation, example, or suggestion, please leave a comment on this page or propose an edit on GitHub.
Batch Generate Multiple Models: File List, Results, and Retry
Batch Generate is for a prepared group of images that should use one shared colour source and one shared set of primary settings. Lumina processes the group and builds one merged 3MF for inspection and layout.
Remember these rules:
- selecting several files on the first upload, or choosing Add more images, enters Batch mode;
- every file uses the same LUT or Material Archives, Width, Thickness, Structure Mode, and Modeling Mode;
- crop, rotation, Color Workstation edits, and per-image Preview are not configured separately inside the Batch; prepare those files first;
- read Success / Total before downloading; if some files fail, the merged 3MF contains only successful models;
- the bed Preview may show fewer models than the merged 3MF can contain. Verify the complete object list in the slicer.
The screenshots below show a real run in the current English interface with two test images and a successful 2 / 2 result.
When is Batch Generate appropriate?
Use it for:
- a group of badges, magnets, tags, or test pieces using the same filaments and layer settings;
- images whose orientation, transparency, and composition are already prepared;
- several models that should enter one 3MF for shared slicer layout;
- processing the complete group first, then retrying only failed files.
Do not use it when:
- every image needs a different LUT, archive set, thickness, structure, or Modeling Mode;
- each file still needs independent crop, rotation, recolouring, or retouching;
- even one representative image has not yet produced a trustworthy Preview;
- the desired feature is not available in Batch, such as Puzzle, Validation Card, or a separately uploaded height-map Relief workflow.
When settings differ per model, use the single-image workflow. If Source Type is still uncertain, start with Installed or Custom Material Archives, Inferred LUTs, or Legacy LUTs?.
Step 1: prepare every image first
Before adding a file to the Batch, confirm:
- its orientation is final;
- transparent edges, shadows, outline, and canvas margin are correct;
- the file opens normally and has an identifiable filename;
- it is suitable for the same Source Type, structure, and target width as the group;
- the original is stored separately.
For crop and rotation, see Upload, Replace, Crop, and Rotate an Image.
the shared settings currently visible in the Batch page. Remove any file that needs a different size, material set, or structure and process it separately.
Step 2: build and inspect the file list
Select several files in the first upload, or upload one and use Add more images. The file count and names appear at the top of Core Settings.
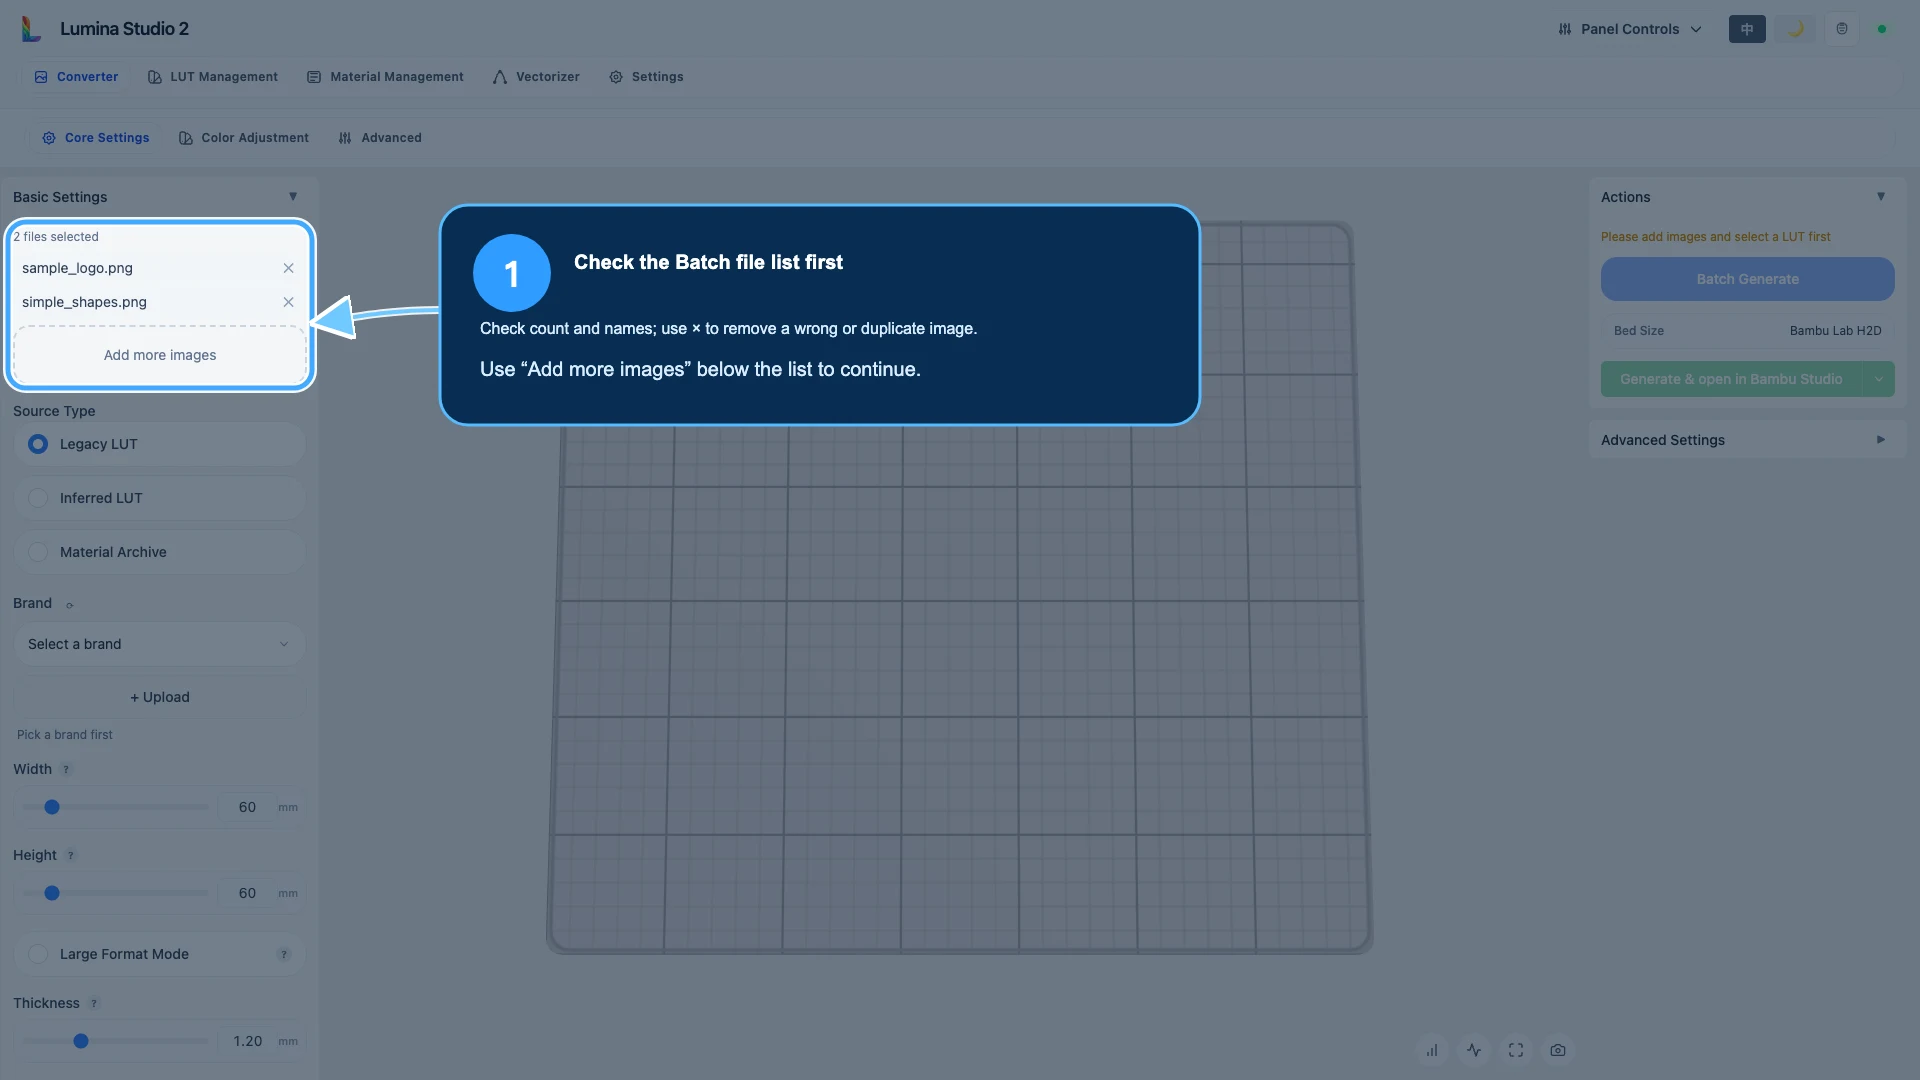
Check three things before configuring the Batch:
- Count: does “N files selected” match the intended group?
- Names: is any file duplicated, outdated, or accidentally included?
- Removal: the × beside a filename removes only that task item and does not delete the source from disk.
Use Add more images to append files. Any change to the list invalidates an older Batch result. Removing files until one remains returns to the single-image workflow.
With a long list, the interface may show only a subset of names and summarise the rest. Use the total count rather than the number of visible rows.
Step 3: choose one shared colour source and setting set
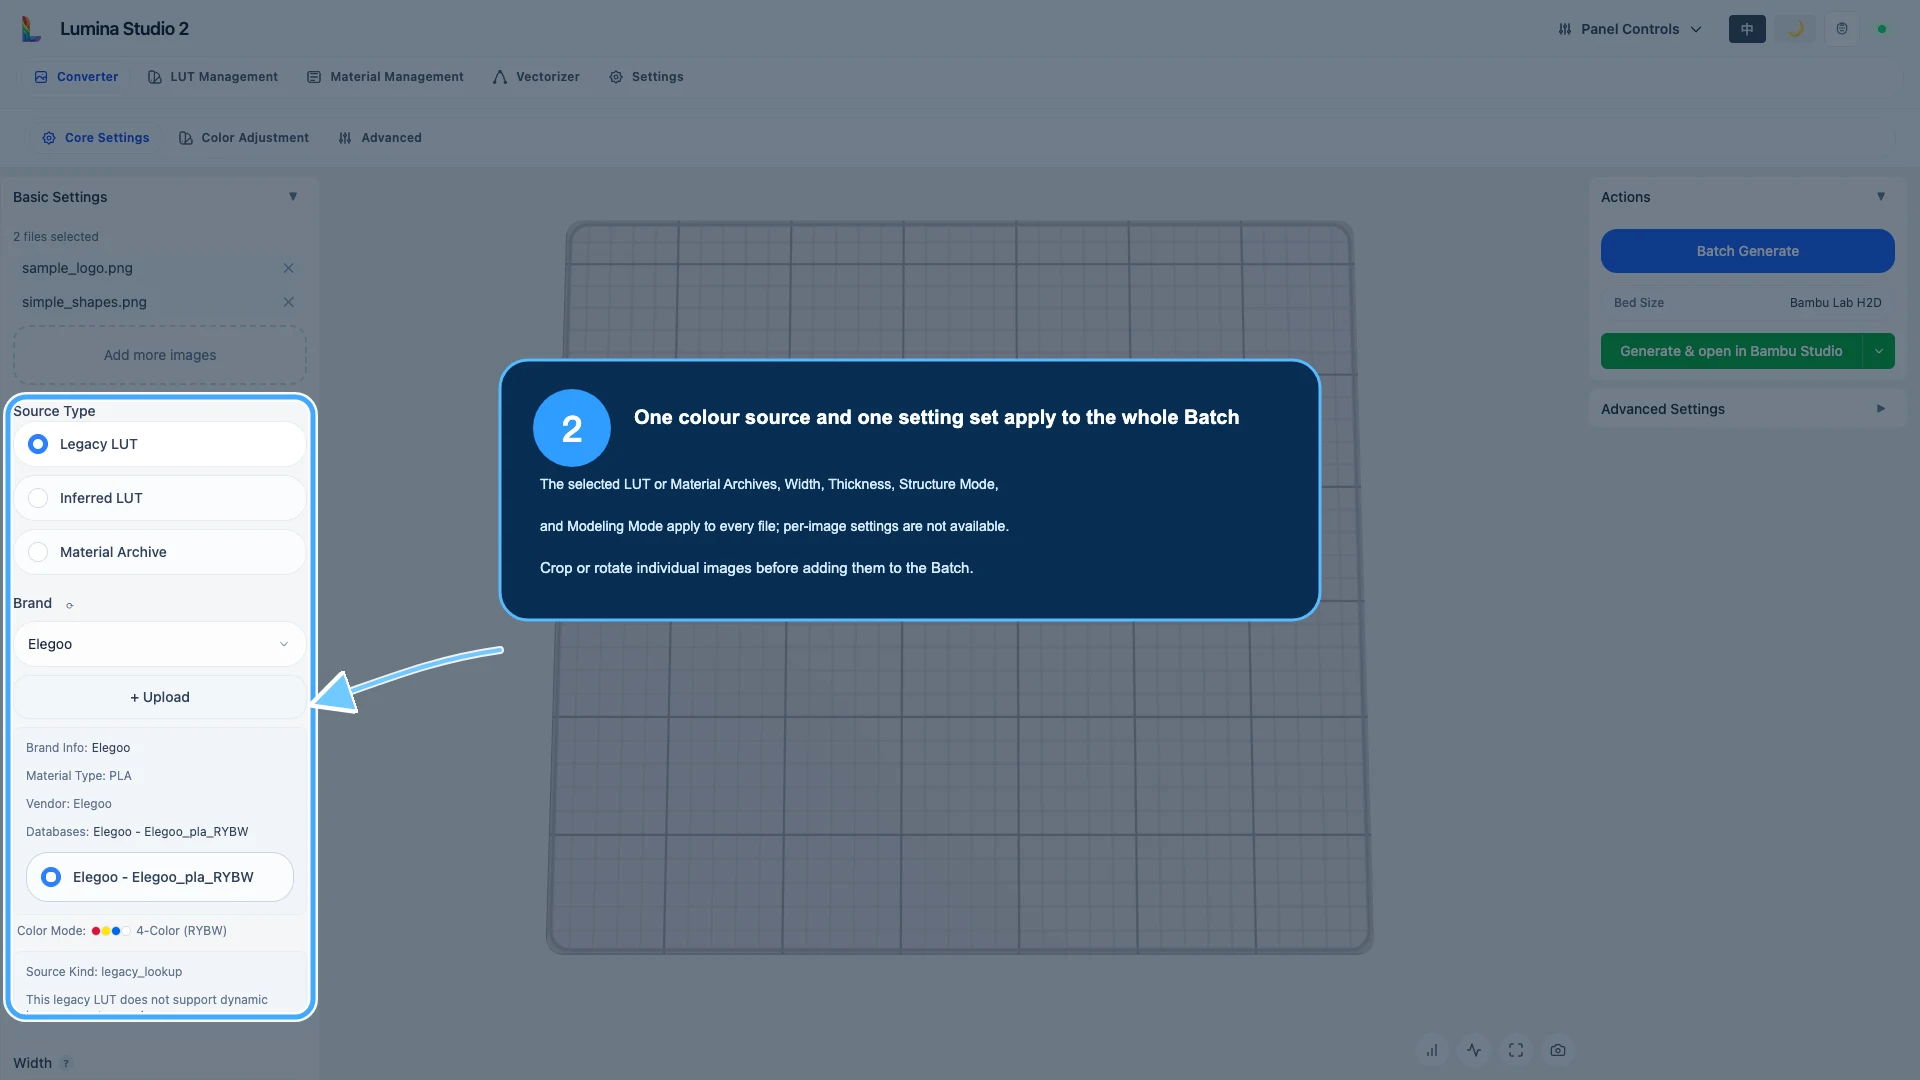
Choose Source Type, then a valid LUT, database, or Material Archive set. Batch Generate remains unavailable until the required source is ready.
The complete Batch shares:
- Legacy LUT, Inferred LUT, or Material Archives;
- target Width;
- Backing Thickness;
- single- or double-sided Structure Mode;
- High-Fidelity, Pixel Art, or Vector Modeling Mode;
- colour-detail, advanced matching, and device settings that Batch supports.
The same Width is applied to every source. Different aspect ratios produce different heights and footprints, so the models will not necessarily occupy equal bed space.
If this source and setting set has never been used, run one representative image through 2D Preview, 3D Preview, Generate, and real slicing before building the Batch. This is faster than discovering a shared-setting mistake after every file has completed.
For mode choice, see High-Fidelity, Pixel Art, or Vector?. For advanced combinations, see Which Features Can Be Used Together?.
Step 4: click Batch Generate once
When the colour source is valid, Batch Generate becomes available. Click it once.
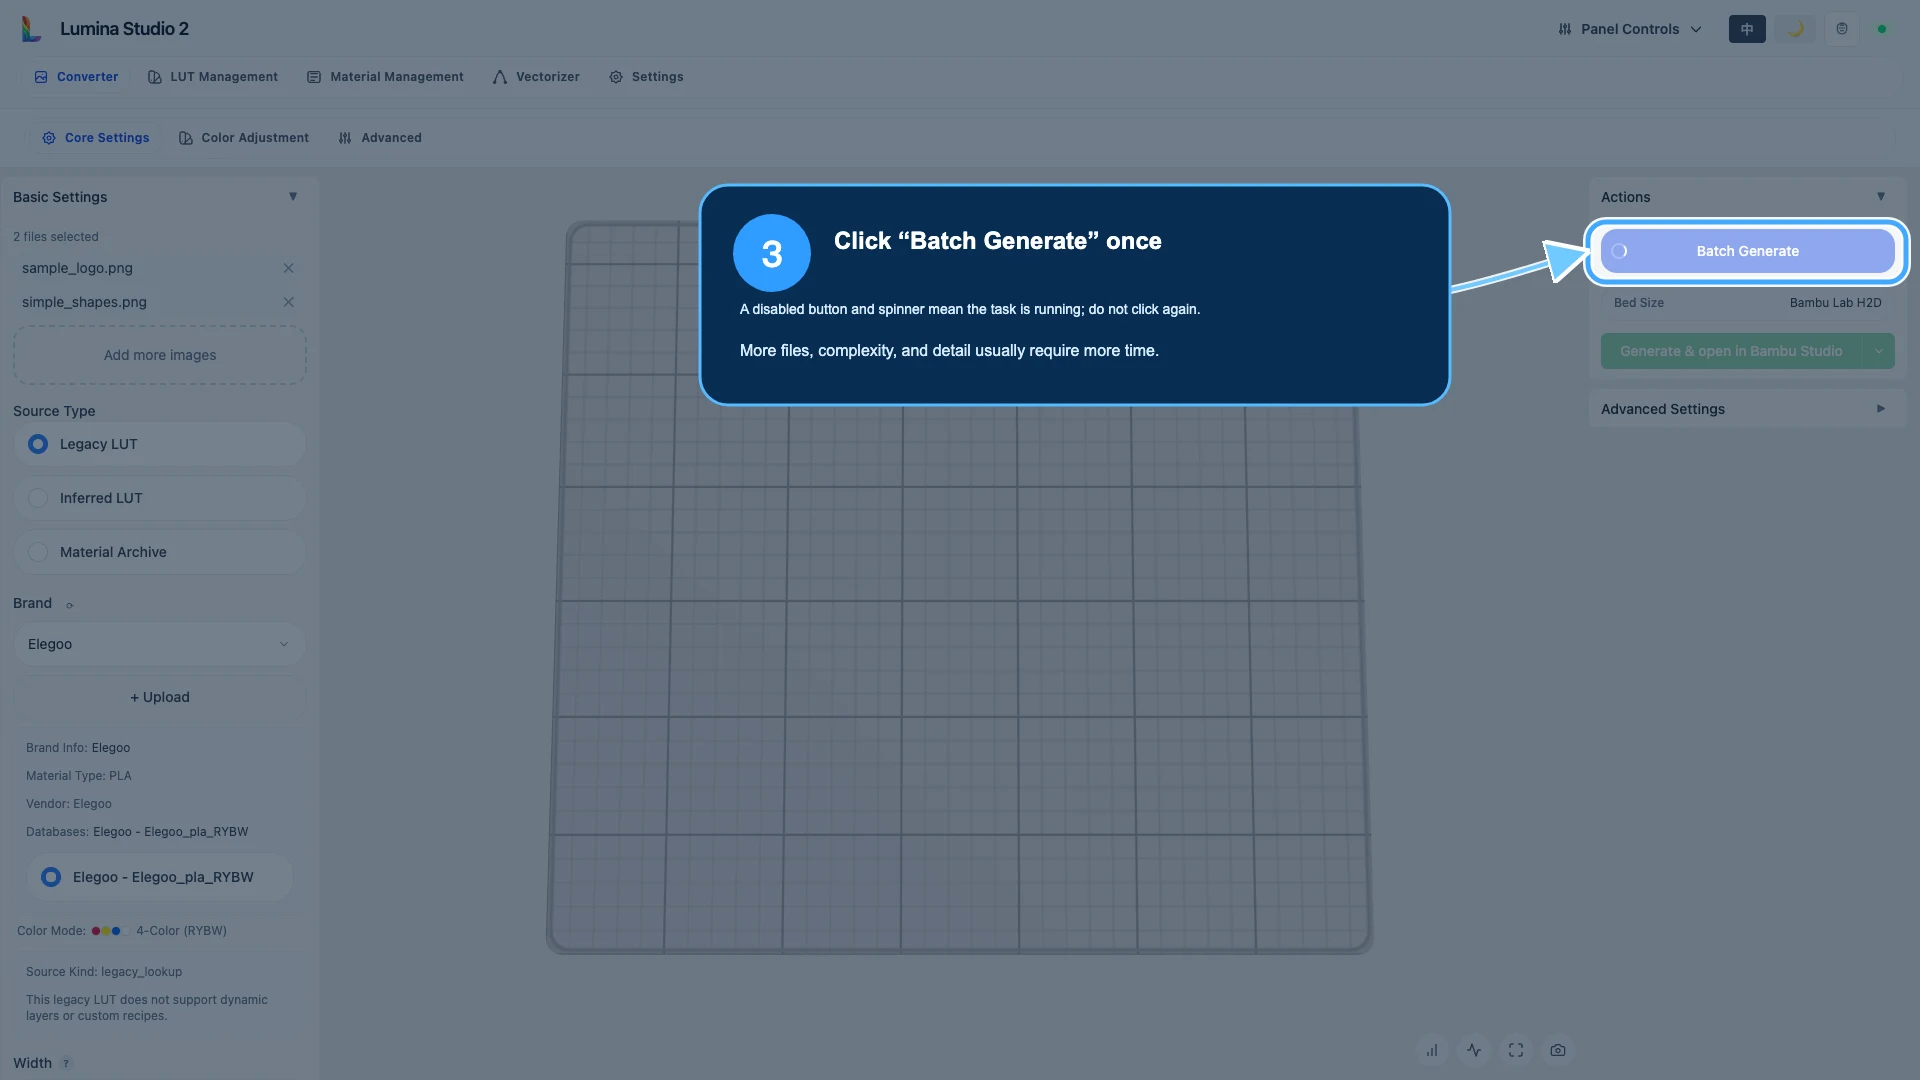
A disabled button and spinner mean that processing is still running. More files, larger images, more complex boundaries, greater Width, more colour detail, and higher Preview precision usually require more time.
Do not click repeatedly, upload another file, or refresh the page. Lumina processes files in the list and merges successful results. One failure does not necessarily fail the entire Batch.
Step 5: read the result and download promptly
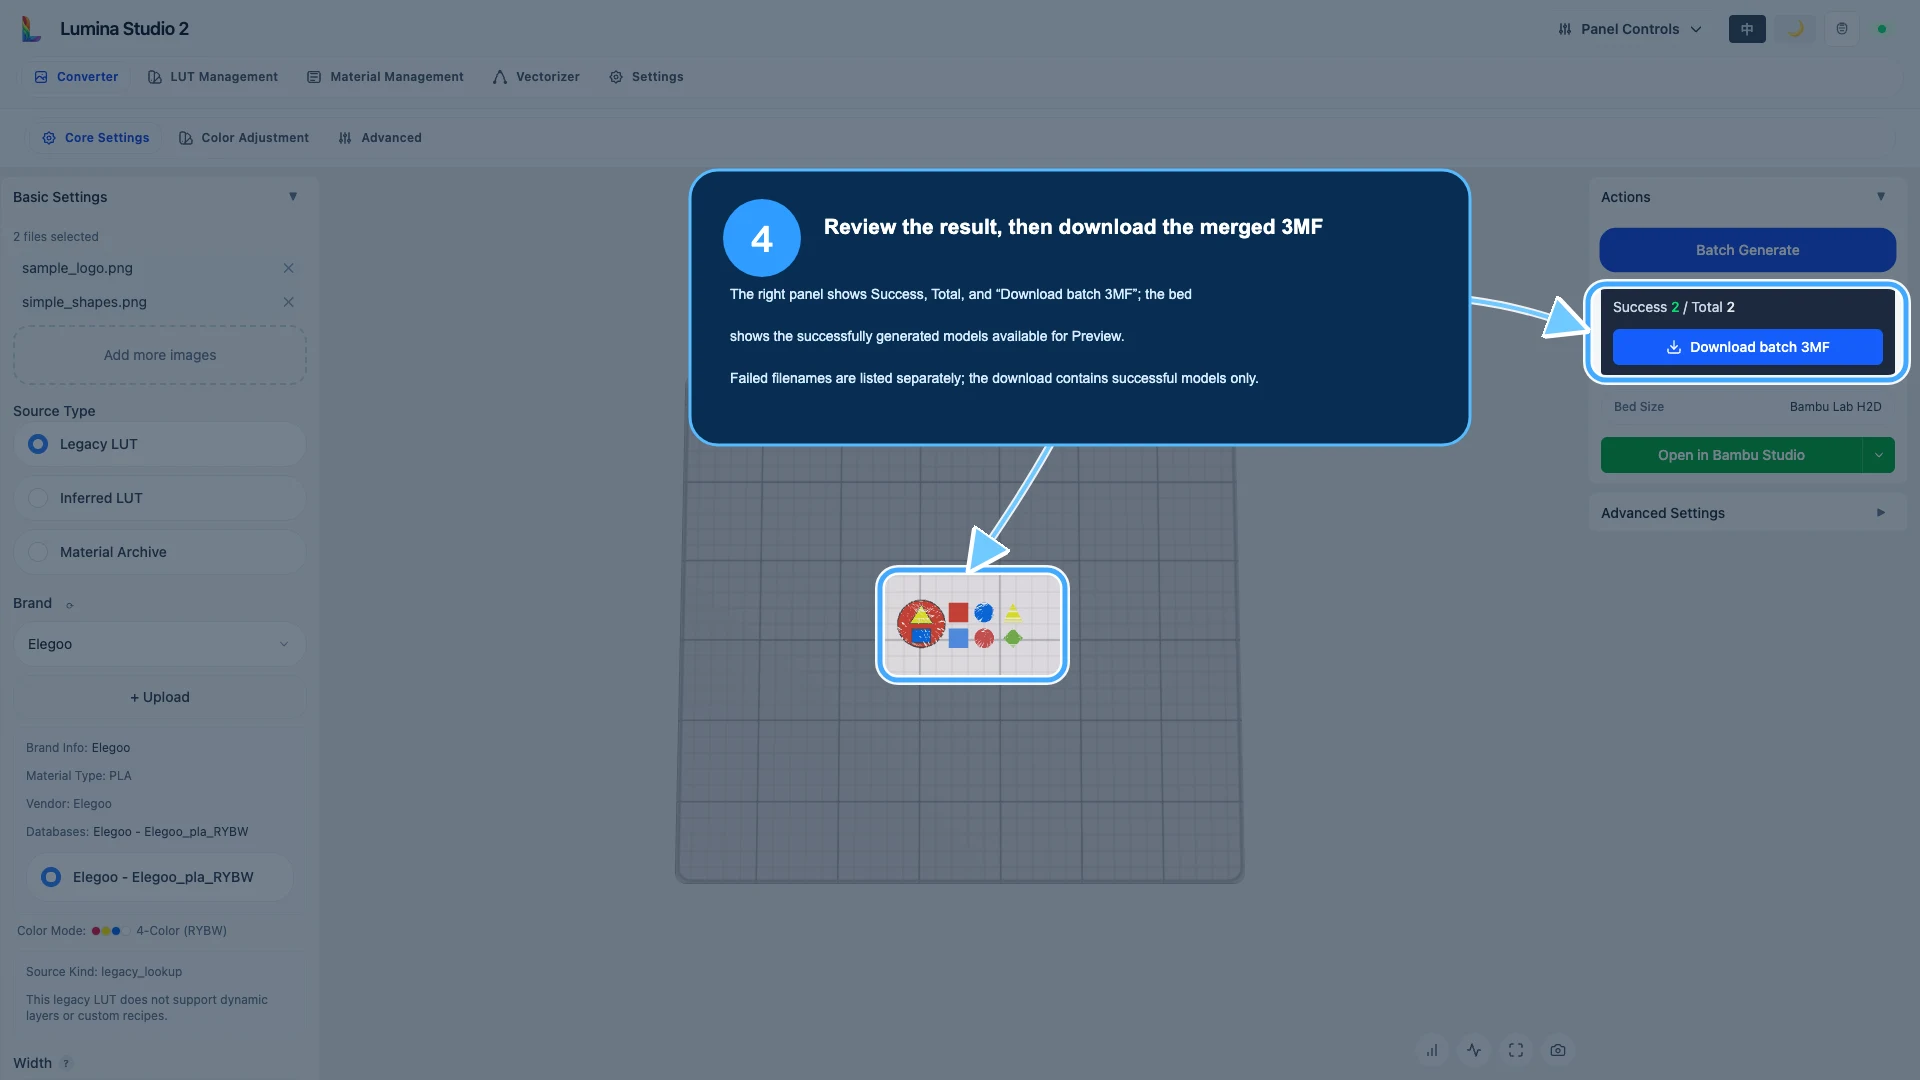
Read four result areas:
- Success: files that actually generated;
- Total: files that participated in this Batch;
- failed files: shown by filename when failures exist;
- Download batch 3MF: available when at least one model succeeded and containing only successful models.
The example’s Success 2 / Total 2 means both images generated. Download the merged 3MF soon after completion. Refreshing, changing the list, uploading another source, or letting temporary files expire can invalidate the download URL.
Why can the bed Preview show fewer models than Success?
When many models succeed or the selected printer bed cannot display them all reliably, the page may Preview only a subset and explain that the Batch 3MF still contains all successful models. Judge the file from Success and the slicer object list, not only the number visible in Lumina’s bed Preview.
What does “some models may be outside the bed” mean?
Lumina still provides the merged 3MF, but automatic layout may place geometry beyond the selected bed. Re-arrange, rotate, scale, or split plates in the slicer. Never print an out-of-bounds layout directly.
Step 6: complete the slicer check
Batch success means that models were generated and merged. It does not mean that the plate is ready to print. In Bambu Studio, OrcaSlicer, or the configured slicer, verify:
- the object count equals Success;
- every model is inside the bed and models do not overlap;
- physical dimensions make sense for each source aspect ratio;
- project filaments map to the intended real spools and machine slots;
- printer, nozzle, and process settings are correct;
- display surface, backing direction, and single/double-sided structure are correct;
- sliced layers, material changes, and estimated usage are reasonable.
When Lumina Preview, slicer Preview, and the physical print disagree, follow Why Do Lumina Preview, Slicer Preview, and the Physical Print Differ?.
Retry failed files without losing successful work
If the result says Success 3 / Total 5, use this order:
- download the merged 3MF containing the three successful models;
- record the two failed filenames;
- upload one failed file alone with the same source and primary settings;
- check for corruption, an abnormal canvas, complex SVG geometry, or excessive size and precision;
- fix it, then generate alone or create a small Batch containing only corrected files.
Do not overwrite a downloaded successful result merely to retry failures. A single-file test makes it easier to separate a source problem from unsuitable shared settings.
For a file that also fails alone, see The Page Will Not Open, Keeps Spinning, or Generation Fails. For SVG-specific problems, see SVG Troubleshooting.
Common questions
Why does Batch mode have Batch Generate instead of separate Preview and Generate?
It processes the group directly, then shows a bed Preview and merged download for successful models. Use the single-image workflow when colour detail, manual replacement, or structure must be examined before generation.
Can each image use a different Width or Thickness?
Not inside one Batch. Split the images into several Batches or Generate individually.
Does one failed image prevent successful downloads?
No. When at least one file succeeds, Lumina provides a merged 3MF containing successful models and lists failed filenames separately. No valid download is available if every file fails.
Is the old result valid after adding another file?
No. The file list has changed. Download important old results first, then Generate the new list again.
Why do models with identical settings have different footprints or heights?
Shared Width does not force identical aspect ratio, alpha boundary, geometry, or structure. Measure the real millimetre size and object bounds in the slicer.
Does a larger Batch always save more time?
Batch reduces repeated setup, clicks, and slicer imports; it does not remove per-image computation. Test 2–3 files before scaling to a large group.
Can I print immediately after downloading?
No. Check bed bounds, spacing, material mapping, nozzle, and Layer Preview first.
Image notes and content licence
The screenshots are real captures of the current English Lumina Studio interface.
sample_logo.png and simple_shapes.png are simple original project test assets. The
visible brand, LUT, and slicer names explain the interface and are not recommendations.
The captures contain no personal files, accounts, address bar, or local path.
Unless otherwise noted, the original text, test graphics, and focus annotations are available under the Wiki’s CC BY-NC-SA 4.0 content licence. Third-party slicer, printer, and material brands belong to their respective owners.
Batch compatibility, Preview limits, and control names can change. Treat the current interface, result message, downloaded file, and real slicer check as the final authority.
Submit feedback
Your feedback is sent privately to the Wiki maintainers and is not displayed publicly on this page.