This article was prepared with AI assistance based on an analysis of the current Lumina Studio source code, existing Wiki content, and relevant workflows. It has been checked against the current version, but omissions or details that become outdated may remain as the software evolves. If you find an error or have a clearer explanation, example, or suggestion, please leave a comment on this page or propose an edit on GitHub.
Convert a Bitmap to SVG, Then Continue in Image Converter
Lumina’s Vectorizer traces a bitmap—such as PNG or JPG—into SVG paths. This can make a logo, icon, line drawing, or flat-colour illustration easier to scale and process with the native Vector workflow.
It does not restore detail missing from the source. A photograph or soft gradient may be divided into a limited set of flat regions, and a noisy image can create many complex paths. Always compare the result with the original before using it.
Start by asking whether tracing is appropriate
Usually suitable:
- logos, icons, signs, and symbols;
- line art with clear boundaries;
- limited-palette illustrations;
- text already converted to visible shapes;
- flat, closed colour regions.
Usually unsuitable without cleanup:
- ordinary photographs;
- soft shadows and subtle gradients;
- very small or heavily compressed images;
- transparent edges with grey or white contamination;
- artwork containing many isolated specks.
If the source is already a valid SVG, upload it directly to Image Converter. Do not trace it again. For basic concepts, see Bitmap vs Vector Images.
Step 1: upload the original bitmap
Open Vectorizer and upload a PNG, JPG, WebP, or BMP. Keep the original file separately.
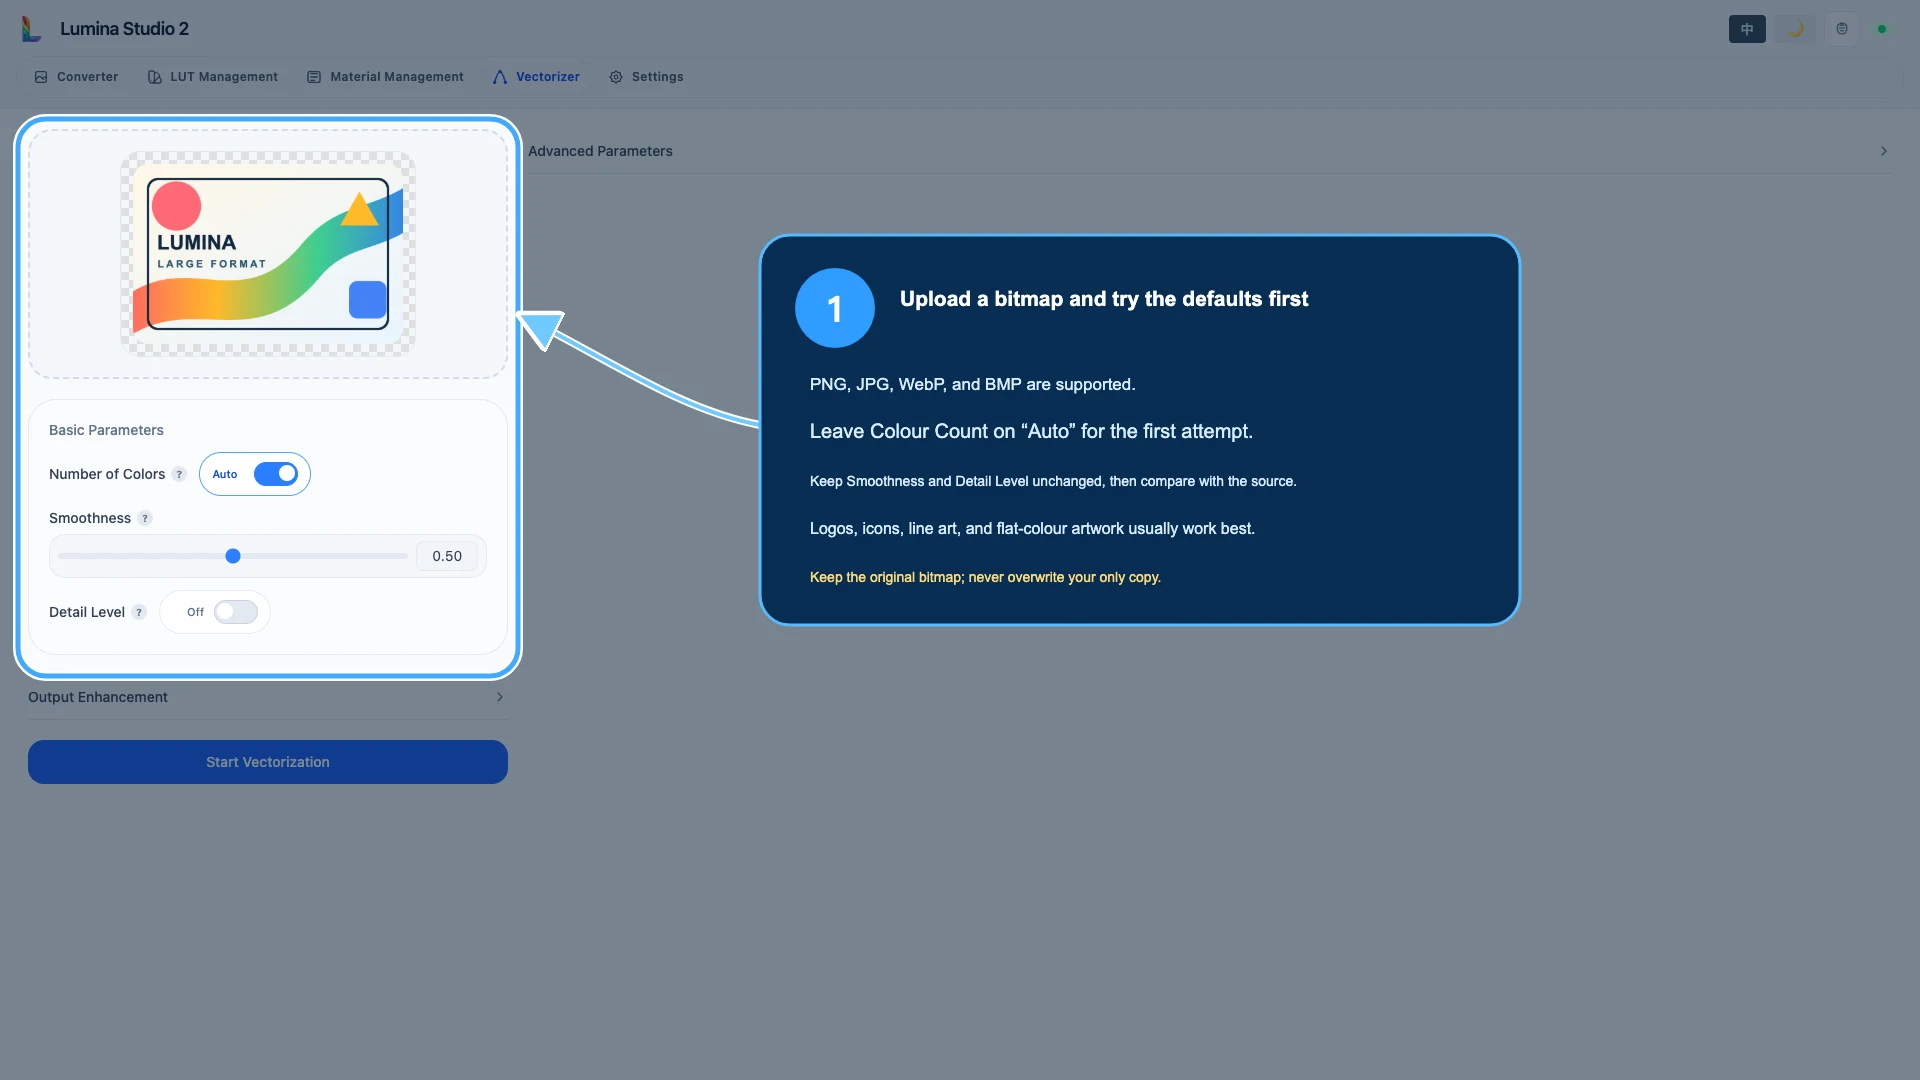
For the first attempt:
- leave Colour Count on Auto;
- keep Smoothness and Detail Level at their defaults;
- select Start Vectorization once;
- wait for the result instead of changing several controls while it runs.
The first result gives you a baseline. Changing several parameters at once makes it hard to know which adjustment helped or damaged the paths.
Step 2: compare the source and SVG result
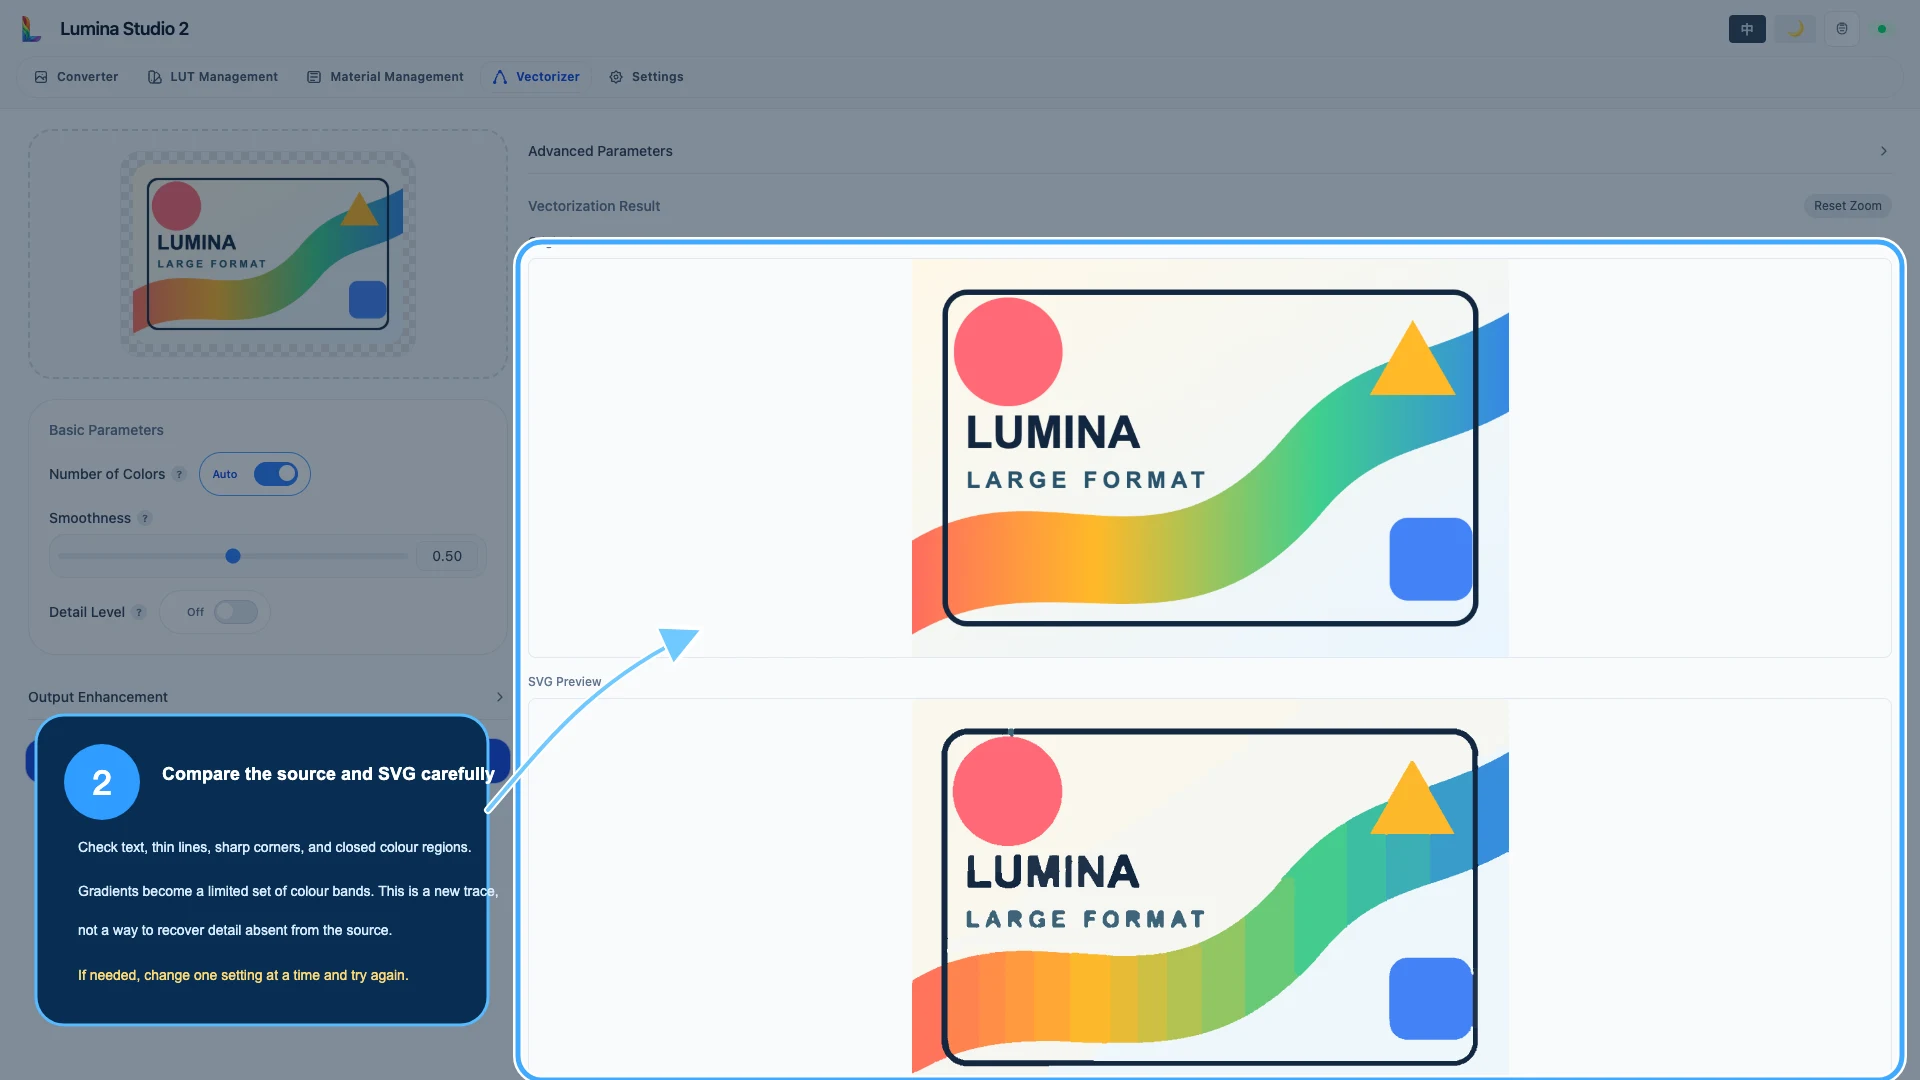
Compare these areas:
- text and small symbols: are counters and enclosed spaces still open?
- thin lines: did they disappear, merge, or become uneven?
- sharp corners: are they rounded or clipped?
- closed colour regions: are there holes, leaks, or unexpected islands?
- transparent boundary: did an unwanted background become a solid shape?
- gradients: how many bands were created, and are those bands acceptable?
Zoom in and inspect the smallest feature that must survive at the final print size. A clean screen preview does not prove that the selected nozzle and line width can print it.
If the result is too rough, adjust Smoothness or Detail Level once and compare again. If it has too many small paths, first clean the bitmap and remove noise rather than simply asking for more colours.
Step 3: read the result before choosing an action
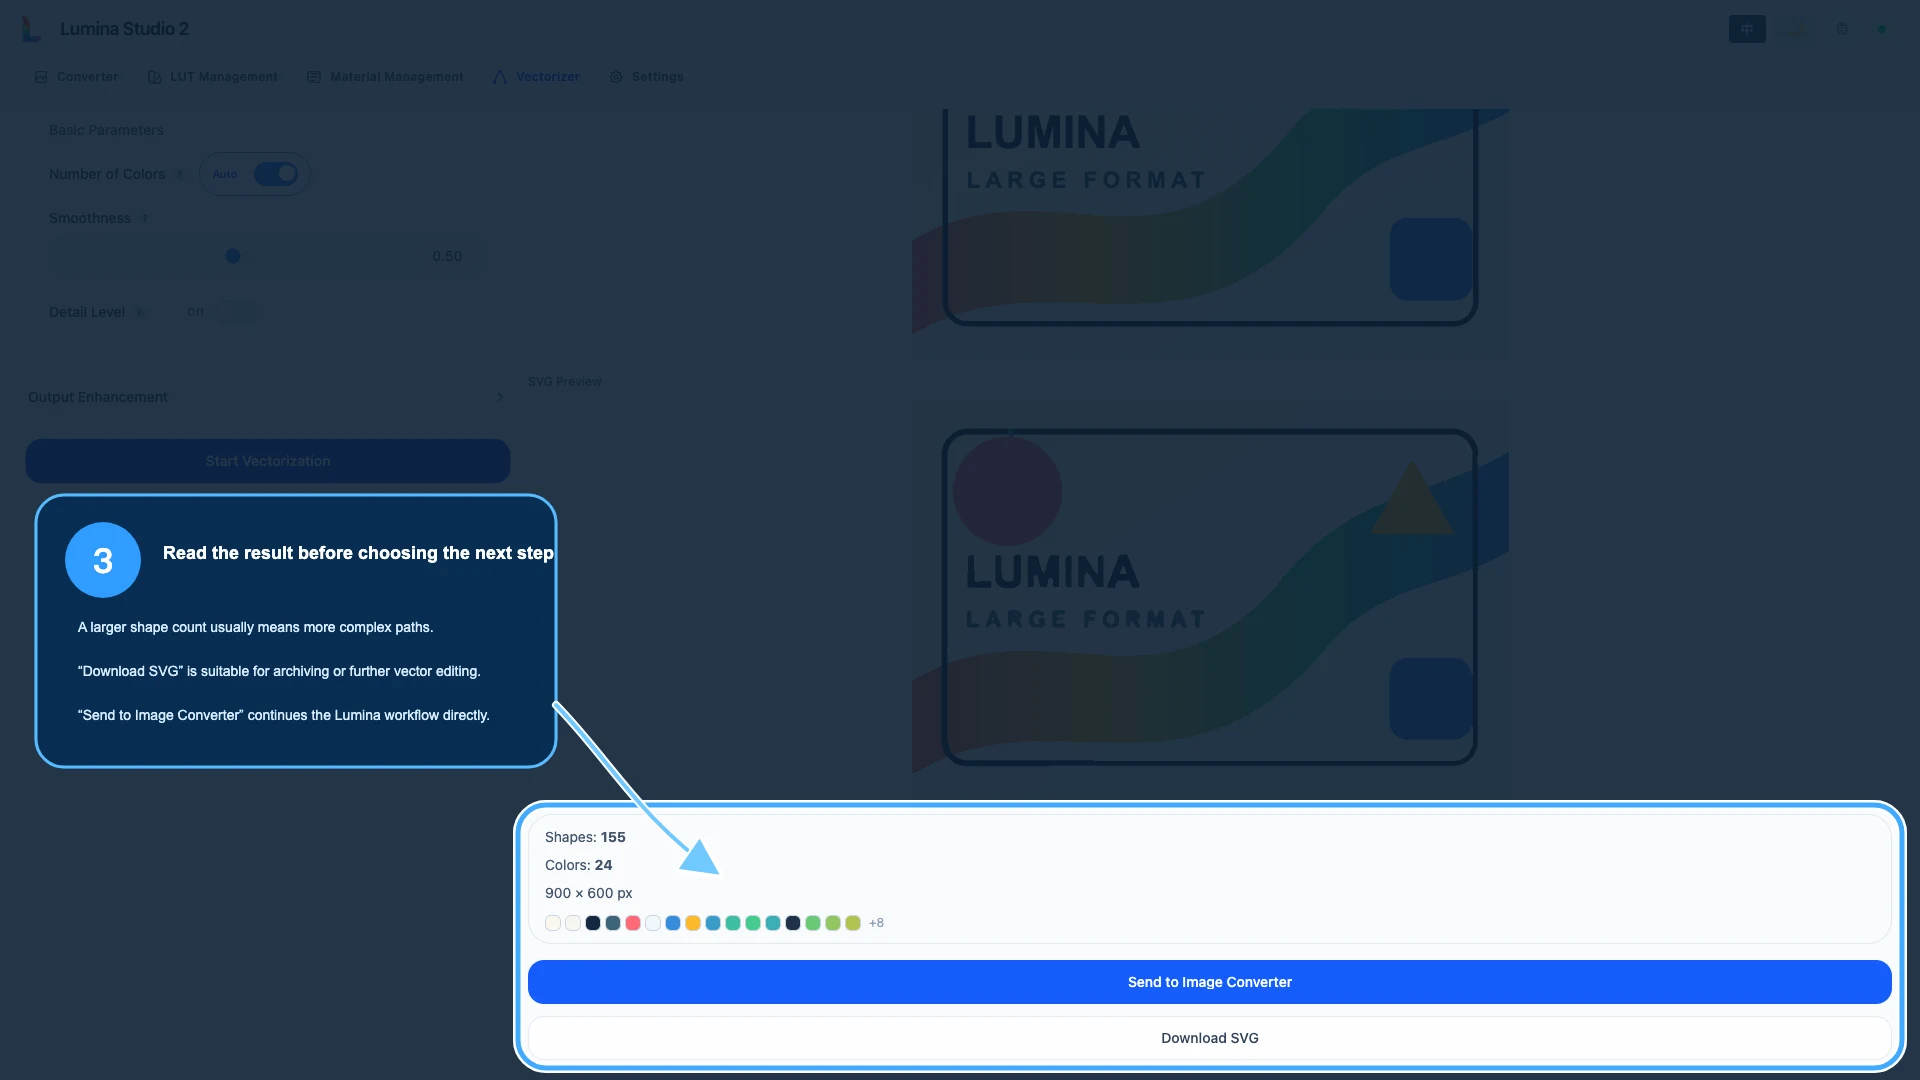
The result area reports information such as shape count. More shapes usually mean more path complexity, not automatically more useful detail.
- Download SVG saves the traced file for archiving or external vector editing;
- Send to Image Converter loads it directly into Lumina’s conversion workflow.
Keep the original bitmap beside the SVG. The traced file is a derived asset and should not replace the only source copy.
Step 4: continue in Vector mode
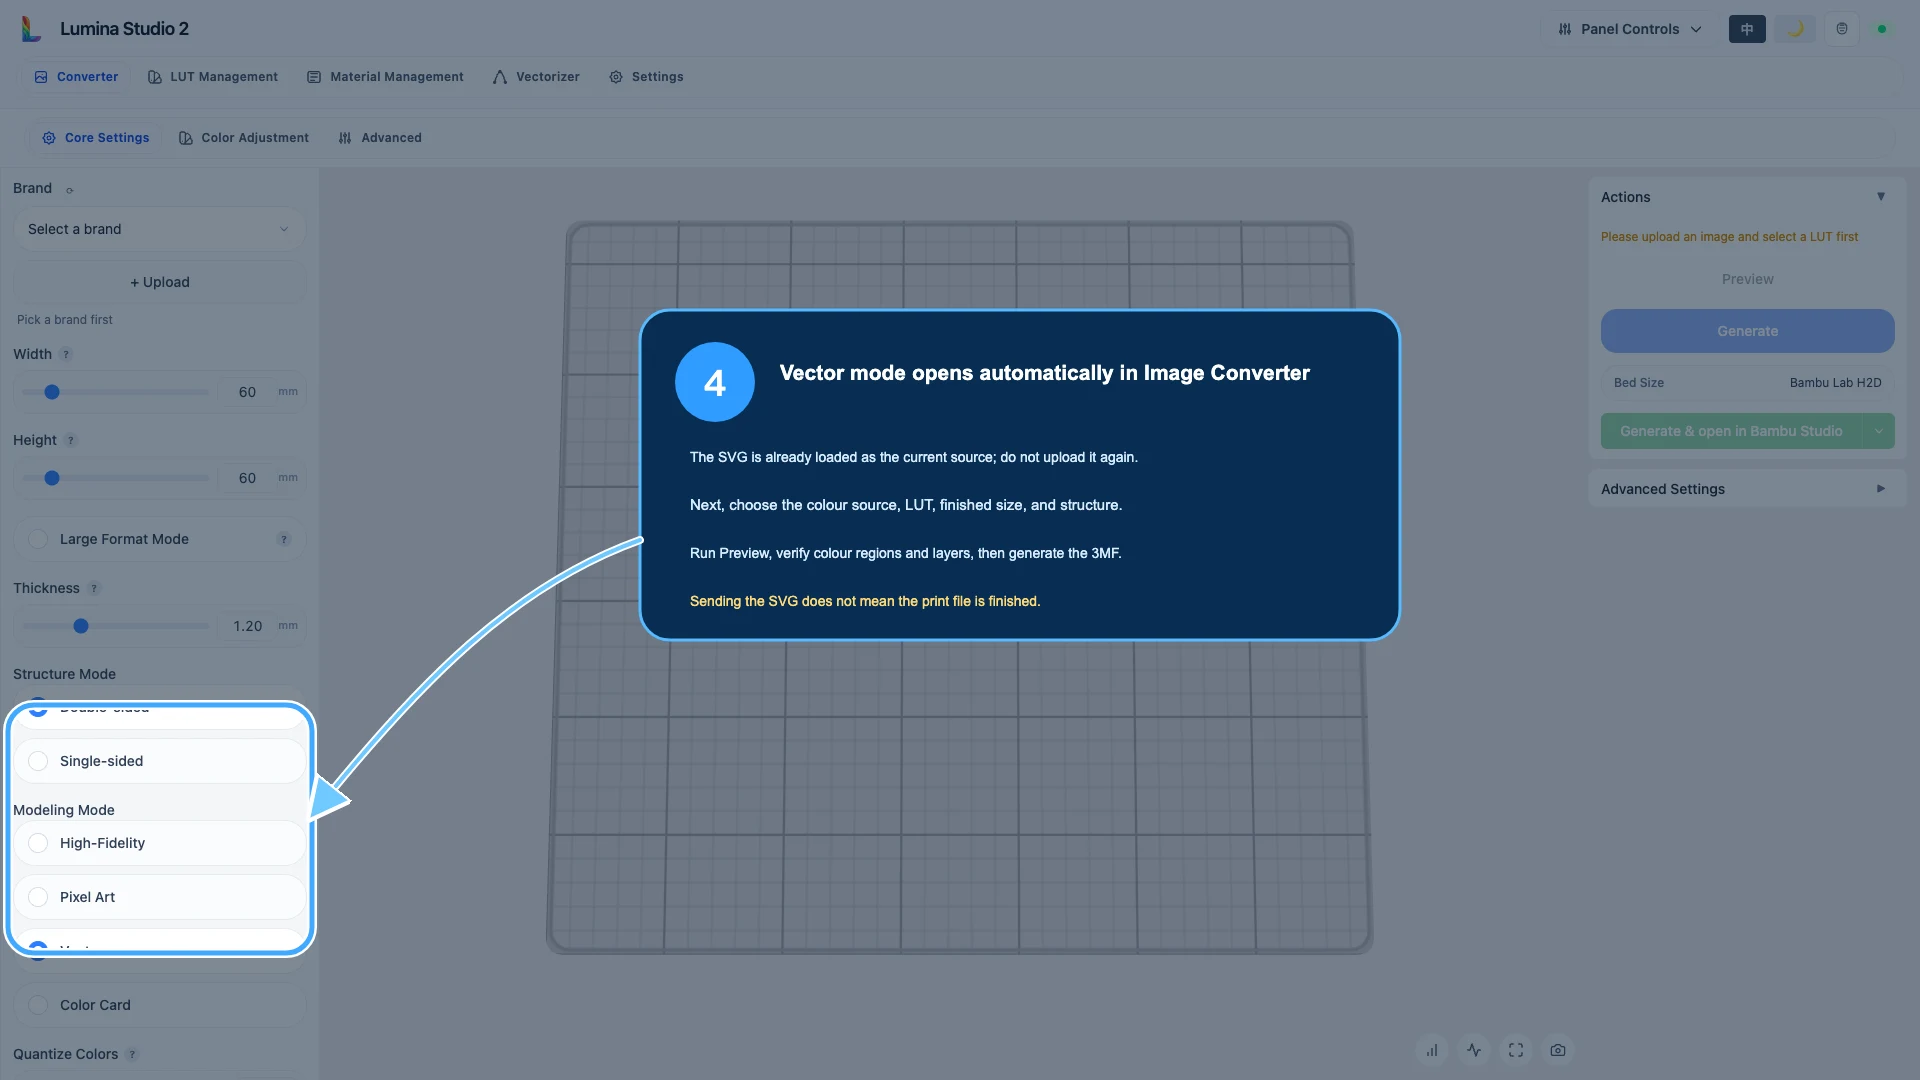
After Send to Image Converter, the SVG is already the current source and Vector mode is selected. Do not upload it a second time.
You still need to:
- choose Source Type and the real colour source;
- choose LUT or Material Archives;
- set finished millimetre size and structure;
- run Preview and inspect colour regions and layers;
- Generate the 3MF;
- open the complete project in the slicer and inspect actual toolpaths.
Sending the SVG only completes the tracing hand-off; it does not complete a printable model.
If the trace looks wrong
| Symptom | Check first |
|---|---|
| A solid white rectangle appears | Remove the bitmap background or crop unused canvas before tracing |
| Text holes fill in | Increase source size, simplify the font, or edit paths in a vector editor |
| Thin lines disappear | Make the source lines thicker and verify final nozzle/line-width limits |
| Too many tiny shapes | Remove compression noise and isolated specks; reduce unnecessary colours |
| Gradient becomes visible bands | Expected for flat-path tracing; use High-Fidelity mode when continuous tone matters |
| SVG opens but has holes or missing regions | Inspect closed paths, masks, fills, and compound paths |
| Result is slower than expected | Reduce source complexity and avoid tracing photographic texture |
For SVG-specific diagnosis, see SVG Upload, White Background, Holes, and Missing Detail.
Common questions
Does vectorisation increase image resolution?
It replaces sampled pixels with fitted paths. Those paths can scale smoothly, but they do not recover facial detail, texture, or edges that were absent or blurred in the bitmap.
Should I always choose the highest Colour Count?
No. More colours can create more shapes and harder-to-print boundaries. Use the fewest colours that preserve the intended design.
Why does a photo look posterised?
The trace approximates continuous tone with a finite set of vector regions. For a photo, use High-Fidelity bitmap processing unless a deliberately posterised style is wanted.
Can I edit the SVG outside Lumina?
Yes. Download it, keep a backup, and use a vector editor. Prefer ordinary SVG paths and fills; external fonts, filters, masks, and embedded resources may not map cleanly to print geometry.
Why is a clean SVG still missing a very small detail in the slicer?
The vector path may exist but be narrower than the selected nozzle or toolpath width at the finished size. Check the real slicer layer Preview.
Should I trace pixel art?
Usually not. Pixel Art mode preserves the grid directly. Tracing may smooth or merge the cells that define the design. See Choose High-Fidelity, Pixel Art, or Vector Mode.
Image notes and content licence
The screenshots show a real trace and hand-off in the current English Lumina Studio interface. The simple test artwork is an original tutorial asset. The focus annotations explain real controls and result state.
Unless otherwise noted, the original text, test artwork, and annotations are available under the Wiki’s CC BY-NC-SA 4.0 content licence.
Vectorizer output depends on source quality and settings. Treat the downloaded SVG, Lumina Preview, slicer toolpaths, and a small physical test as the final verification chain.
Submit feedback
Your feedback is sent privately to the Wiki maintainers and is not displayed publicly on this page.