This article was prepared with AI assistance based on an analysis of the current Lumina Studio source code, existing Wiki content, and relevant workflows. It has been checked against the current version, but omissions or details that become outdated may remain as the software evolves. If you find an error or have a clearer explanation, example, or suggestion, please leave a comment on this page or propose an edit on GitHub.
Color Workstation Basics: Select, Replace, Undo, and Free Color
If you remember only one rule: choose what this edit should affect before choosing a colour that looks attractive.
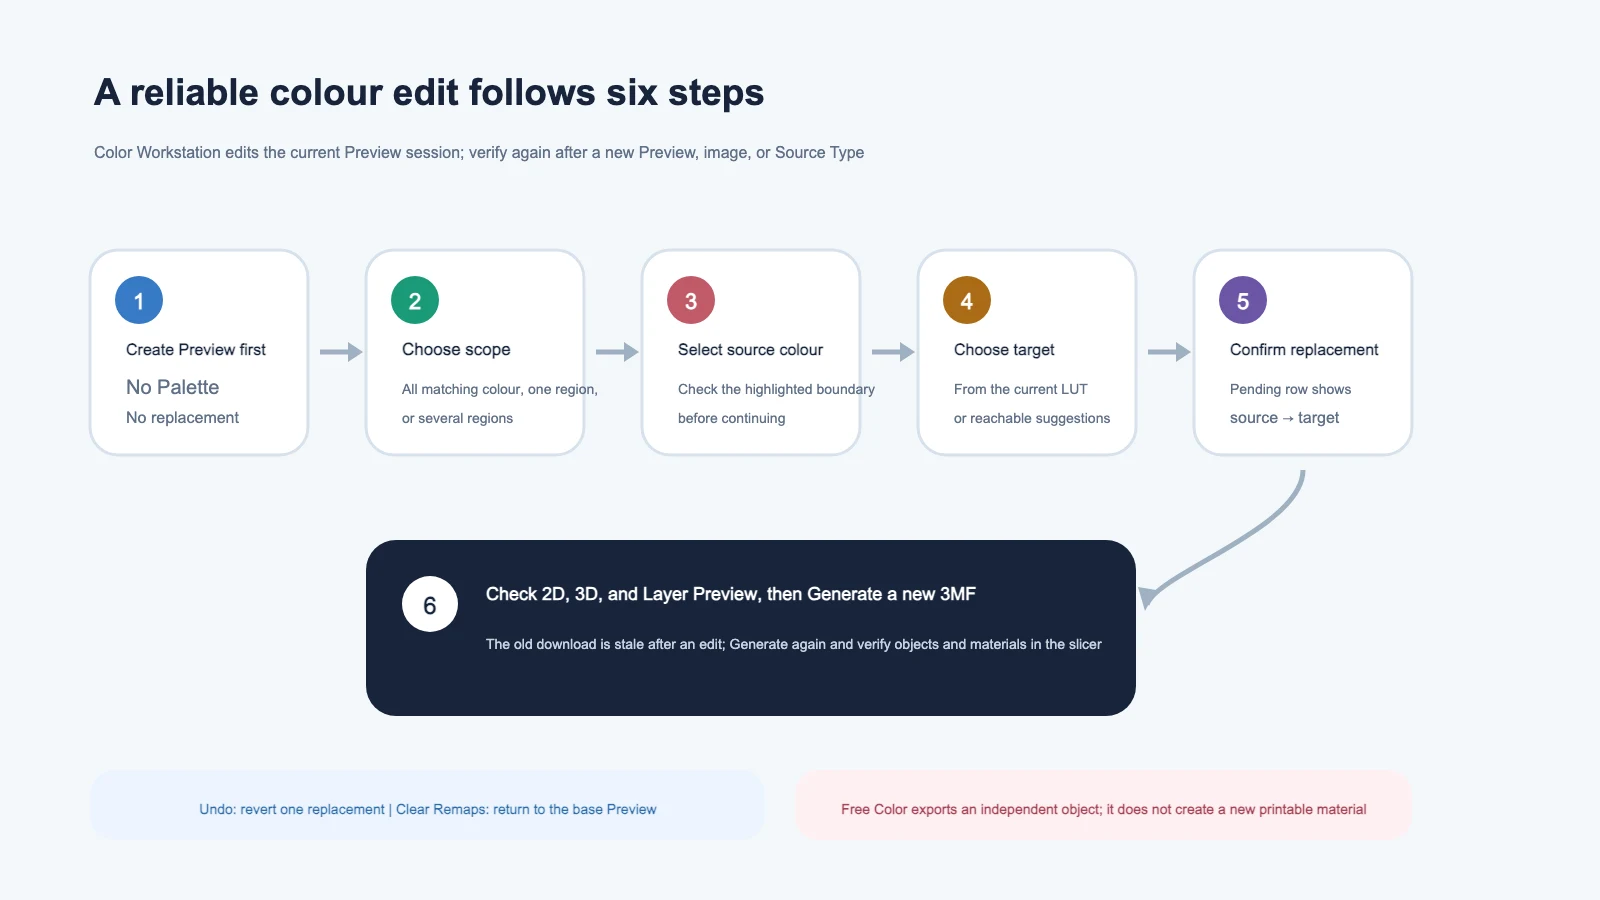
A reliable edit follows six steps:
- create a successful Preview;
- choose the affected scope;
- select the source colour or region in the Preview or Palette;
- choose a reachable target from the current LUT or Material Archives;
- confirm the source-to-target replacement;
- inspect 2D, 3D, and Layer Preview, then Generate a new 3MF.
Undo, Clear Remaps, and Clear Free Colors are different operations. Free Color also does not create a new physical colour. It exports a matched colour as an independent object for manual slicer assignment.
When is Color Workstation available?
Color Workstation depends on the current image’s matched result and Palette, so a Preview must succeed first. Without one, there is no colour data to replace.
Uploading another image, switching Material Archives or LUTs, changing Colour Layers or Layer Height, or rebuilding the base Preview can invalidate the previous selection. Select again instead of reusing a visually similar swatch.
Edits belong to the current Preview session. A 3MF generated before the edit is now stale and must be generated again.
What does each selection mode affect?
Select All
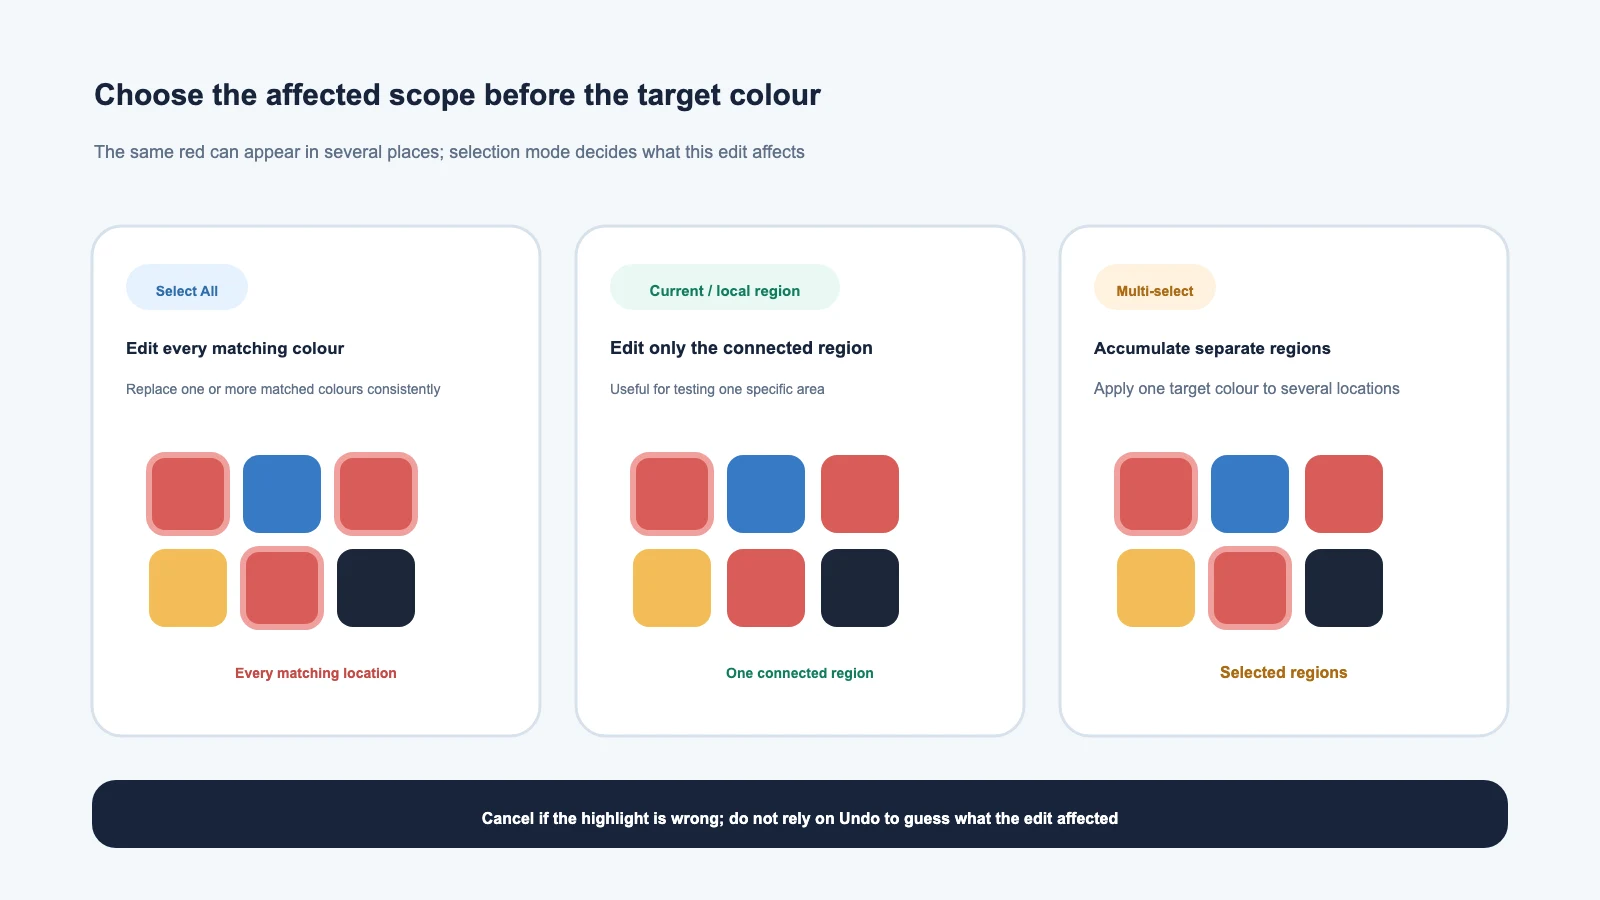
Select All works from matched colours. Select one colour and every location using that matched colour can change. You can also select several matched colours and send them to one target.
Use it to:
- replace one shade consistently across the artwork;
- merge several similar matched colours to reduce visible banding;
- apply one Custom Recipe to a complete class of matched colours.
Do not use it when only an eye should change but clothing happens to use the same matched colour. Both locations can be affected.
Current / Local Region
These modes use the connected region clicked in the Preview as the main scope. They are suitable for one specific part. Always inspect the highlighted boundary before choosing a target colour.
The current interface retains both labels. For an ordinary single-region edit, the important evidence is the actual highlight, not the label.
Multi-select
Multi-select accumulates several separate connected regions, then applies one target colour in a single confirmation. It is useful for a pair of eyes, separate highlights, letters, or decorative dots.
It does not mean “select every colour in the Palette.” Each click adds a real region. Remove a mistaken region before confirming the replacement.
Switching modes
Switching the selection mode clears the current colour and region set so that a scope from the previous mode cannot leak into the next operation. Make a fresh selection.
Complete one replacement safely
1. Inspect the base Preview
Confirm that the outline, transparent regions, and colour matching are already reasonable. Color Workstation cannot repair a black Preview, missing geometry, incorrect transparency, or a bad source profile.
2. Choose the affected scope
Choose the whole matched colour, one connected region, or several regions. Trust the highlighted image rather than only the displayed HEX value.
3. Choose a target colour
The source of target colours depends on the current Source Type:
- Legacy LUT or Inferred LUT: choose from colours exposed by that LUT;
- Material Archive: enter a desired colour, let Lumina solve reachable candidates from the selected real materials, then choose one candidate;
- the input colour is a search target, not a guarantee of an identical physical RGB.
Lumina first displays a pending source-to-target row. Check both swatches and the selection scope, then confirm. Cancelling this pending row does not undo earlier edits.
4. Inspect the result
After confirmation, check that:
- only the intended regions changed in the 2D Preview;
- the 3D Preview has refreshed;
- Layer Preview uses materials consistent with the new result;
- Select All did not affect another small region unexpectedly;
- a newly generated 3MF still maps objects to the intended physical spools.
If 2D has updated while 3D is still loading, wait for the operation to finish. Do not submit several opposite edits rapidly to “force” a refresh.
Undo, Clear Remaps, and Cancel are different
Undo
Undo reverts the most recent recorded global or batch colour mapping. Repeated use can step backwards through those records.
Local-region edits use spatial masks rather than a simple whole-image mapping. If Undo is unavailable after a local edit, do not assume that it can restore every region.
Clear Remaps
Clear Remaps removes global mappings and local-region replacements from the current session and rebuilds from the base match. Use it when the edit history or scope is no longer clear.
An old 3MF on disk is not updated by this action. Generate a new file after confirming the restored Preview.
Cancel a pending replacement
Cancel beside a target colour only abandons the replacement that has not yet been confirmed. It does not revert edits already applied.
What is Free Color?
Mark as Free Color records the selected matched colour and extracts its geometry as an independent object during the next Generate. This is useful when you want to:
- recognise and map that region to another real spool in the slicer;
- complete a material assignment manually when the automatic recipe is unsuitable;
- process one matched-colour class as a separate object.
Free Color does not:
- turn any screen RGB into a real filament automatically;
- add a physical AMS slot;
- extract only one connected region—other locations with the same matched colour can enter the same object;
- select the physical spool for you.
Free Colors appear with an independent marker. Clear Free Colors only removes those markers; it does not clear colour replacements or Custom Recipes.
After Generate, look for an object such as Free_FF0000 and assign it to the physical
filament you intend to load. Its display colour is an identifier, not a machine slot.
How should gradient groups be handled?
Material Archive mode can map a smooth gradient to several adjacent material colours, creating visible bands. Color Workstation may identify such regions as a gradient group.
Inspect the group highlight first, then decide whether to:
- merge only one local region into a representative colour;
- replace the complete group consistently;
- retain the original multi-colour gradient.
Do not merge every detected group automatically. Smooth transitions, shadows, and skin tones can contain intentional variation. Compare the before and after Preview.
Common questions
Why does clicking the Palette do nothing?
Confirm that Preview has succeeded and check the selection mode. Current, Local Region, and Multi-select primarily use clicks on the Preview; Select All is the mode designed for whole-image matched colours from the Palette.
Why did clothing change when I edited only the eyes?
Select All probably found the same matched colour in both places. Clear the mistaken mapping, choose Current or Local Region, and verify the highlight before confirming.
Why is a reachable result not exactly the RGB I entered?
Material Archive mode solves colours from the selected physical materials, layer count, layer height, and recipes. The entered RGB is a search target. Choose the best reachable candidate and verify it with a test print.
Must I Preview again after a replacement?
The operation updates the current Preview, which must be inspected in 2D, 3D, and Layer Preview. The final 3MF must be generated again.
How is Free Color different from colour replacement?
Replacement maps a selected scope to another reachable colour or recipe. Free Color changes object organisation so one matched colour can be assigned independently in the slicer. Neither feature replaces the other.
How can I keep the edit for later?
Keep the source image, Source Type and archive/LUT, settings, final 3MF, and a recipe exported through Share Cards and JSON. A browser Preview is not a durable backup, and reopening a recipe still requires version, material, and Preview checks.
Content licence
Unless otherwise noted, the original text and diagrams on this page are available under the Wiki’s CC BY-NC-SA 4.0 content licence.
Color Workstation continues to evolve. Treat the current interface and the resulting Preview as the final authority for button names, reachable colours, and selection modes.
Submit feedback
Your feedback is sent privately to the Wiki maintainers and is not displayed publicly on this page.