This article was prepared with AI assistance based on an analysis of the current Lumina Studio source code, existing Wiki content, and relevant workflows. It has been checked against the current version, but omissions or details that become outdated may remain as the software evolves. If you find an error or have a clearer explanation, example, or suggestion, please leave a comment on this page or propose an edit on GitHub.
How Should I Choose and Store Filament for Lumina 2.0?
If you remember only one rule: choose a physical filament that your machine can print reliably, that you can identify, and that matches a trustworthy Material Archive before chasing the closest screen colour.
“Red PLA” is not a complete identity. Material family, brand, product line, shade, batch, finish, light transmission, moisture condition, and the selected archive can all change a layered-colour result.
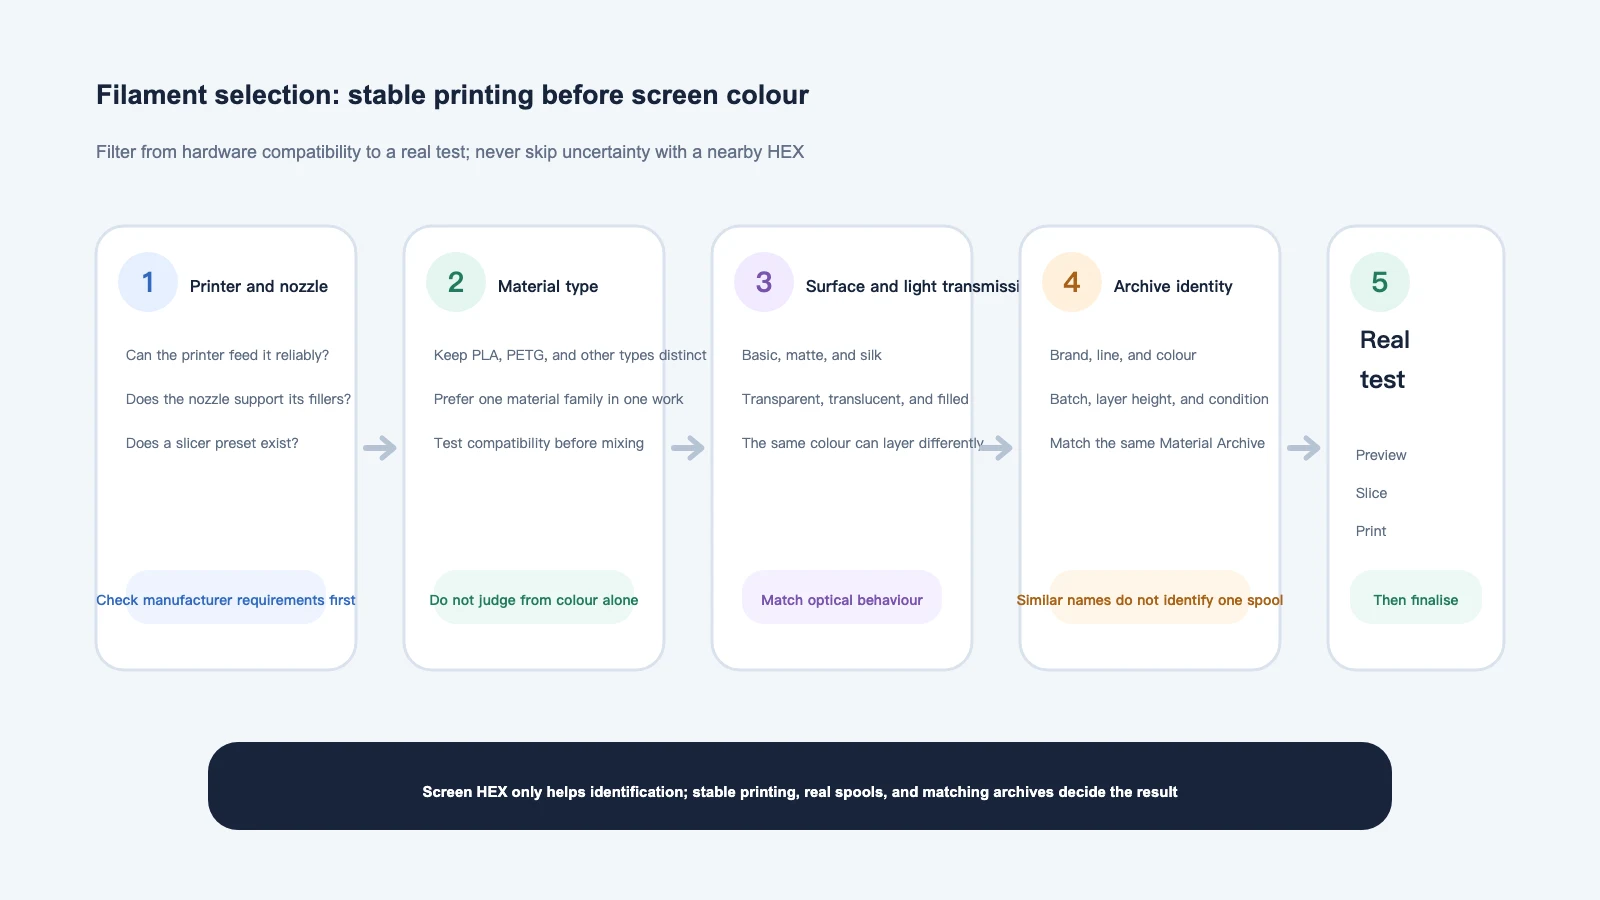
Use five filters when choosing or buying filament
1. Does the printer, feed system, and nozzle support it?
Begin with the filament and printer manufacturers' current requirements:
- Can the printer and feed system handle this material, spool, flexibility, and stiffness?
- Is the nozzle material and diameter suitable for any filler?
- Does the slicer provide an appropriate material preset for this printer?
- Are the build plate, temperature range, enclosure, and ventilation suitable?
Glow, carbon-fibre, glass-fibre, metal-filled, wood-filled, and other highly filled filaments can be abrasive or more likely to clog. The fact that Lumina can select a colour does not mean a 0.2 mm nozzle, ordinary brass nozzle, or automatic material system can use that product safely. Follow the product and machine guidance and change hardware first when required.
2. Choose the material family before the colour
PLA and PETG can both be used for flat multicolour prints, but they are not interchangeable merely because their colours look similar. They can differ in print temperature, first layer, flow, stringing, surface finish, and behaviour when stacked.
Prefer one material family within an artwork until a cross-material combination has been tested. If you intend to mix PLA, PETG, or another family, confirm at least:
- the printer and slicer support the combination;
- every project filament keeps the correct material preset;
- adjacent materials bond reliably in this structure;
- purge volume and transition temperature do not contaminate later colours;
- a real test has passed before the finished artwork.
Some printer guidance uses poor adhesion between PLA and PETG for a support interface. That does not prove the same combination is suitable anywhere in a coloured object. Generating project filaments in Lumina is not a guarantee of machine compatibility, interlayer bonding, or material safety.
3. Treat finish and light transmission as part of filament identity
Two spools labelled “white” or “red” should not automatically share one archive.
| Filament type | How it can affect Lumina results | Check before use |
|---|---|---|
| Basic colour | A useful stable baseline, but brands and batches still vary | Brand, product line, shade, and batch |
| Matte | Additives and surface scattering can change brightness and transmission | Verify separately; do not assume a same-colour basic PLA archive applies |
| Silk or metallic appearance | Viewing angle and lighting can change the appearance strongly | Compare tests under controlled light |
| Clear, translucent, or natural | Backing and lower layers remain visible through more layers | Prefer a custom archive and inspect both white- and black-backed cards |
| Glow, wood, metal, carbon fibre, and other fillers | Changes optics and can increase wear, clogging, or feed risk | Check hardware requirements before using a fine nozzle or multi-material system |
| Recycled, mixed, or batch-variable material | Nominally identical spools can differ | Test a new batch; revalidate critical work |
4. Tie every physical spool to the correct Material Archive
Verify at least:
- material family;
- brand and product line;
- commercial colour, shade code, and finish;
- the Layer Height used when the archive was measured;
- the spool and machine slot actually loaded for this print.
A screen swatch or HEX value helps a person recognise a material. It cannot describe how the filament behaves at different thicknesses, over different backing colours, or under different light. For choosing among archives and LUTs, see Installed or Custom Material Archives, Inferred LUTs, or Legacy LUTs?.
5. Finalise the choice with a physical test
Before a finished artwork, complete a small source → Lumina Preview → slicer layer preview → physical print loop. Use the same spools, slicer material presets, nozzle, colour Layer Height, and backing conditions intended for the final print.
If the test differs visibly from Preview, check spool identity, archive, material mapping, and moisture first. Do not immediately edit the source image to hide a material problem.
How does TD relate to a Lumina Material Archive?
TD means Transmission Distance. In common filament-painting workflows, it is a value in millimetres describing how much solid filament is needed to block most light. A lower TD generally hides the layer below more quickly; a higher TD lets underlying colours influence more layers.
However, TD is not a complete colour profile for one spool:
- it does not independently describe hue, brightness, and all three colour channels;
- it does not replace gradients measured over both white and black backing;
- it cannot capture every matte, silk, filler, and surface-scattering effect;
- measurement method, lighting, thickness, and batch can all change the value.
Lumina 2.0 Material Archives are extracted from real gradient cards over white and black backing and record measurements used by the current prediction workflow. An online TD value can help describe transparency, but it cannot replace an archive tied to your physical filament.
How should one spool be stored and tracked?
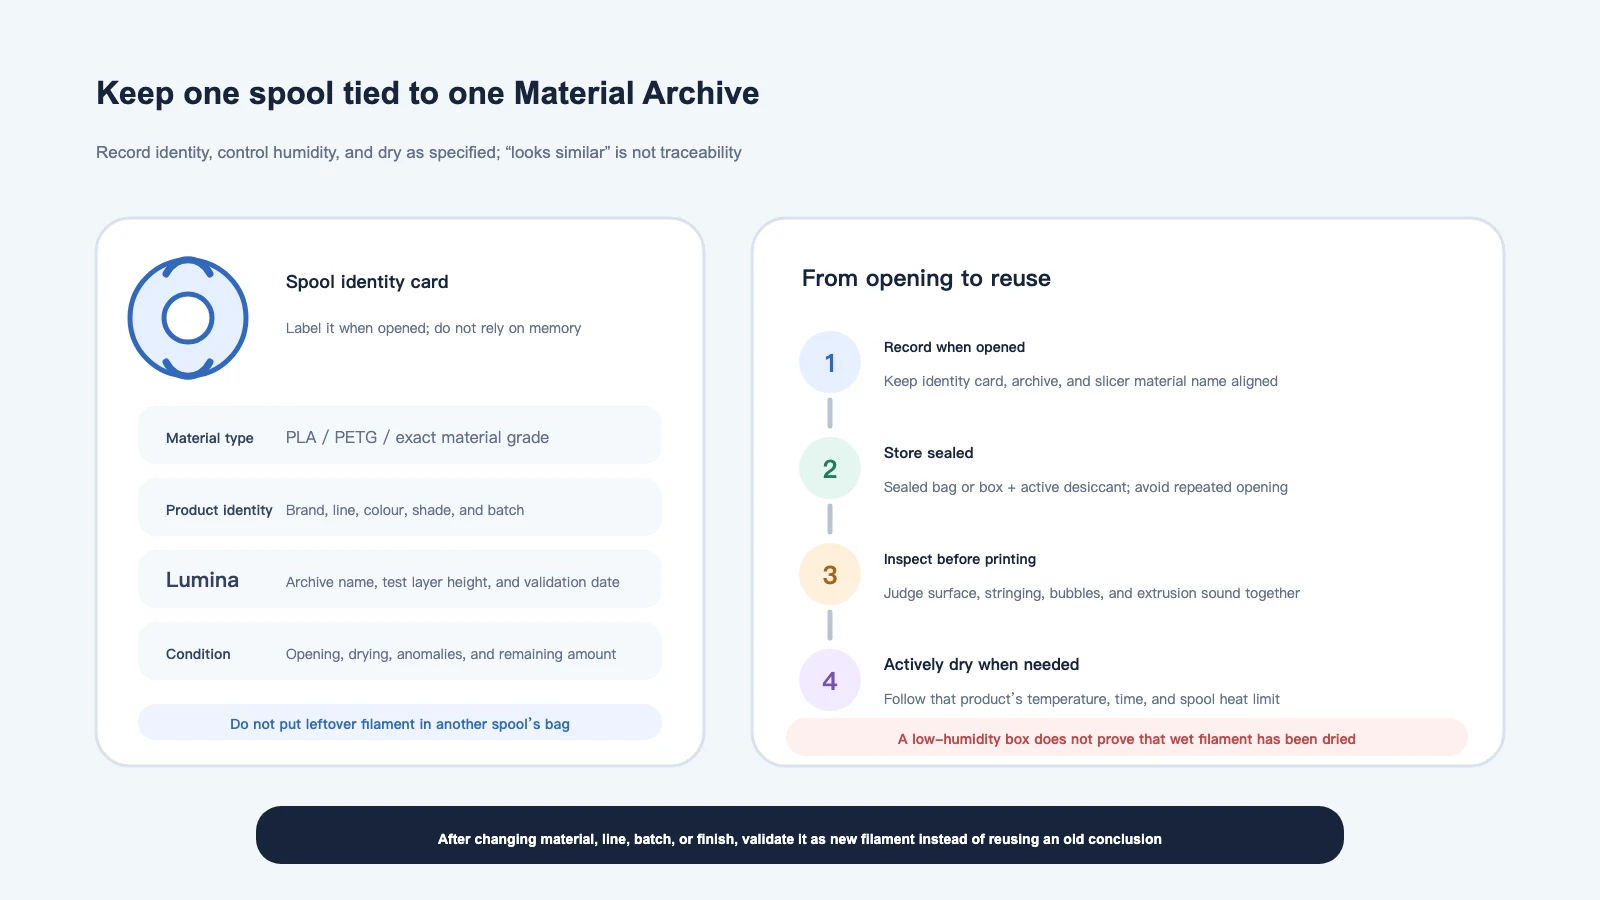
Create an identity card when opening the spool
Record on the spool or sealed bag:
- material, brand, product line, colour, shade code, and batch;
- opening date;
- corresponding Lumina Material Archive name;
- archive test Layer Height and last validation date;
- drying history, abnormal behaviour, and remaining amount.
Do not put leftover filament into another spool's bag, and do not rely on memory such as “the darker blue.” Once the physical spool is confused, even a precise archive cannot restore the mapping.
Sealed storage is not active drying
When not in use, store filament in a sealed bag or box with active desiccant. Reduce unnecessary opening and inspect the seal and desiccant regularly.
A dry box mainly slows moisture uptake and maintains a low-humidity environment. Already wet filament usually needs active drying. Placing it in a box with desiccant does not prove that moisture has left the material.
There is no universal drying table
Material formulas and spool heat limits differ. Too little heat may be ineffective; too much can fuse filament, deform the spool, or create other hazards.
- Use the filament manufacturer's temperature and duration first.
- Confirm that the spool itself tolerates that temperature.
- Use equipment intended for filament with stable temperature control.
- Return the spool immediately to sealed, low-humidity storage after drying.
- Add the drying cycle to the spool identity record.
Stringing does not prove moisture
Wet filament can cause a rough surface, bubbles, popping, blobs, weaker bonding, or more stringing. Stringing can also come from temperature, retraction, travel paths, the material itself, or slicer settings.
Change one condition at a time. Compare the same small model before and after correct drying, then decide whether temperature or retraction also needs adjustment.
One-minute pre-print check
- Spool label matches the archive selected in Lumina.
- Every slicer project filament retains the correct material type.
- The recorded spool is loaded in the expected physical slot.
- Filament has no obvious moisture, brittleness, tangling, or feed problem.
- Filled filament is approved for the current nozzle and feed system.
- A new Preview and slicing pass were made after changing archive, Layer Height, or spool.
- A small test passed before a large finished print.
For mapping generated objects to physical slots, continue with Open a Lumina 3MF in Your Slicer.
Common questions
Can I use both PLA and PETG?
Each can have its own archive when the printer, slicer, and workflow support it. One archive cannot represent both PLA and PETG. Mixing material families within one artwork requires separate tests for temperature, feed, bonding, and slicer settings.
Should I search for the closest HEX when I cannot find an exact colour?
No exact HEX match is required. Start with a clearly identified filament that prints reliably and has usable archive data. Decide from Lumina Preview and a physical test. Similar display colour does not prove similar transmission or stacking behaviour.
Must I recalibrate every new batch of the same product?
Not necessarily. Begin with a small test using the existing archive. If colour, transmission, finish, or print behaviour has changed visibly, revalidate or create an archive for the new batch when the artwork requires consistency.
Can matte PLA use the archive for the same colour in basic PLA?
Do not assume so. Matte additives change surface and light scattering. Test first, and create a separate archive when colour consistency matters.
Is a higher TD always better for transparent filament?
No. Higher and lower transmission create different blending ranges and hiding power. Choose for the artwork, Layer Height, and other filaments, then verify with archive data and a test print.
Can a 0.2 mm nozzle print wood-, carbon-fibre-, or glow-filled filament?
Do not apply one rule to every product. Filler size, abrasiveness, and feed requirements vary, and many products specify a hardened or larger nozzle. Use the material only when the filament and printer manufacturers support the current nozzle and feed system.
Why does filament still string in a box with desiccant?
Sealed storage and desiccant mainly slow further moisture uptake. They may not remove moisture already inside the filament. Dry it according to the product instructions, then compare again while keeping temperature, retraction, and path causes in view.
Further reading
- HueForge Wiki: Transmission Distance
- Prusa: Filament Material Guide
- Prusa: Drying filament
- Prusa: Prusa USS Drybox
- Prusa: Combining materials (XL)
- Prusa: Prusament PETG Ultraglow troubleshooting
Third-party references explain general material boundaries. Product-specific settings apply only to the stated material and device. Use the current Lumina interface for Material Archive names and available functions.
Content licence
The original text, tables, and diagrams on this page are covered by the Wiki's CC BY-NC-SA 4.0 content licence, unless otherwise stated. Rights in third-party materials, brands, trademarks, product instructions, and external documentation remain with their respective owners.
This page does not replace filament, printer, nozzle, dryer, or ventilation safety instructions. Check the manufacturer's current guidance before buying, printing, or drying a special material.
Submit feedback
Your feedback is sent privately to the Wiki maintainers and is not displayed publicly on this page.