This article was prepared with AI assistance based on an analysis of the current Lumina Studio source code, existing Wiki content, and relevant workflows. It has been checked against the current version, but omissions or details that become outdated may remain as the software evolves. If you find an error or have a clearer explanation, example, or suggestion, please leave a comment on this page or propose an edit on GitHub.
How Do I Choose High-Fidelity, Pixel Art, or Vector Mode?
If you only want the short answer: identify the most important property of the source, then choose the mode designed to preserve it.
- For photos, detailed illustrations, soft gradients, and texture, start with High-Fidelity.
- For pixel art, grid patterns, and mosaic-style artwork, start with Pixel Art.
- For native SVG logos, text, icons, line art, and flat-colour shapes, start with Vector.
“Start with” is not a mandatory rule. The three modes preserve different structures; they are not a low-to-high quality ranking. You can preview the same source in more than one mode and decide from the finished size, visual style, model complexity, and your own preference.
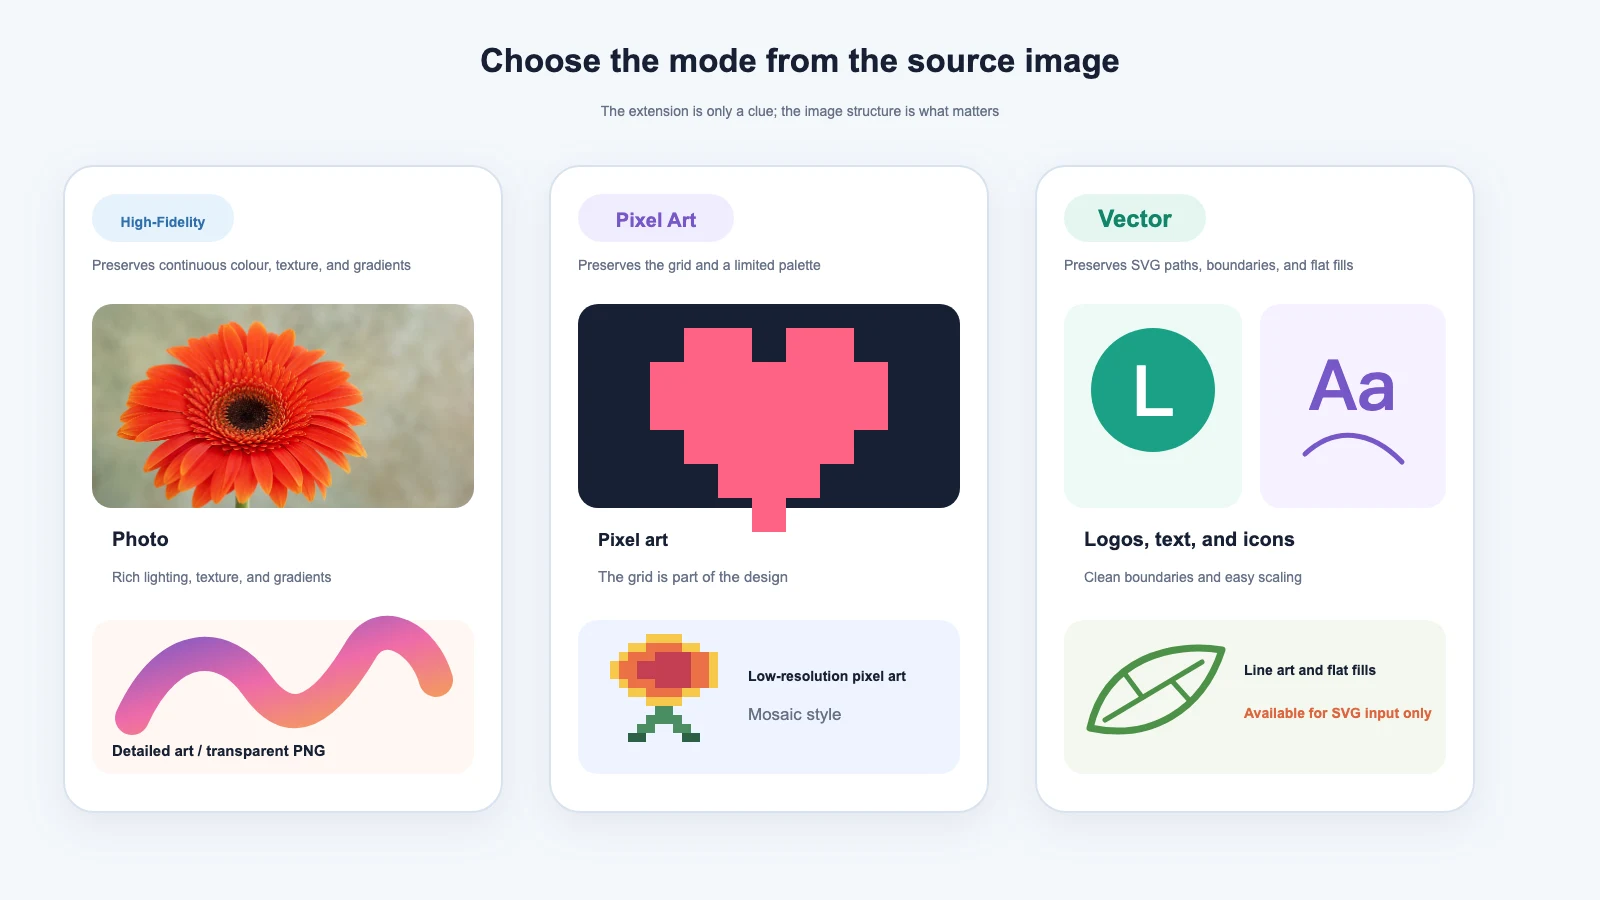
SVG can contain native paths or only an embedded bitmap. The real question is whether you need to preserve continuous colour, a deliberate pixel grid, or editable path boundaries.
What does each mode preserve?
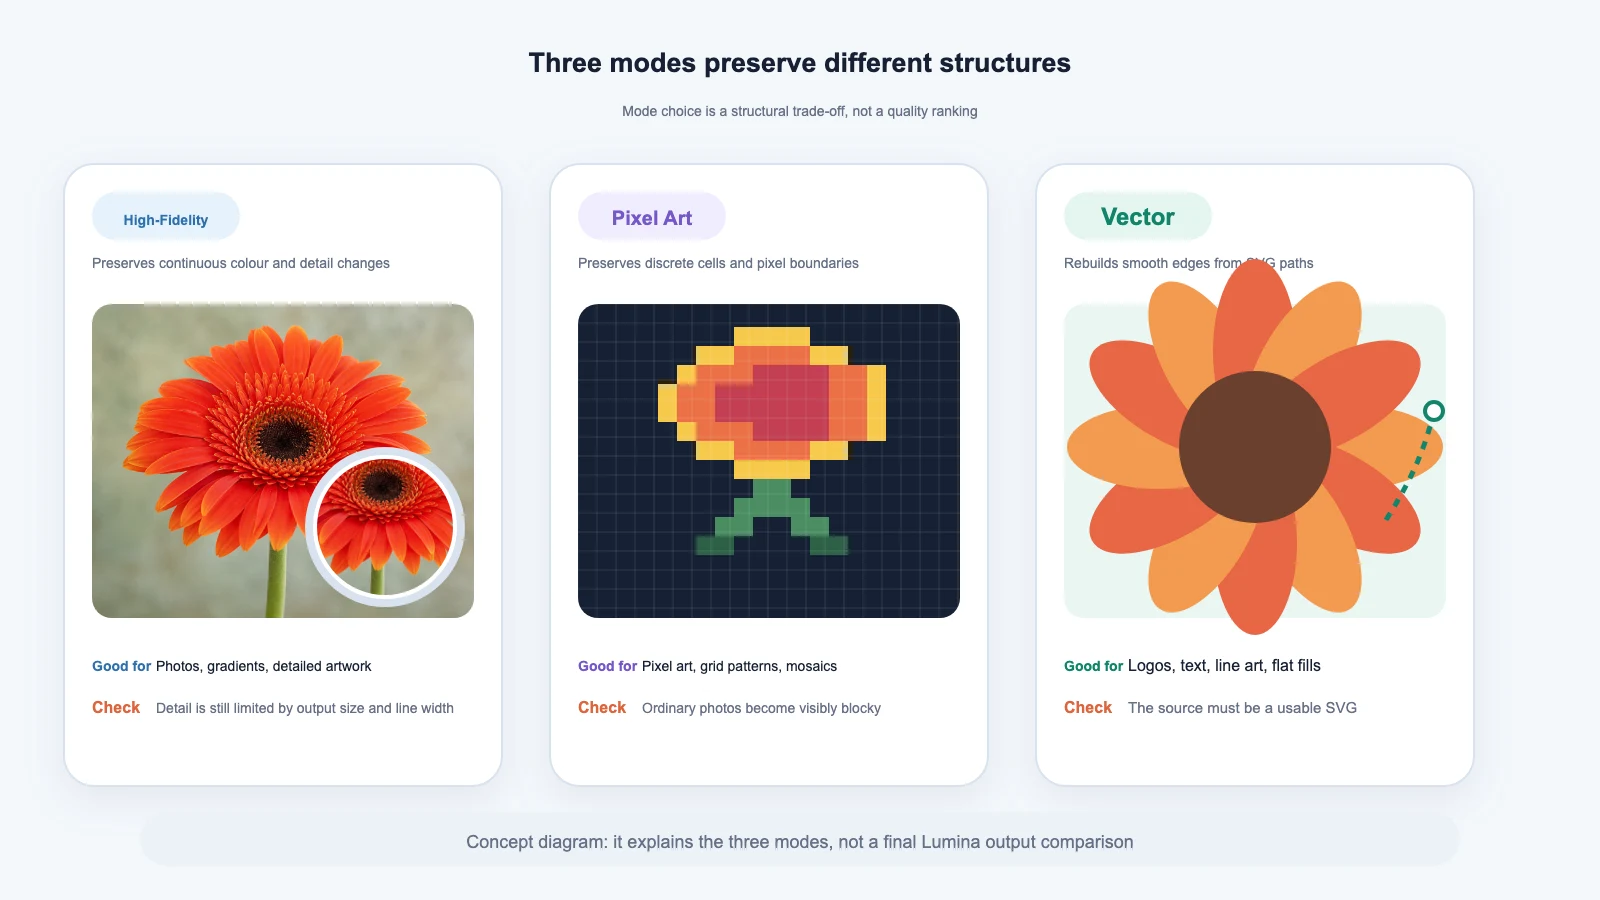
The diagram explains the structures that the three modes focus on. It is not a comparison of the final Lumina output from one identical file. Real results also depend on the number of colours, finished size, nozzle line width, slicer settings, and the quality of the source image.
High-Fidelity: continuous colour, texture, and detail changes
High-Fidelity treats the input as a continuous image. It focuses on colour changes, texture, lighting, and gradients. It is a common starting point for:
- portraits, pets, landscapes, and product photos;
- detailed illustrations with brush texture, shadows, glow, or soft gradients;
- detailed PNGs with a transparent background;
- content that came from SVG but should be processed from its final appearance rather than its native paths.
“High-Fidelity” does not mean that every source detail can be printed unchanged. Eyelashes, tiny text, or noise thinner than the available line width can still merge during model generation or slicing. A source with many colour changes can also create more regions and increase processing cost. Always inspect the preview at the intended finished size instead of judging only from a zoomed screen image.
Pixel Art: a deliberate grid and limited palette
Pixel Art treats regular cells as part of the artwork's structure. It is suitable for:
- pixel-art characters, objects, and scenes;
- grid puzzles, mosaics, and cross-stitch-style patterns;
- artwork deliberately reduced to a small palette with boundaries aligned to a grid;
- designs whose finished print should retain a clear blocky appearance.
When an ordinary photo uses Pixel Art mode, continuous faces, skies, and shadows are split into visible blocks. That may be an intentional style choice, but it does not automatically make a photo clearer.
Keep the original grid when preparing pixel art. Avoid smoothing the edges before import. If the source must be enlarged, nearest-neighbour scaling is more likely to preserve the boundary of every cell. After import, check whether one source pixel is large enough at the intended finished size; otherwise it may disappear when sliced.
Vector: rebuild boundaries from SVG paths
Vector mode generates geometry from the paths, outlines, and fills in an SVG. It is a common starting point for:
- native SVG logos, icons, and marks;
- text already converted to paths;
- line art with clear boundaries;
- flat-colour graphics with a small number of well-defined regions.
In the current Lumina Studio version, Vector mode is available only for SVG input. Its boundaries come from paths rather than from a fixed pixel grid, so curves and diagonal edges are easier to keep smooth when the finished size changes.
However, a filename ending in .svg does not guarantee that the file suits Vector
mode. SVG can embed bitmaps and can also use filters, masks, complex gradients,
clipping paths, stroke effects, and other advanced features. Support can differ
between renderers. After import, inspect missing regions, fill colours, holes,
overlaps, and the appearance of text.
Common source types and a useful starting mode
| Source | Mode to check first | What to inspect |
|---|---|---|
| Portrait, pet, or landscape photo | High-Fidelity | Facial features, fur, shadows, background noise, and small colour patches |
| Detailed illustration with texture and soft gradients | High-Fidelity | Gradient banding and excessive tiny texture regions |
| Native pixel art | Pixel Art | Grid alignment and accidental smoothing after scaling |
| Mosaic or grid puzzle | Pixel Art | Whether each cell is large enough for the line width |
| Native SVG logo or icon | Vector | Paths, holes, overlaps, fills, and canvas bounds |
| Text and line art | Vector or High-Fidelity | Whether text is converted to paths and whether small lines can print |
| Transparent PNG | Decide from the artwork | White or grey fringes, semi-transparent pixels, and background specks |
| Auto-traced SVG | Compare Vector and High-Fidelity | Messy nodes, region count, and incorrect contours |
This table provides a starting point, not a final decision. A three-colour PNG logo can work in High-Fidelity. If you also have a native SVG exported from the design software, compare it in Vector mode. If both previews satisfy your needs, choose from your editing workflow and visual preference.
Which mode should a transparent PNG use?
A transparent PNG is still a bitmap. Transparency does not turn it into vector data.
- For a photo, detailed illustration, or soft gradient, start with High-Fidelity.
- For native pixel art, start with Pixel Art.
- For a logo or line drawing without a native SVG, start with High-Fidelity. You can also trace a separate SVG candidate and compare the Vector result.
Transparent edges often retain white fringes, grey fringes, or dirty semi-transparent pixels. A fringe that is hard to see on a dark preview can become a separate region in the model. Inspect the source once on a light background and once on a dark one before import.
Clean the source before choosing a mode
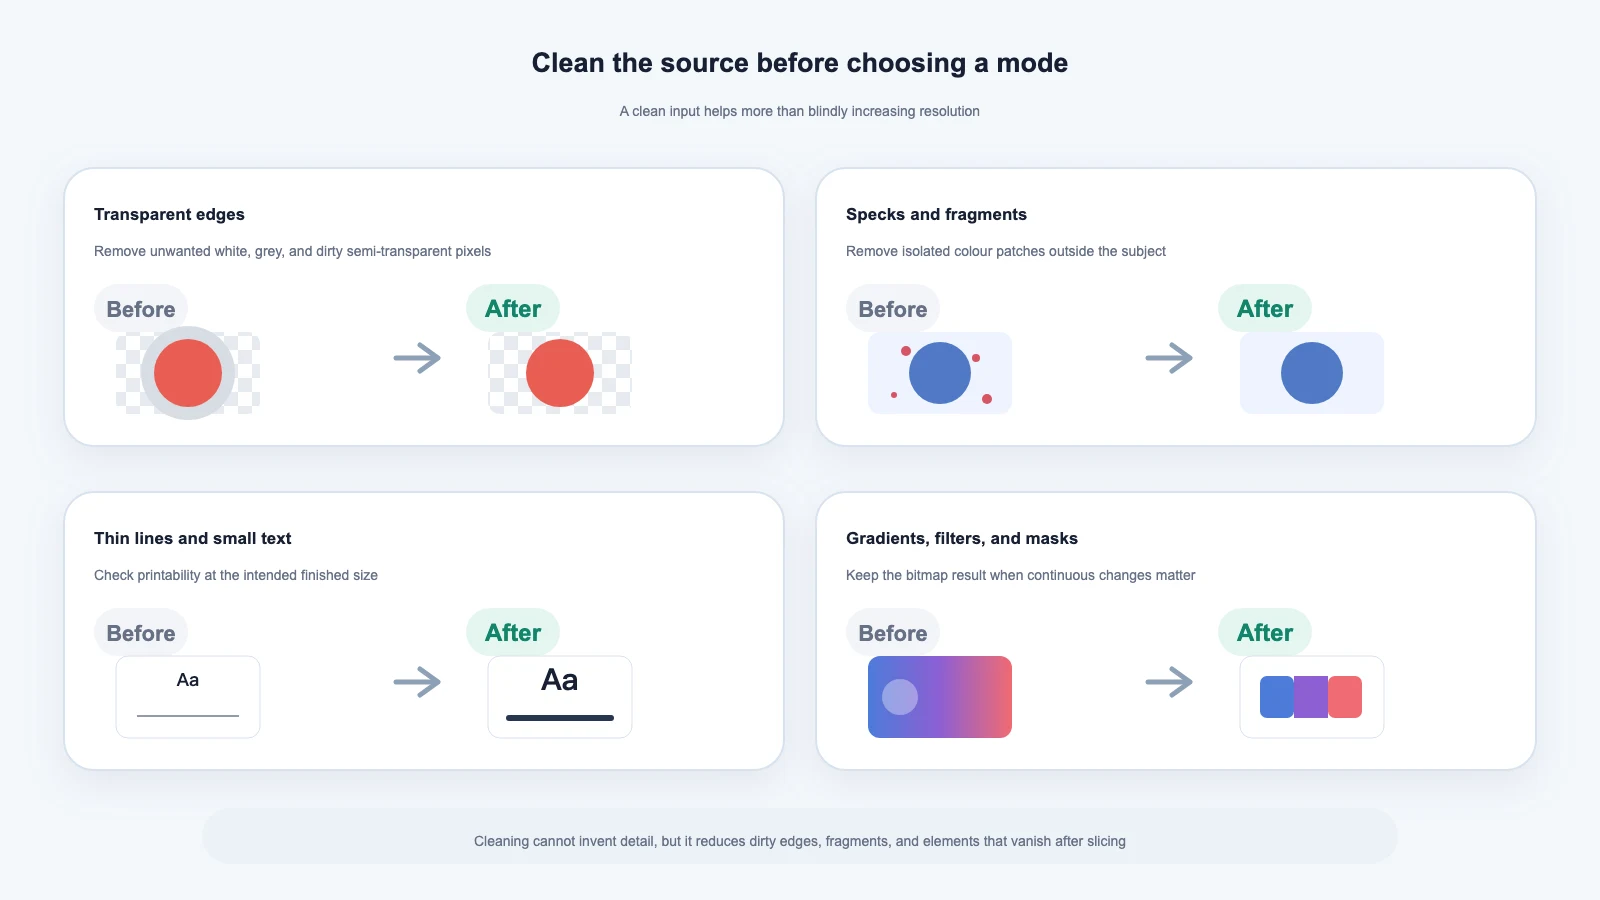
Transparent edges
Remove unwanted white or grey fringes and dirty semi-transparent pixels. If the soft edge is intentional, do not delete all translucency merely to make the file look “clean.” First check whether the High-Fidelity preview preserves the appearance you need.
Specks and fragments
Remove isolated colour patches, compression noise, and scanning dust that do not belong to the subject. They can create many tiny independent model regions without adding useful detail to the print.
Thin lines and small text
Inspect lines and text at the intended physical size. Being visible on a zoomed screen does not prove that it will survive at 60 mm or 100 mm. When necessary, make a line thicker, enlarge text, or simplify decorations that are too small.
Gradients, filters, and masks
If gradients, shadows, blur, glow, or complex masks depend on continuous appearance, keep a bitmap version and check High-Fidelity first. If you must use SVG paths, verify that these effects were expanded correctly, or prepare a bitmap copy with the final appearance already rendered for comparison.
and elements that must disappear at the intended size, allowing the generated model to focus on the artwork you actually want to preserve.
Four common misunderstandings
Converting to SVG does not restore lost detail
Automatic vectorisation estimates new contours from existing pixels. It can regularise a simple logo, but it can also turn photo noise, compression blocks, and jagged edges into a large number of paths. Eyes, text, and texture already missing from the source do not return automatically.
More source pixels do not guarantee a clearer print
A high-resolution source gives Lumina more information, but the final detail remains limited by the finished size, line width, colour regions, and sliced toolpaths. To understand the relationship between size and line width, read What Image Resolution Is a 0.2 mm or 0.4 mm Nozzle Equivalent To?.
Vector mode does not create more colours
Vector paths describe boundaries. They do not add filament colours or turn flat fills into photographic gradients. The available materials, colour configuration, and generated result still determine the colours that can be represented.
Pixel Art is not a low-quality mode
Pixel art deliberately uses a limited grid and palette. The square boundaries are part of the visual language. Smoothing those cells into blurred curves can damage the design. For the underlying format concepts, read Bitmap vs. Vector Images: What’s the Difference?.
A one-minute decision sequence
When you receive an image, check it in this order:
- Identify the content: is it a photo, detailed illustration, pixel art, logo, text, or line art?
- Inspect the internal structure: does an SVG contain usable paths, or only an embedded bitmap?
- Decide what must be preserved: continuous colour, a regular grid, or smooth path boundaries?
- Clean the input: check transparent fringes, noise, fragments, thin lines, and small text.
- Preview at the intended size: focus on facial features, text, thin lines, holes, and isolated colour patches.
- Compare two modes when useful: judge from the preview and a real test print, not from the mode name.
Common questions
Why does Lumina select Vector automatically when I upload one SVG?
The current version sends a single SVG to Vector mode by default so that its path information can be preserved. This is only a starting point. If the file contains complex gradients, filters, or an embedded bitmap, switch to High-Fidelity and compare the visible result.
Can JPG, PNG, and WebP use Vector mode?
They cannot be used directly as vector paths because they store pixels. To use Vector
mode, obtain a native SVG or use a tracing tool to create an SVG candidate, then check
whether its paths are correct. Renaming the extension to .svg does nothing.
Must a logo be converted to SVG?
No. A clear PNG logo with enough pixels can use High-Fidelity. A native SVG makes path boundaries and resizing easier to preserve. If an auto-traced SVG introduces fringes or incorrect regions, continuing with the original PNG is reasonable.
Can pixel art use High-Fidelity?
Yes. Compare whether the cell boundaries still look right. Pixel Art mode explicitly treats the grid as structure, while High-Fidelity treats it as a general image. Choose according to whether you want the blocky grid or another smoothed or region-based result.
What if part of the artwork disappears in Vector mode?
Check for embedded bitmaps, filters, masks, clipping paths, stroke effects, text not converted to paths, and content outside the SVG canvas. In a vector editor, expand important appearances into ordinary paths and fills, then save a new copy. You can also export a high-resolution PNG and compare it in High-Fidelity.
If all three modes generate successfully, which one is correct?
Judge from the preview at the intended size, model complexity, important detail, sliced result, and your own preference. There is no universal priority between the three modes.
Image notes and content licence
The flower photograph on this page was generated with AI and is used only as generic teaching material for photographic input. The three mode diagrams were created by the Lumina Studio Wiki to explain the decision logic. They are not real output comparisons from Lumina Studio and do not promise a specific print result.
Unless otherwise stated, the original text, tables, layout, and diagrams on this page are covered by the Wiki’s CC BY-NC-SA 4.0 content licence. Lumina Studio, third-party software, file formats, trademarks, and other third-party content remain the property of their respective rights holders.
This page helps new users understand the modelling modes in the current version. Features and format compatibility can change. Use the current interface, preview, sliced result, and a test print as the final reference.
Submit feedback
Your feedback is sent privately to the Wiki maintainers and is not displayed publicly on this page.