This article was prepared with AI assistance based on an analysis of the current Lumina Studio source code, existing Wiki content, and relevant workflows. It has been checked against the current version, but omissions or details that become outdated may remain as the software evolves. If you find an error or have a clearer explanation, example, or suggestion, please leave a comment on this page or propose an edit on GitHub.
How to Read Lumina Layer Preview
Lumina’s main Preview answers: “What colour should this region look like after the material layers interact?” Layer Preview answers: “Which material colour is used at every position in each colour layer?”
Use both views together. The final Preview does not explain the stack, and one isolated layer does not show the combined surface colour.
Layer 1 is the viewing face; higher numbers are nearer the backing. These are colour recipe layers, not the slicer’s physical Z-layer numbers counted from the build plate.
Three views answer different questions
| View | Main question | It cannot prove |
|---|---|---|
| Lumina main Preview | What surface colour should the stack produce? | Real spool mapping or toolpaths |
| Lumina Layer Preview | Which colour is used at each position in every colour layer? | Extrusion paths, seams, supports, or print order |
| Slicer layer Preview | What paths will the printer actually extrude? | Whether the archive predicts physical colour accurately |
Passing Layer Preview does not remove the need for slicer inspection.
Step 1: complete a valid Preview
- upload the image;
- choose the actual Legacy LUT, Inferred LUT, or Material Archives;
- set the intended mode, dimensions, and layers;
- select Preview;
- wait for the main result and layer thumbnails.
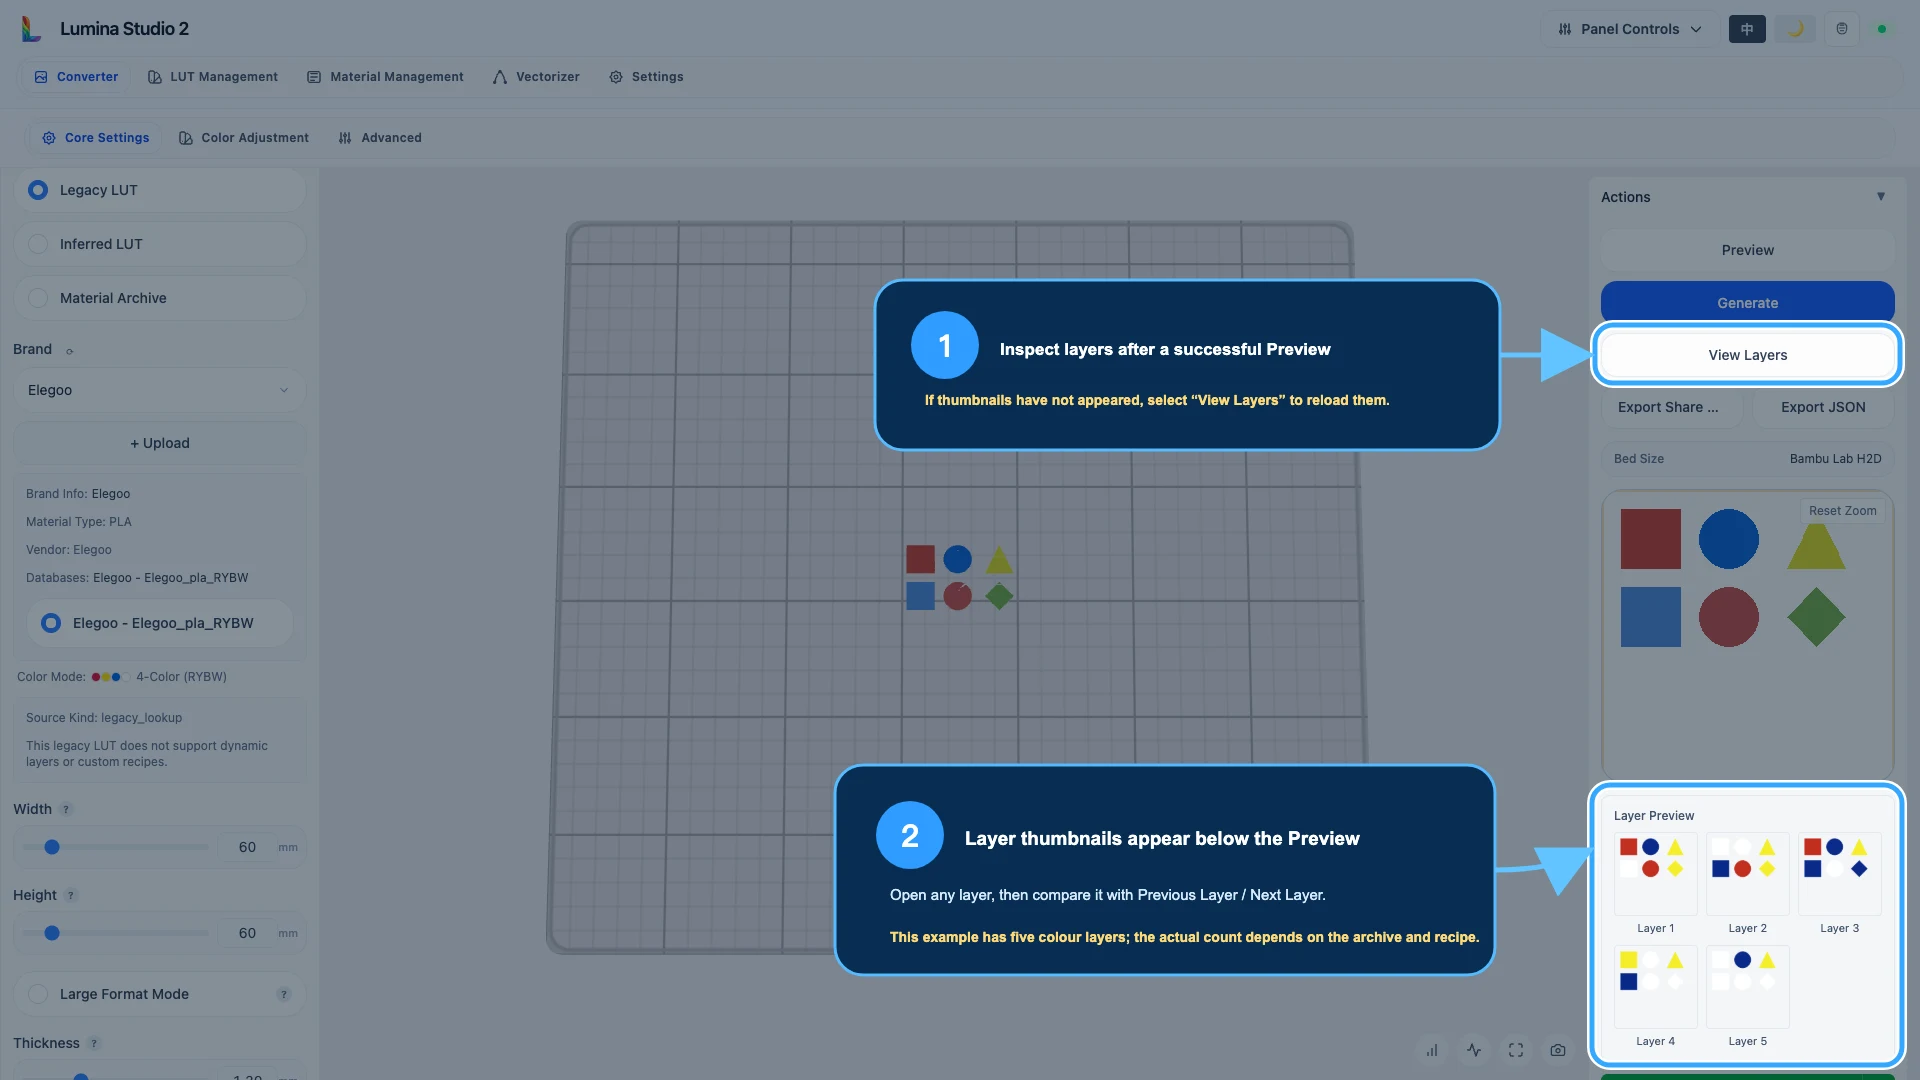
Current builds load layer data automatically after a valid Preview. If thumbnails have not appeared, use View Layers to request them again.
After changing the image, colour source, colour-layer count, layer height, or another core recipe setting, run Preview again. Do not use old layer screenshots to judge a changed task.
Step 2: read from viewing face to backing
Lumina orders colour data as:
- Layer 1: outermost colour layer at the viewing face;
- middle layers: material layers that participate in transmission, coverage, and mixing;
- last colour layer: innermost colour layer nearest the backing.
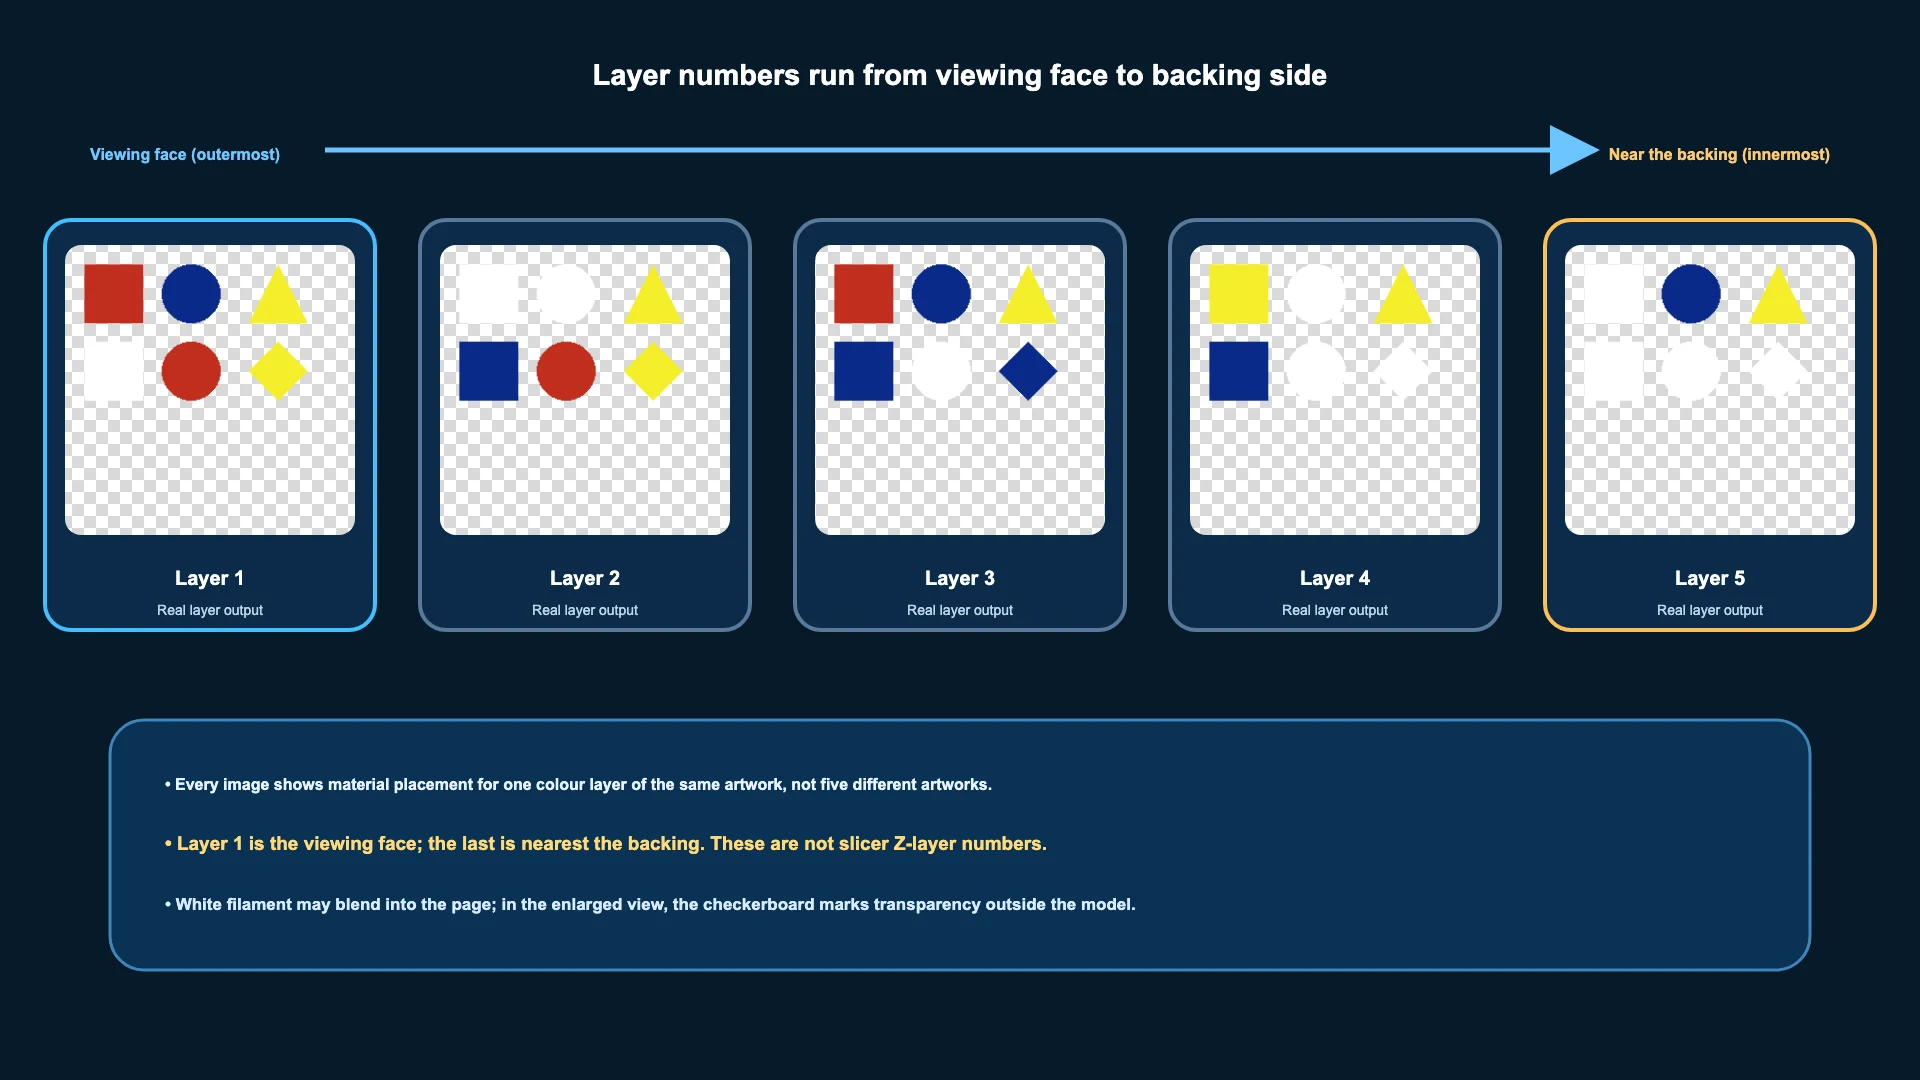
Every thumbnail is the same artwork at one colour layer, not a separate artwork. If one shape is yellow in Layer 1 and blue in Layer 2, that location uses different materials at different heights. That stack is how a new surface colour is created.
A slicer counts physical layers from the build plate and may include backing thickness, first layer, Relief, and other geometry. Lumina Layer Preview explains the colour recipe from the viewing face. The two Layer 1 labels describe different coordinate systems.
The final colour-layer image is not necessarily the complete backing. The physical backing may contain several ordinary print layers of one material.
Step 3: inspect outline before colour
Check layers in this order:
- outline: are the edge, holes, and transparent areas complete?
- critical detail: did text, eyes, thin lines, or small shapes disappear in one layer?
- colour changes: does one position follow the expected archive or custom recipe?
- layer count: does it match the selected colour source and recipe?
- recent edits: did Color Workstation or recipe changes reach the intended layer?
White material may blend into a white page thumbnail. In the enlarged view, a checkerboard outside the model means transparency; white inside the outline is white material.
Step 4: enlarge and compare adjacent layers
Select any layer thumbnail.
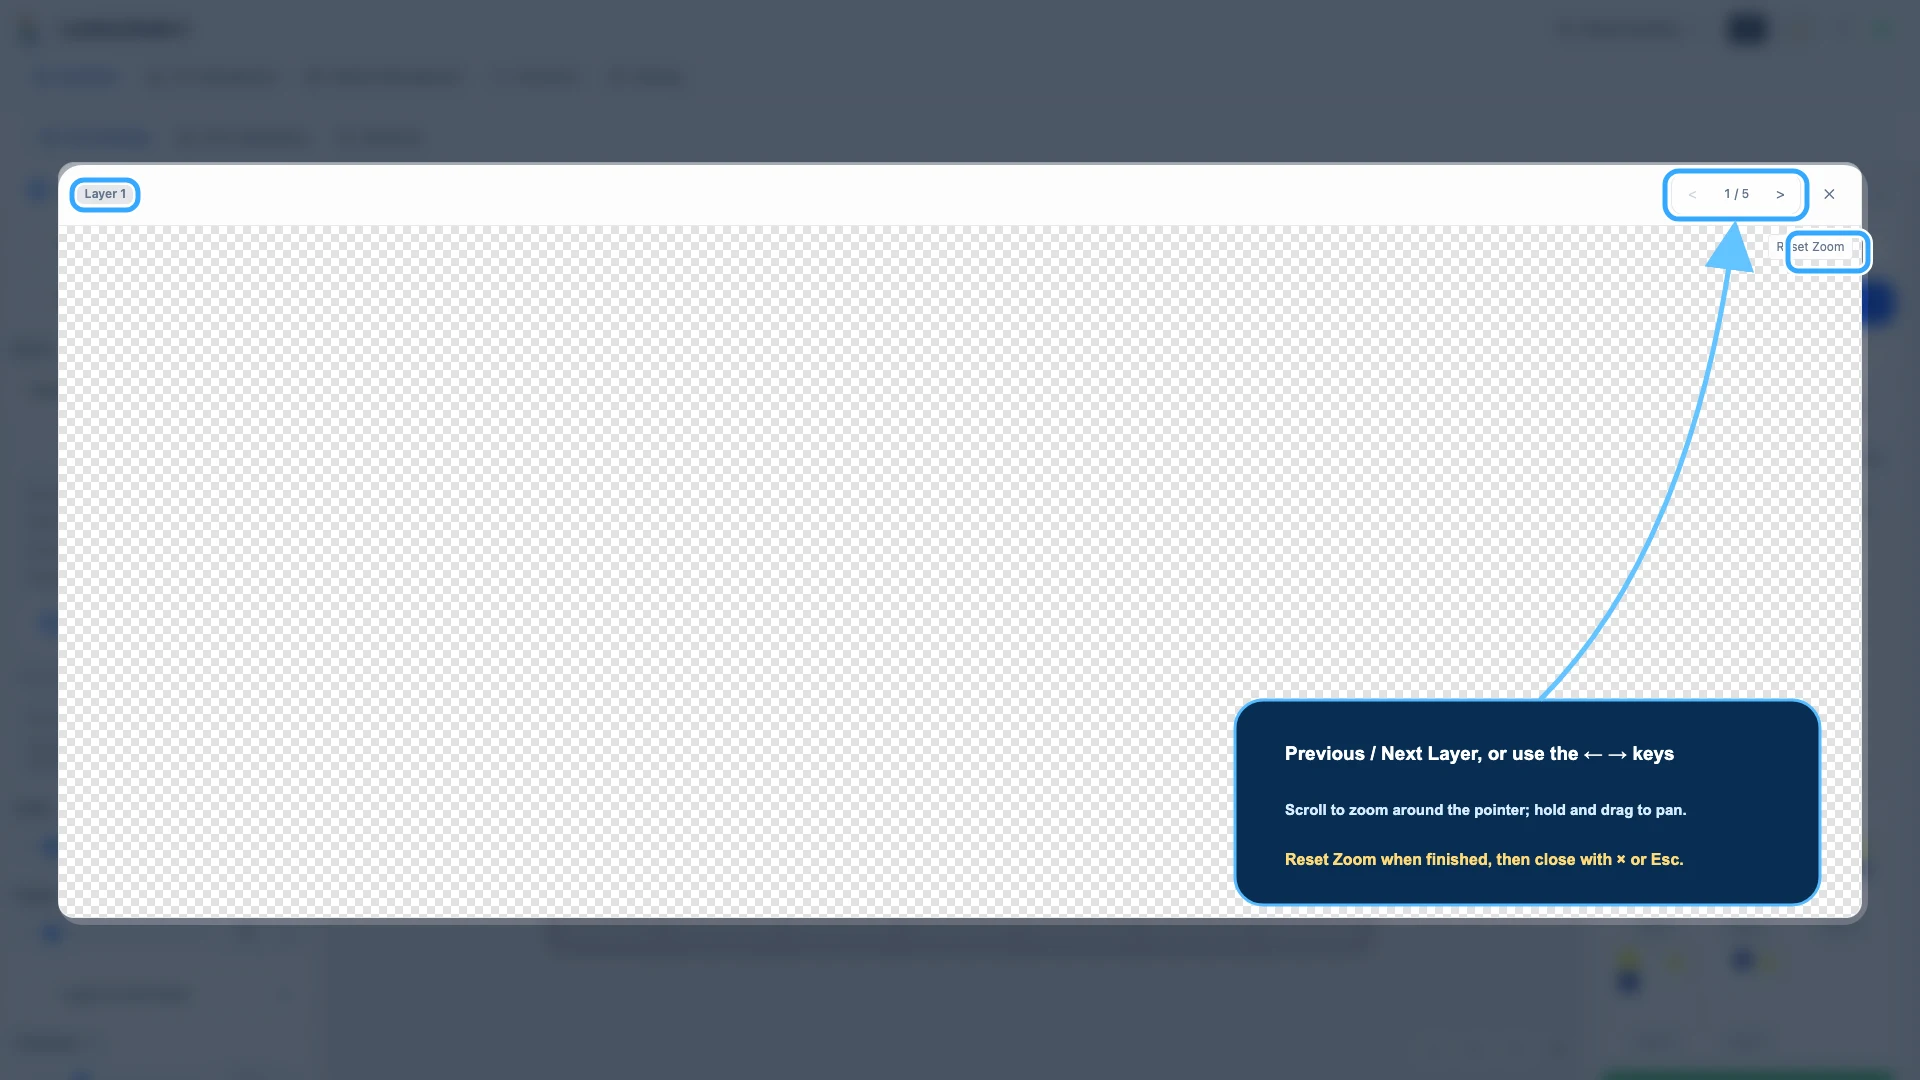
You can:
- select Previous Layer or Next Layer;
- use the
←and→keys; - scroll around the pointer to zoom;
- hold and drag to pan;
- use Reset Zoom to return to the full image;
- close with
×,Esc, or the area outside the dialog.
Keep the same zoom and position while switching adjacent layers. A fixed view makes a small island, break, or unexpected recipe change easier to detect.
Step 5: hover over the main Preview to read one pixel’s stack
Move the pointer over the main Preview and pause. The hover inspector shows:
- a magnified neighbourhood;
- pixel coordinates;
- the predicted combined surface colour;
- the material colour used in Layers 1–N at that pixel.
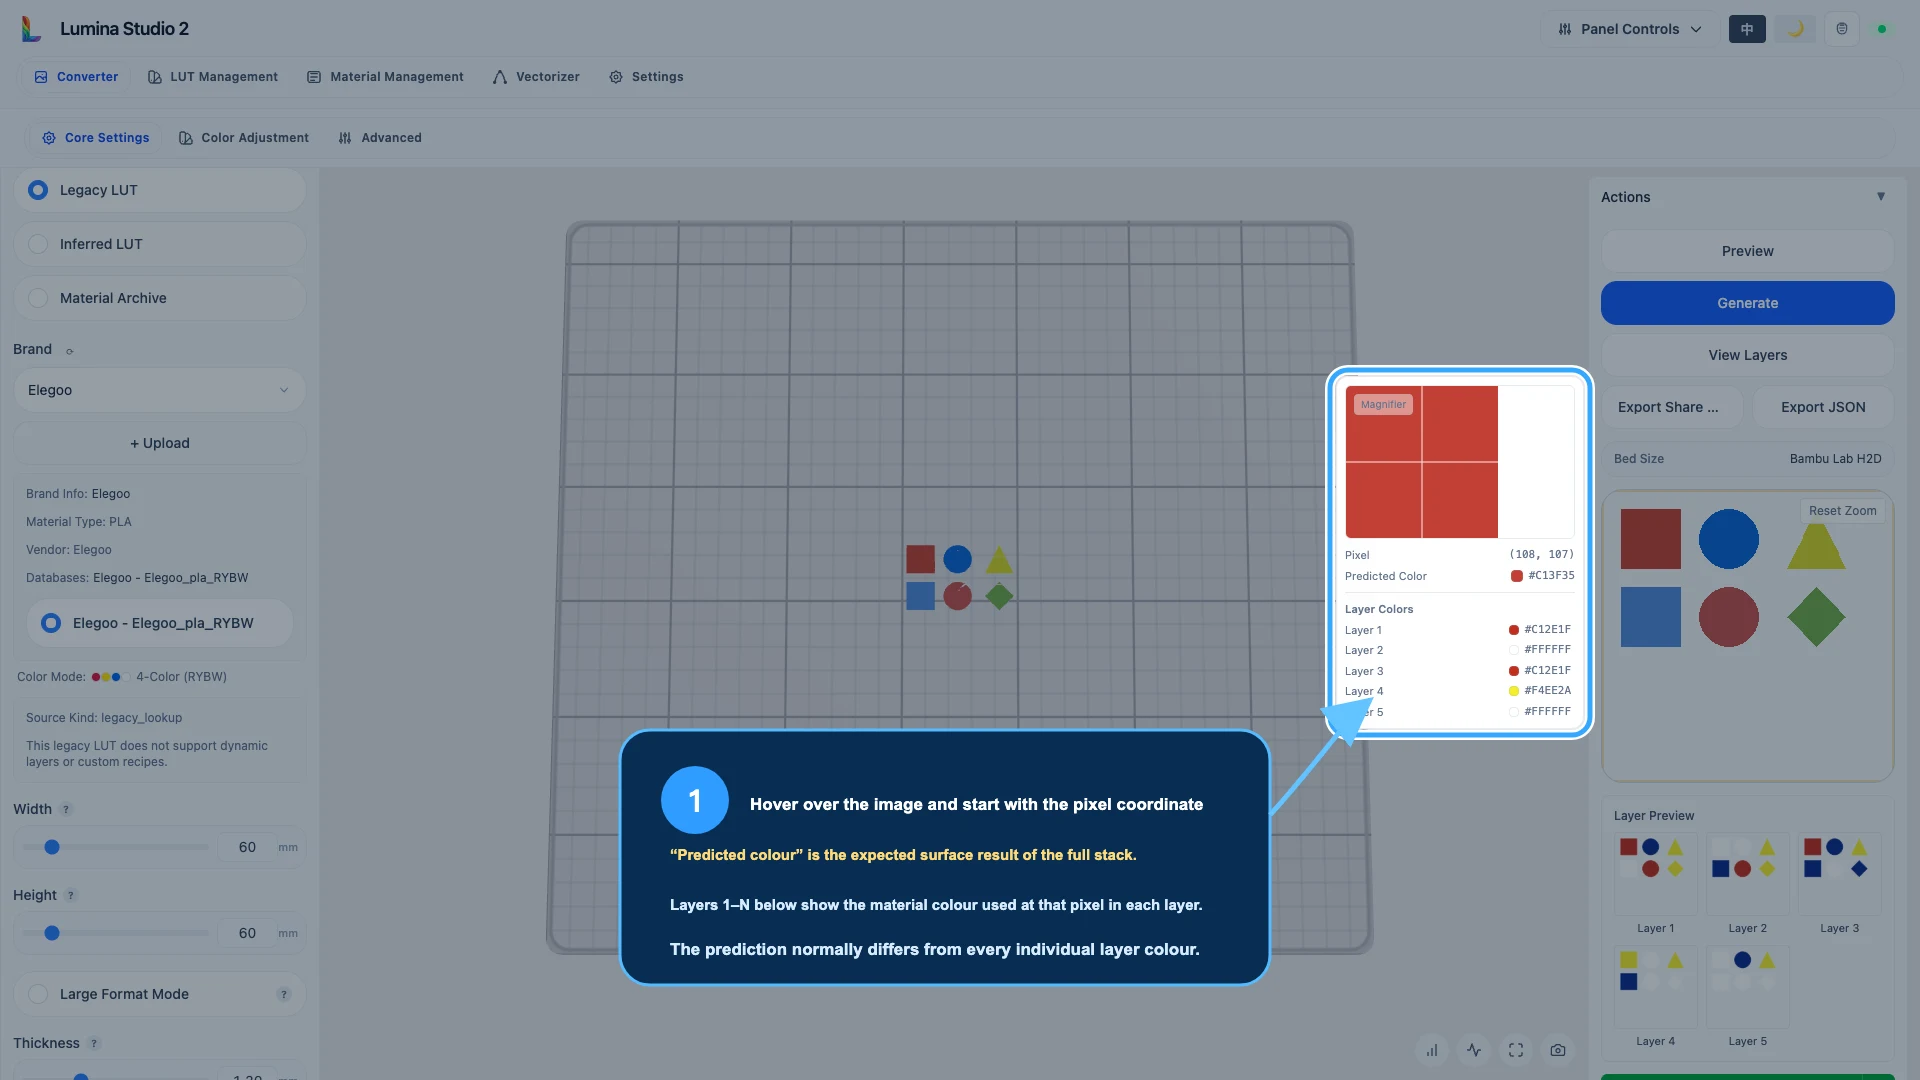
The predicted colour normally differs from every individual layer colour. That is expected: Lumina estimates the optical result of the complete stack; it does not simply average Hex values.
Coordinates help you return to the same area when comparing a replacement or custom recipe. They refer to the Preview image, not millimetre bed coordinates or hardware slots.
Step 6: diagnose the first abnormal view
| Symptom | Check first |
|---|---|
| Main Preview is already wrong | image, Source Type, LUT/archive, colour count, and Modeling Mode |
| Main Preview is plausible but one layer has an isolated patch | source noise, colour replacement, and custom recipe for that region |
| Every layer misses the same area | transparency, crop, SVG path, or geometry mode |
| Layer count differs from expectation | current archive, custom recipe expansion, special colour mode, or stale Preview |
| White appears to be missing | enlarge and distinguish white material from checkerboard transparency |
| A colour edit still shows old layers | wait for reload; run Preview again after core-setting changes |
| Lumina layers are correct but slicer colours are wrong | object, project filament, physical spool, and slot mapping |
| Lumina and slicer are correct but print colour differs | archive, spool batch, layer height, flow, surface, and viewing light |
If the layer area remains blank, grey, or stuck loading, run Preview once more with a small simple image and default-compatible settings. Then use The Page Will Not Open, Keeps Spinning, or Generation Fails.
Step 7: continue into the slicer
Layer Preview does not show:
- real nozzle lines and line width;
- first-layer adhesion or over-squish;
- seams, purge tower, supports, or bridges;
- project-filament mapping to physical spools;
- AMS, ACE, MMU, or external-spool slot assignment;
- the printer’s physical layer order.
Generate the 3MF, open it as a complete project, and use Import a Lumina 3MF into the Slicer Correctly. If the three stages differ, follow Why Lumina Preview, Slicer Preview, and the Print Differ.
Common questions
Why is Layer 1 the viewing face instead of the first printed layer?
This numbering explains the optical stack from the observed surface. Slicer numbering describes physical Z height from the build plate. They serve different purposes.
Why is the predicted colour different from all five layer colours?
Transmission, opacity, height, and order combine into a new surface appearance. The result is not required to equal a material colour or a simple RGB average.
Why do some modes have fewer or more than five layers?
The selected LUT, archive, colour mode, and custom recipe determine the count. Layer Preview and generated 3MF should use the current real count.
Why is View Layers still present if thumbnails load automatically?
It provides an explicit reload when thumbnails are delayed, missing, or need to be requested again.
What does Transparent mean in the hover inspector?
The coordinate is usually outside visible model geometry or has no visible Preview pixel. Check the magnifier and outline before treating transparency as white material.
Can Layer Preview tell me which AMS slot to use?
No. It describes model colour layers, not hardware slots. Map project filaments to real spools in the slicer.
Does visible small text prove it will print?
No. The colour data may contain the text while nozzle diameter and line width still remove it during slicing. Inspect real slicer toolpaths.
Image notes and content licence
The screenshots, five layer masks, and hover values come from a real Preview in the current English Lumina Studio interface using simple original tutorial shapes. Focus annotations explain real controls and output.
Unless otherwise noted, the original text, test artwork, and annotations are available under the Wiki’s CC BY-NC-SA 4.0 content licence.
Layer count, control names, and prediction behaviour can change. Treat the current Preview, actual layer images, slicer paths, and printed sample as the final verification chain.
Submit feedback
Your feedback is sent privately to the Wiki maintainers and is not displayed publicly on this page.