This article was prepared with AI assistance based on an analysis of the current Lumina Studio source code, existing Wiki content, and relevant workflows. It has been checked against the current version, but omissions or details that become outdated may remain as the software evolves. If you find an error or have a clearer explanation, example, or suggestion, please leave a comment on this page or propose an edit on GitHub.
Manage Material Archives: Edit, Re-Verify, Import, and Export
A Lumina Material Archive is a reusable calibration record for one physical filament. The Material Library lets you inspect identity, edit display information, review previous verification runs, continue verification, and move archives through ZIP files.
The central distinction is:
- Edit Details changes how an archive is identified in the interface;
- Re-Verify updates measured physical data through a new calibration run.
Changing a blue swatch to a prettier blue on screen does not recalculate transmission or fitting parameters. Use the correct operation for the reason you are making the change.
Step 1: read selection state and brand groups
Open Material Management → Material Library.
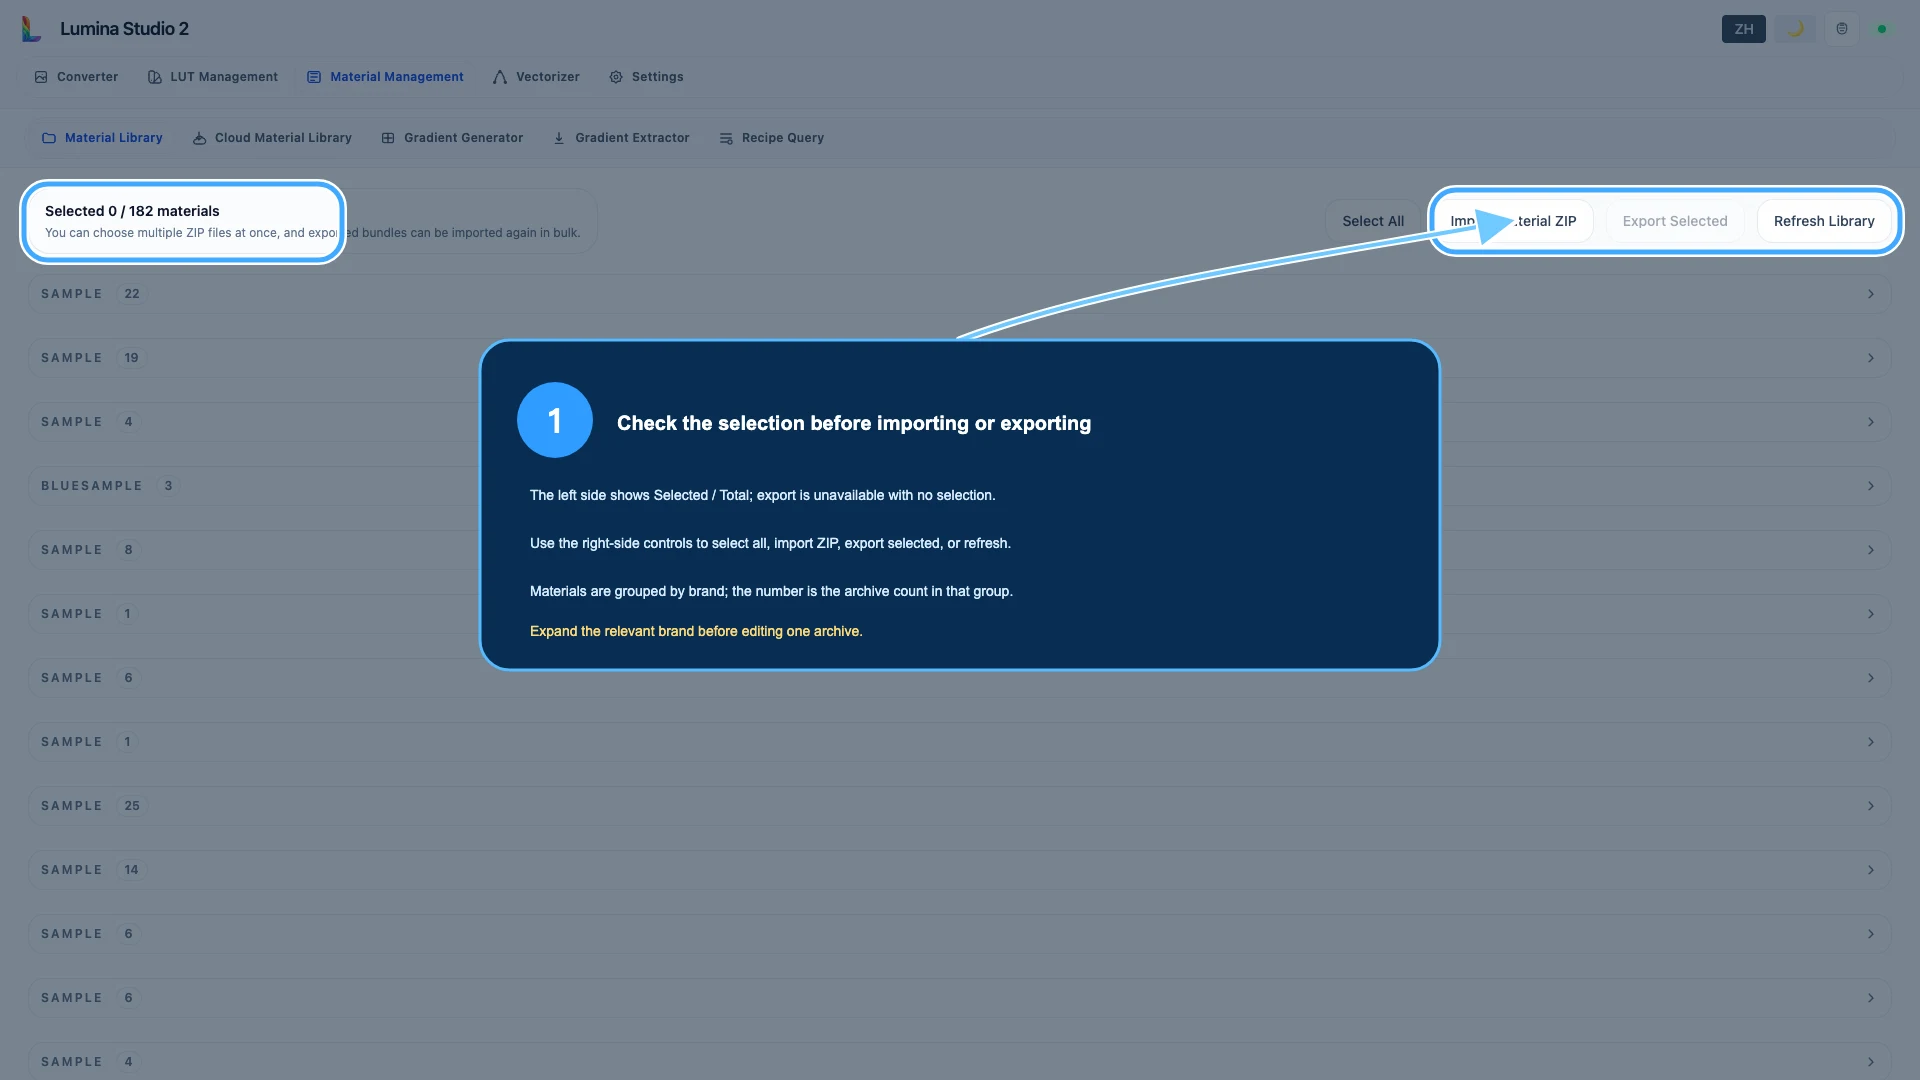
The top area shows selected archives and total archives. With no selection, export is unavailable. Brand groups are collapsed by default, and the number beside a brand is the number of archives in that group.
Use:
- Select All to select every visible archive;
- Import Material ZIP to add one or more Lumina archive packages;
- Export Selected to download selected archives as one ZIP;
- Refresh after an external archive change or import.
Expand the relevant brand before editing an individual archive. Do not identify a spool from colour name alone; similar names may refer to different products or calibration data.
Step 2: identify an archive before using it
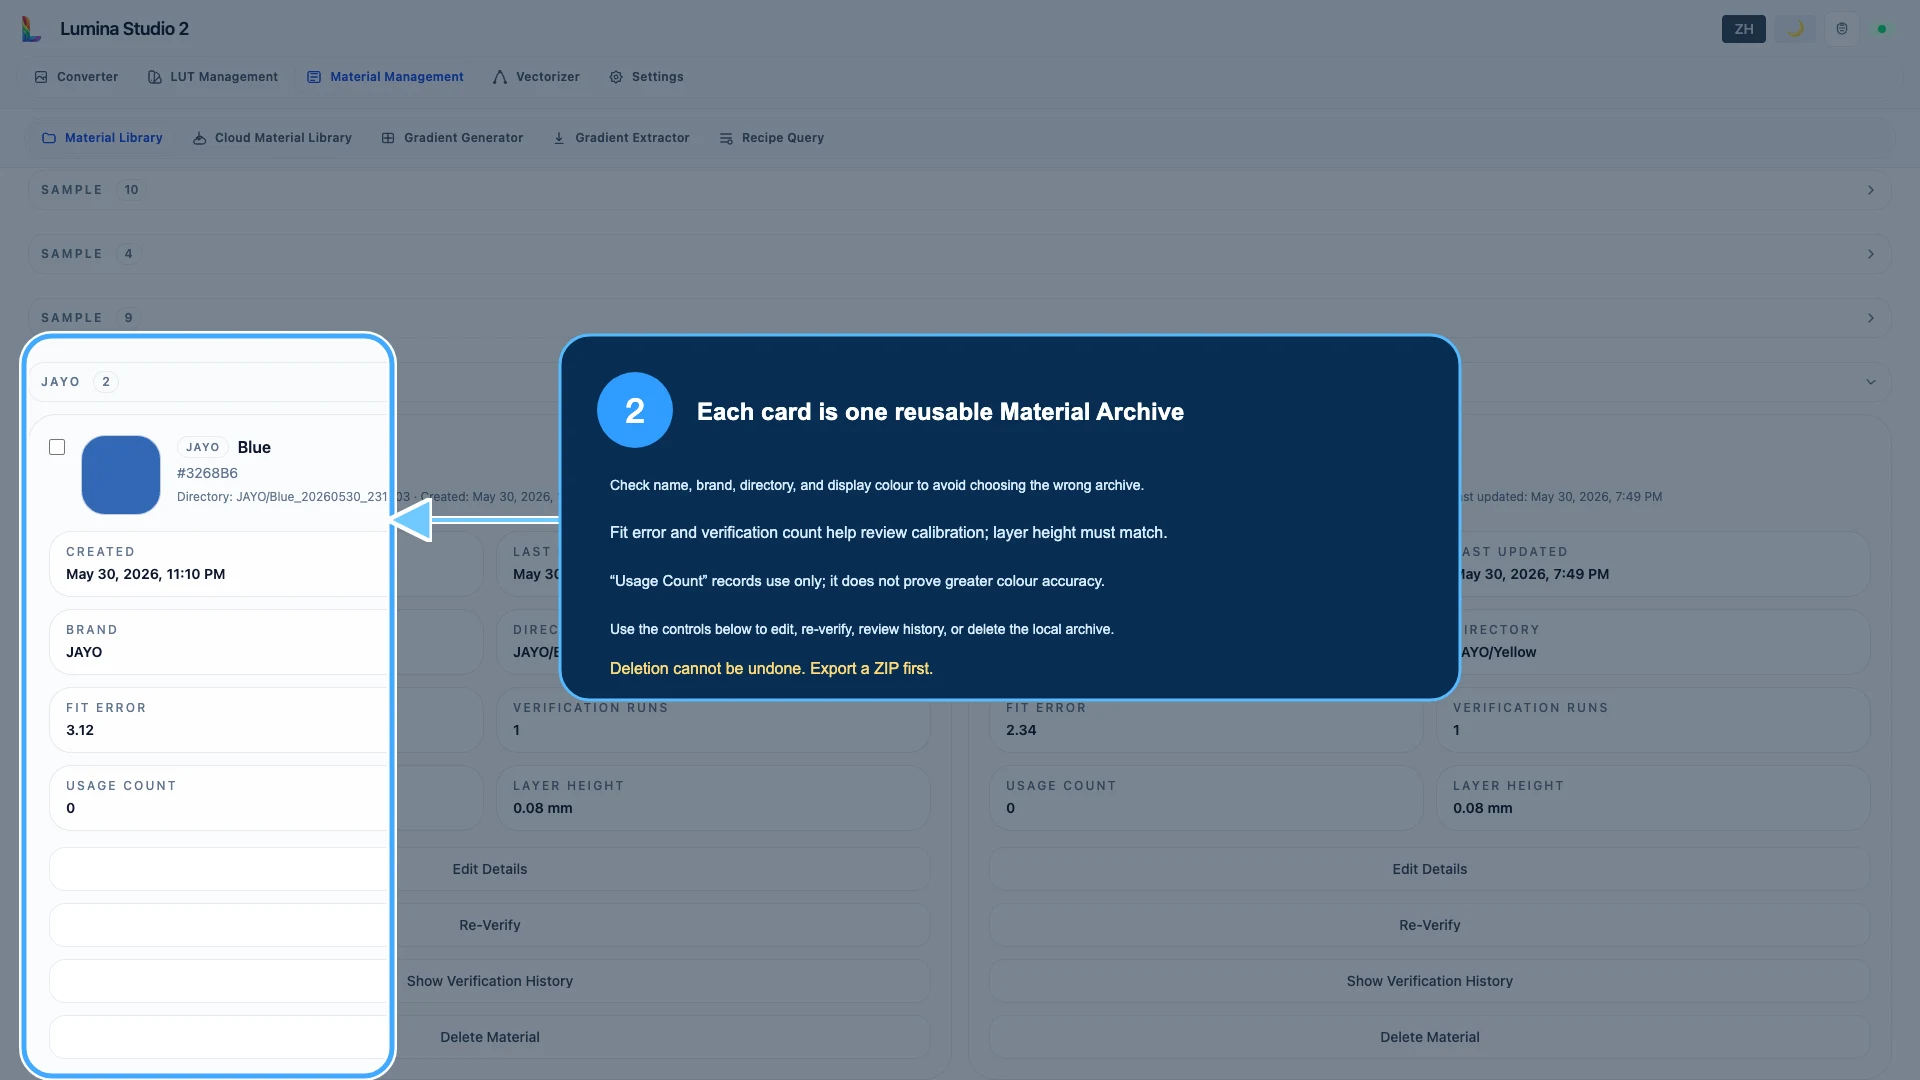
Check:
- material name and brand;
- directory identity and archive source;
- display colour and Hex value;
- layer height used for verification;
- fit error and verification-run count;
- creation and last-updated times.
Usage Count records how often the archive was used; it is not an accuracy score. Fit metrics help compare verification quality, but they do not replace a real printed test under controlled lighting.
If several cards use similar colours, match the exact product, filament type, batch when known, archive source, and supported layer height. See Choose Installed or Custom Material Archives, Inferred LUTs, or Legacy LUTs.
Step 3: edit display information only when that is the goal
Select Edit Details on the correct card.
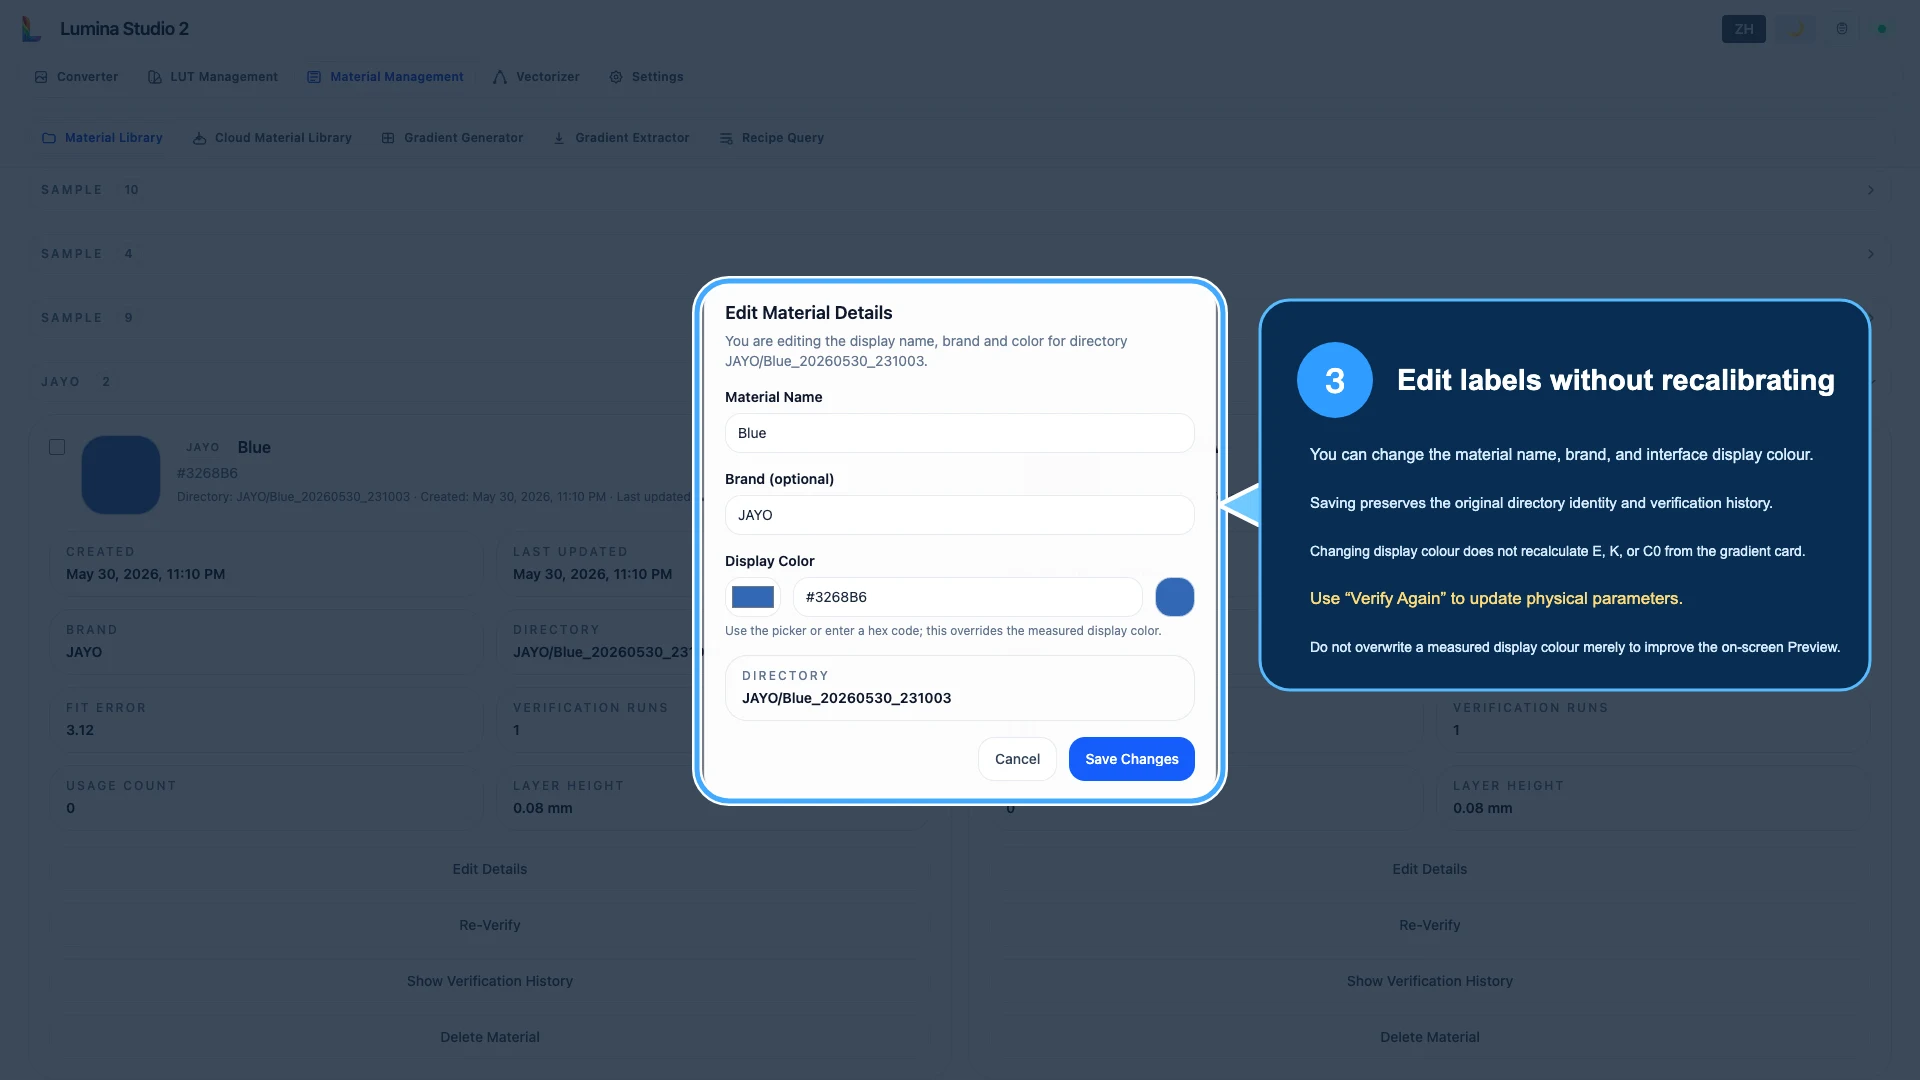
You can change:
- Material Name;
- optional Brand;
- Display Color used for interface identification.
Saving preserves the archive’s directory identity and existing verification history. It does not recalculate gradient-card values such as E, K, or C0.
Do not change Display Color only to make Preview look better. If the archive’s physical prediction is wrong, re-check the filament, capture conditions, layer height, and verification data. Use Re-Verify when physical parameters must change.
Step 4: review verification history
Select Show Verification History.
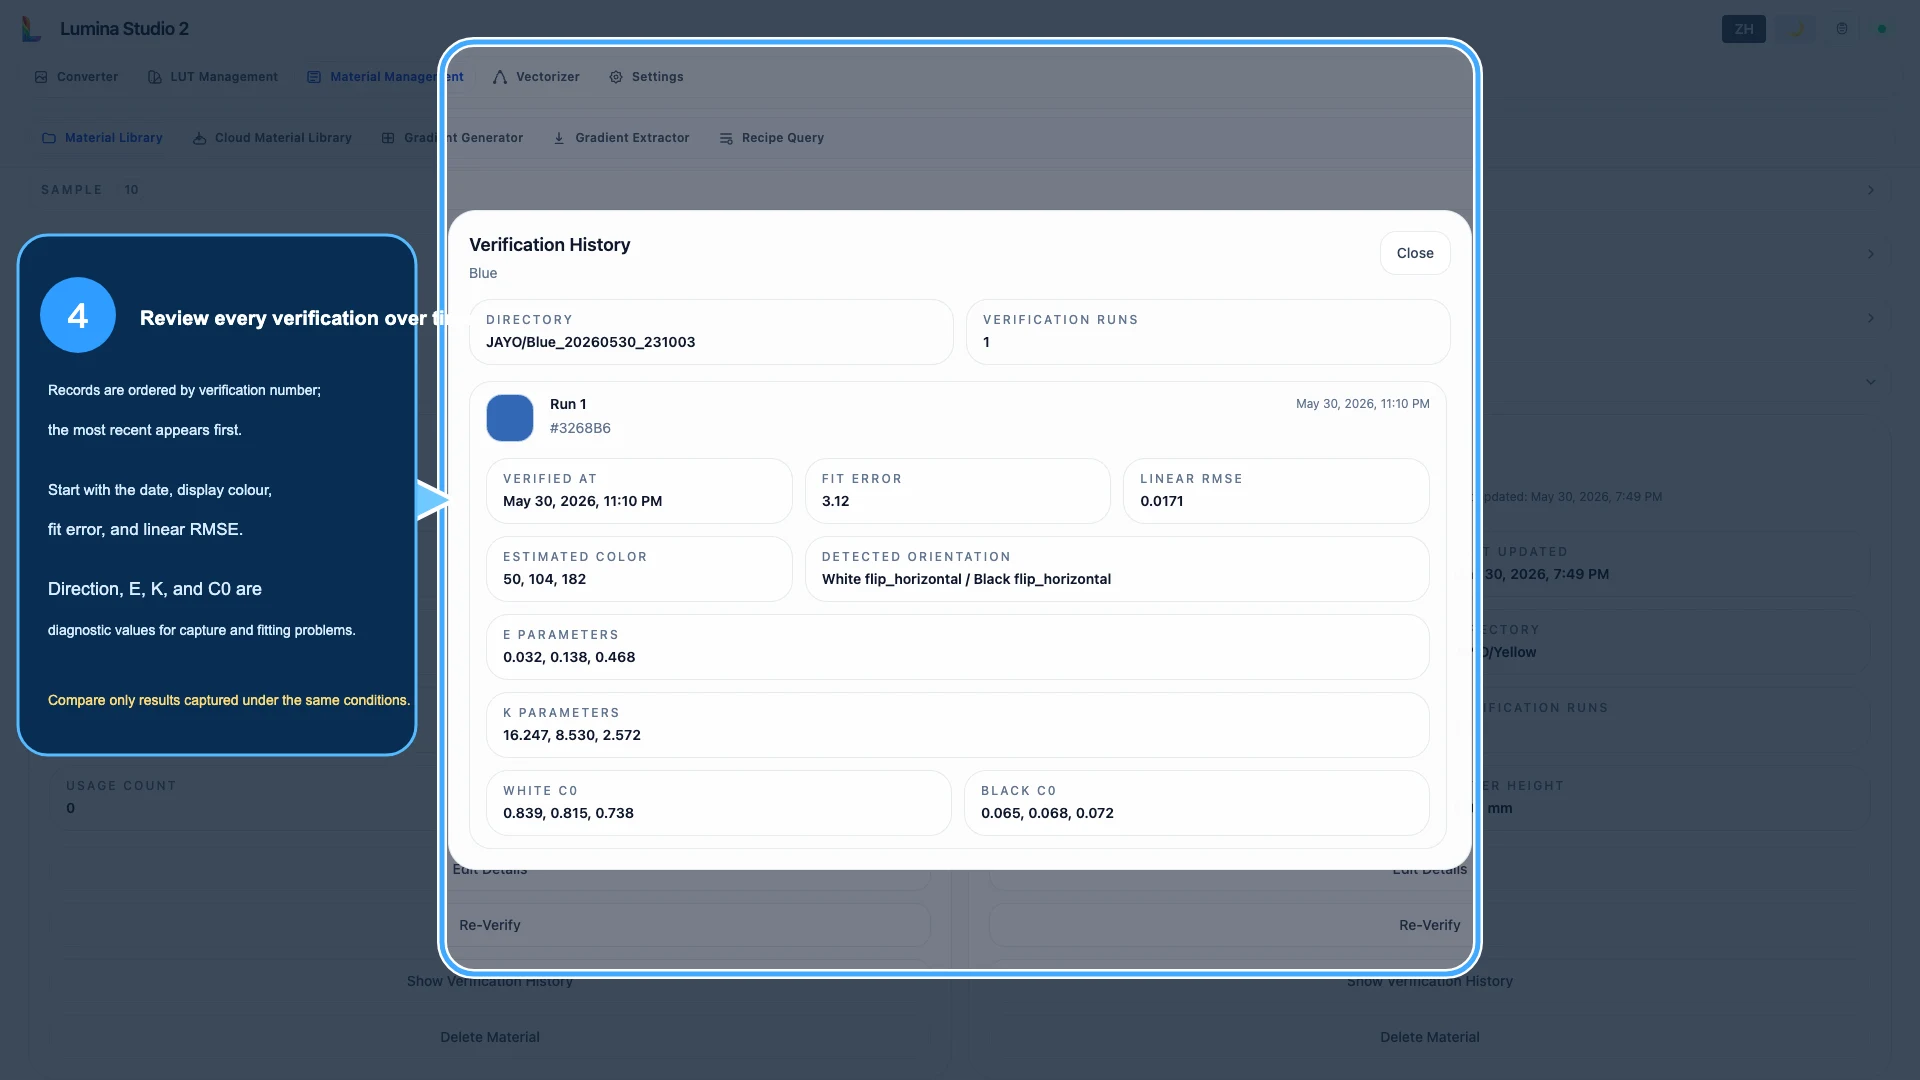
Records are ordered by verification number, with the most recent first. For an ordinary review, start with:
- date and time;
- display colour;
- fit error and linear RMSE;
- layer height and capture conditions recorded with the run.
Direction, E, K, and C0 are diagnostic values used when examining capture and fitting problems. Compare runs only when the gradient card, camera position, lighting, white balance, and backing conditions were comparable.
History is evidence, not an instruction to choose the numerically smallest value without context. Confirm the physical swatch and the intended print workflow.
Step 5: re-verify the same archive
Select Re-Verify on the target card.
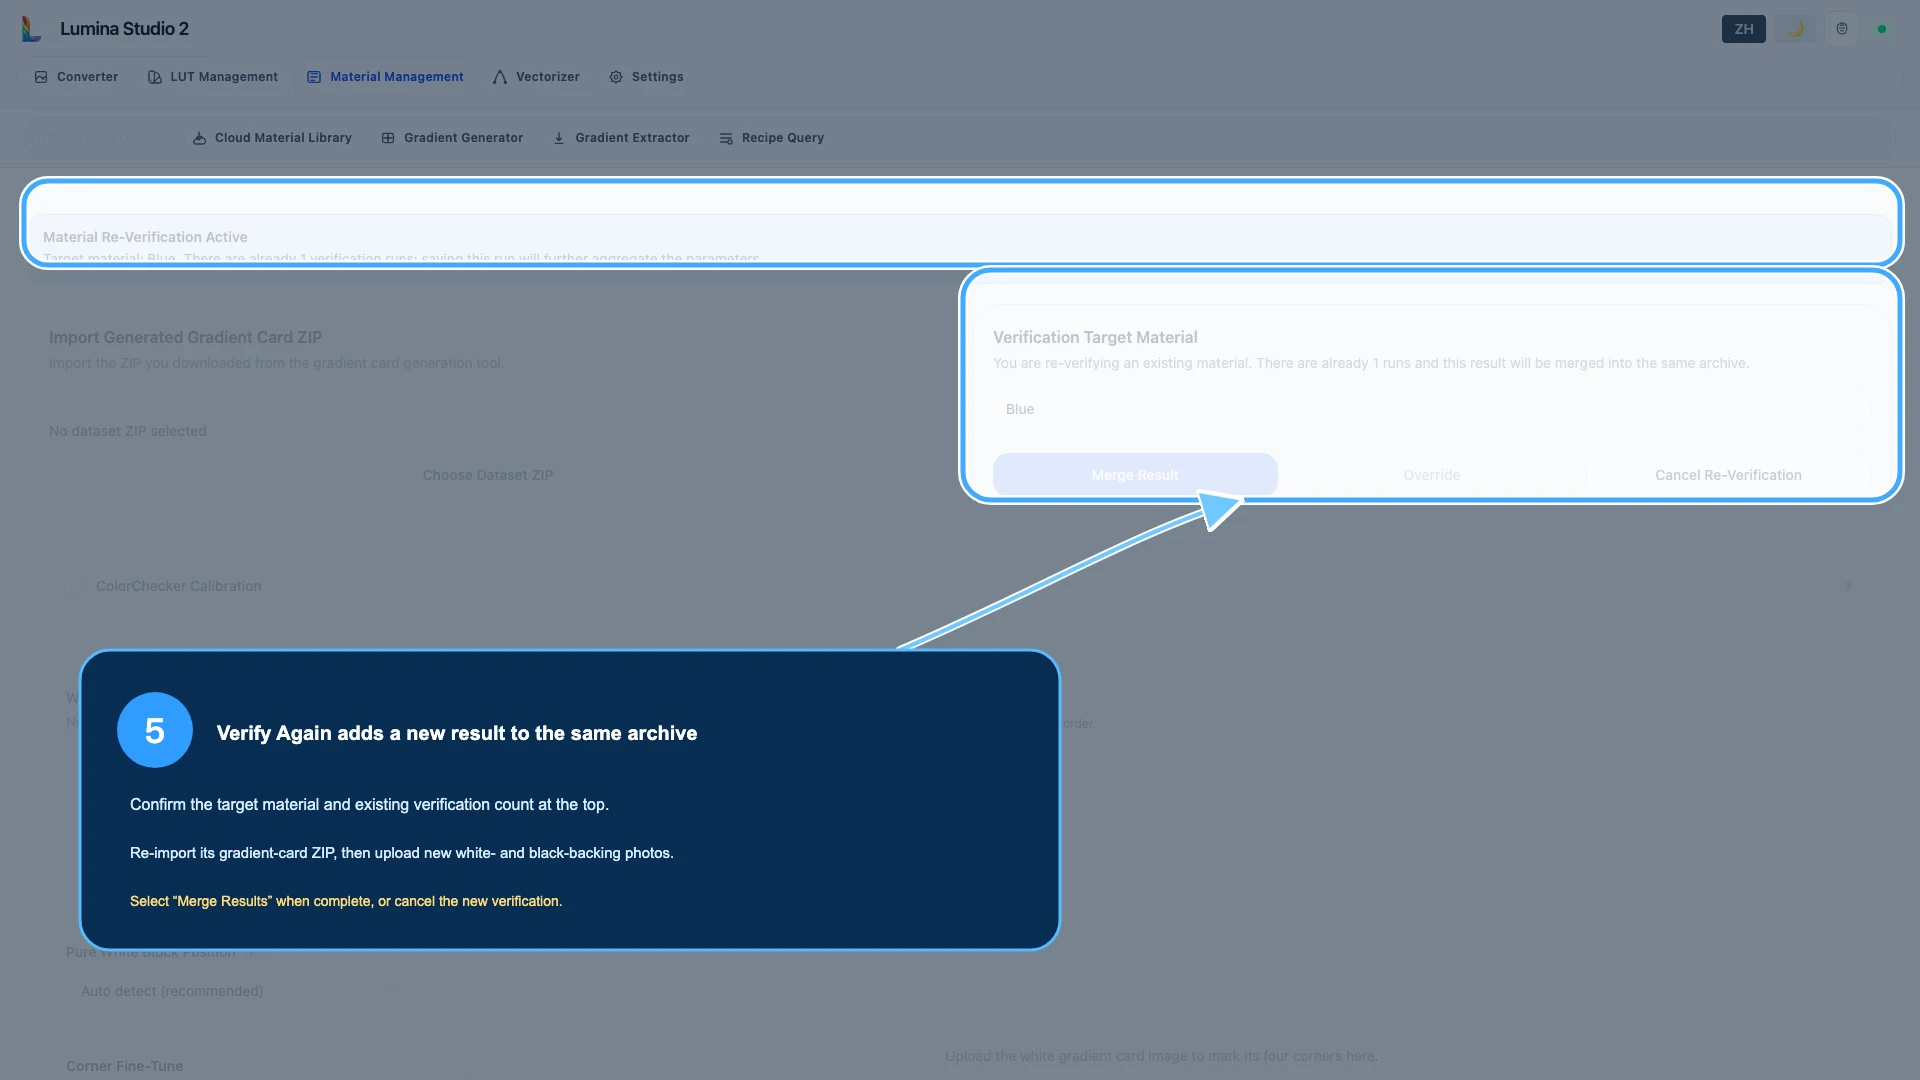
Before continuing, confirm the target archive shown at the top. Then:
- import the matching gradient-card ZIP for that filament;
- upload new white-backing and black-backing photos;
- check that each image uses the intended orientation and capture conditions;
- complete the fitting process;
- choose Merge Results to add the new result to the same archive.
Cancel if the target archive, filament, layer height, or photos are wrong. A verification made from another spool or mismatched gradient card should not be merged merely because the visible colour name looks similar.
Step 6: export an offline ZIP before risky changes
Select one or more archives, then choose Export Selected.
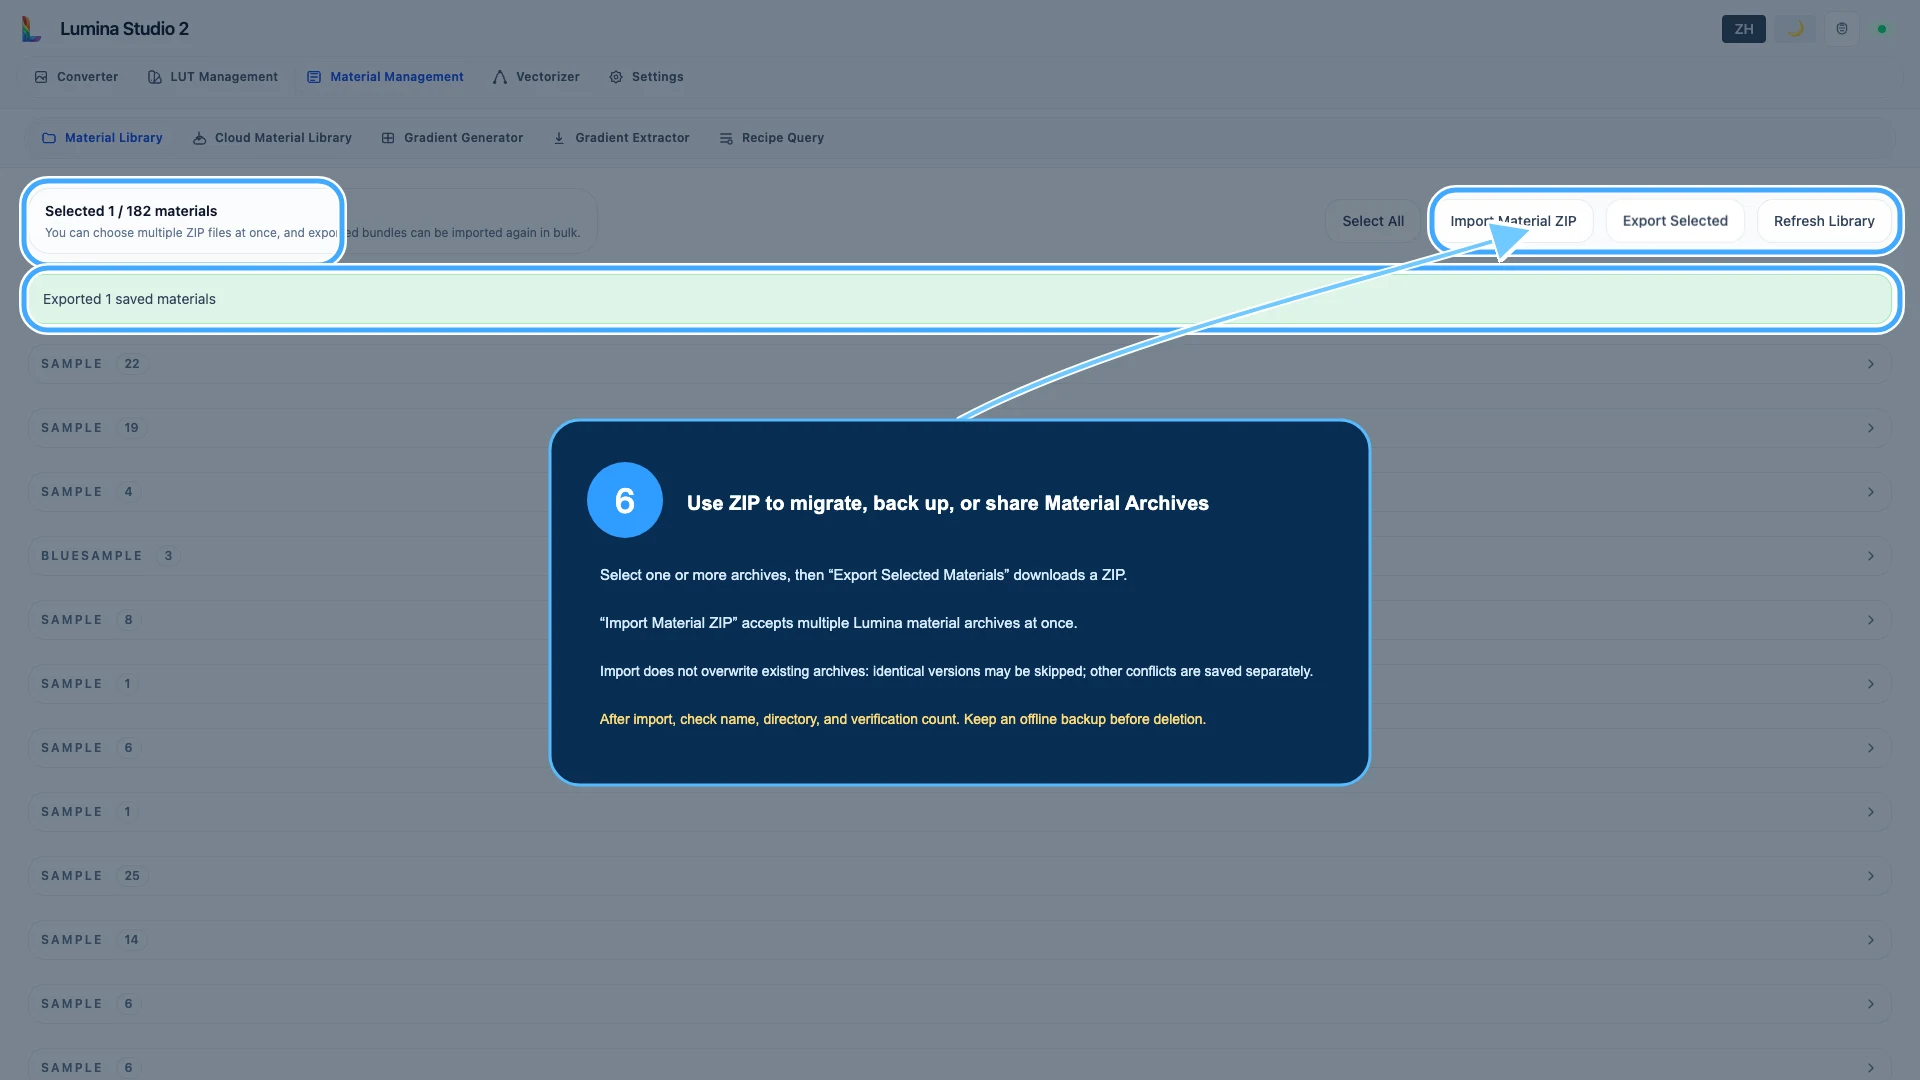
Use exported ZIP files for:
- offline backup before editing or deletion;
- transfer between authorised Lumina installations;
- sharing a calibration with someone using the same physical filament and print conditions;
- preserving a known working archive before a new verification.
Deletion cannot be undone from the interface. Keep a ZIP outside the active Lumina data directory before deleting a valuable archive.
Step 7: import archives carefully
Import Material ZIP can accept multiple Lumina archive ZIP files. The importer avoids blindly overwriting existing data: an identical version may be skipped, while other name conflicts can be stored separately.
After import, inspect:
- displayed name and brand;
- directory identity;
- verification count and layer height;
- archive provenance and permission to use or redistribute it;
- a small printed validation swatch.
Do not unpack and reconstruct the archive by hand unless you are developing the format. Use the original ZIP so required files and metadata remain together.
A sensible backup structure
material-archives/
  YYYY-MM-DD/
    exported-materials.zip
    verification-notes.txt
    reference-photos/
Notes may record filament product, batch, layer height, printer/nozzle, capture lighting, and which physical spool was used. Keep private machine paths, accounts, and credentials out of packages intended for public contribution.
Common questions
Why does changing Display Color not fix the physical result?
Display Color is identification metadata. It does not rerun the physical model. Use Re-Verify and print a new validation swatch when the prediction is wrong.
Does a lower fit error always mean a better print?
Not by itself. Compare runs made under the same conditions, then verify the physical result. A technically low error from mismatched photos or the wrong spool is not useful.
Can I rename an archive safely?
Edit Details changes its visible name and brand while preserving the directory identity. Keep a ZIP backup and avoid creating several ambiguous copies with nearly identical names.
Can an archive from another user be trusted automatically?
No. Check provenance, filament product, layer height, printer conditions, and redistribution rights. Print a small validation sample before production work.
What should I do before deleting a duplicate?
Export it, compare directory identity and verification history, and confirm no project still depends on it. Deletion in the interface is not an undoable temporary action.
Why does the imported archive appear under another brand group?
Brand grouping follows archive metadata. Edit the display brand if the archive is correctly identified but grouped poorly; do not change physical data for a grouping issue.
Image notes and content licence
The screenshots are real captures of the current English Lumina Studio interface. Sample archive labels were localised in the documentation capture only; no archive was modified or saved. The archive data shown is used solely to demonstrate controls and is not a material recommendation.
Unless otherwise noted, the original text and focus annotations are available under the Wiki’s CC BY-NC-SA 4.0 content licence. Material brands and product names belong to their respective owners. Do not redistribute third-party archive data without permission.
Archive format and verification controls can change. Treat the current interface, original ZIP, verification history, and printed swatch as the final authority.
Submit feedback
Your feedback is sent privately to the Wiki maintainers and is not displayed publicly on this page.