This article was prepared with AI assistance based on an analysis of the current Lumina Studio source code, existing Wiki content, and relevant workflows. It has been checked against the current version, but omissions or details that become outdated may remain as the software evolves. If you find an error or have a clearer explanation, example, or suggestion, please leave a comment on this page or propose an edit on GitHub.
Installed or Custom Material Archives, Inferred LUTs, or Legacy LUTs?
If you only want the short answer: use a colour source that matches the physical filament, intended layer height, and workflow for this print.
- If a verified Material Archive fully matches your filament, start with it.
- If no archive fully matches, or colour consistency is important, create archives from your own filaments.
- If Lumina provides an Inferred LUT for your material set, use only the supported modes listed with it.
- Use a Legacy LUT when reopening a 1.x project or reusing an older colour set that was already verified.
“Installed” and “custom” describe where a Material Archive came from. Material Archive, Inferred LUT, and Legacy LUT are different Source Type choices in the current Lumina Studio interface. Do not mix these two classifications.
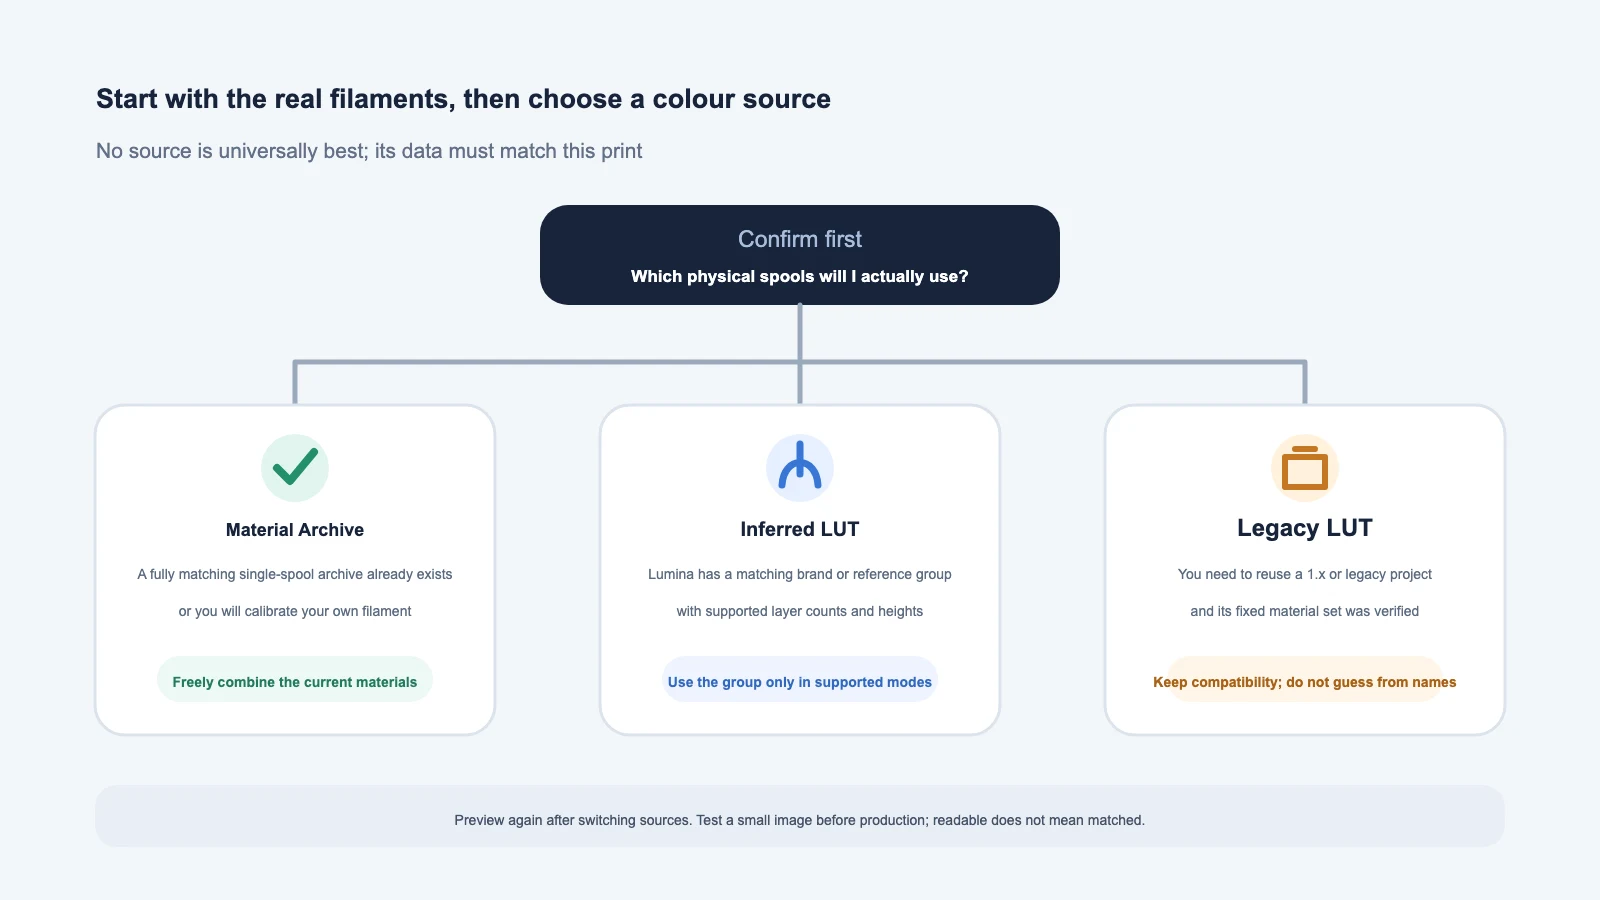
How are the three source types different?
| Source Type | Main purpose | Most important selection evidence | Pay particular attention to |
|---|---|---|---|
| Material Archive | Freely combine several single-spool archives for the current artwork | The real filament's material, product line, colour, and archive source | If an installed archive does not fully match the physical spool, its preview is only a reference |
| Inferred LUT | Use a prepared reference group and palette supplied by Lumina | The brand or material group and the listed supported layer count and layer height | Do not force an unlisted combination or substitute an unrelated palette |
| Legacy LUT | Continue using a verified fixed colour set from 1.x or an older workflow | The original filament order, Color Mode, layer count, and layer height | Matching names do not prove identical internal data; verify again after changing filament |
One image uses only the currently selected Source Type. After changing the source, generate a new preview. Do not treat a preview from the previous source as the result of the new one.
Material Archive: flexible combinations for the current 2.0 workflow
A Material Archive records how one physical spool behaves in gradient cards printed over white and black backing. For conversion, select several archives from the Material Library, then set the Color Layers, Layer Height, and Base Plate Material for this artwork.
A Material Archive can come from:
- an archive supplied by Lumina or an official resource and installed locally;
- an archive shared by another user and imported after you verify its origin;
- a custom archive extracted after printing gradient cards with your own filament.
They are selected in the same way once installed in the Material Library, but their reliable scope differs. An installed archive is convenient for a quick start. A custom archive better represents your physical spool, measurement, and print conditions.
When can I start with an installed archive?
Start with a small test image when all of these are true:
- the material type matches, such as PLA with PLA or PETG with PETG;
- the brand, product line, and colour name match;
- the archive is not reported as damaged, missing, or clearly outdated;
- the intended Layer Height is compatible with the archive and current conversion;
- you can identify the exact physical spool rather than a similarly coloured one.
Even products with identical names can vary by batch, moisture, print temperature, and actual colour. “Same product” means it is reasonable to test first; it does not guarantee an identical physical result.
When should I create my own archive?
Consider a custom archive when any of these apply:
- the Material Library has no exact match for the brand, product line, material, or colour;
- a test print from an installed archive differs visibly from the real result;
- the filament has unusual translucency, filler, surface finish, or batch variation;
- the artwork requires more consistent skin tones, greys, or brand colours;
- you want a reusable, traceable material library tied to your real spools.
Follow Generate and Print Gradient Calibration Cards and Photograph and Extract Gradient Cards to create one.
Inferred LUT: use a prepared reference group
An Inferred LUT is not another name for a single-spool Material Archive. After you select it, the interface lets you choose the corresponding brand or reference group and shows the available database plus supported combinations of Color Layers and Layer Height.
It is useful when:
- Lumina already includes a reference group matching the material set you plan to use;
- you want a prepared palette with explicit supported modes;
- you do not need to replace the group freely with arbitrary single-spool archives.
Follow the supported modes shown in the current interface. If a layer count or layer height is not listed, do not assume a nearby value is equivalent. After switching to an Inferred LUT, check the exported project filaments again. Do not carry over the colour order from a previous Legacy LUT.
Legacy LUT: fixed, verified combinations and older projects
A Legacy LUT is a precomputed mapping from target colours to layered recipes. It remains useful for verified older projects, fixed material combinations, and LUT files created by the 1.x workflow.
Keep and verify all of the following together:
- the original Color Mode and filament order;
- the physical filament used by every channel;
- the supported layer count and Layer Height;
- the slicer and print conditions used for the original validation.
Some Legacy LUTs support dynamic layer counts and heights; others only support a fixed combination. If the current interface says dynamic settings are unsupported, use the modes stored in that LUT instead of forcing parameters from another file.
The current upload control accepts .npy, .json, .npz, and .msgpack Legacy LUT
files. A file being readable only proves that its format can be parsed. It does not
prove that the data matches your physical filament.
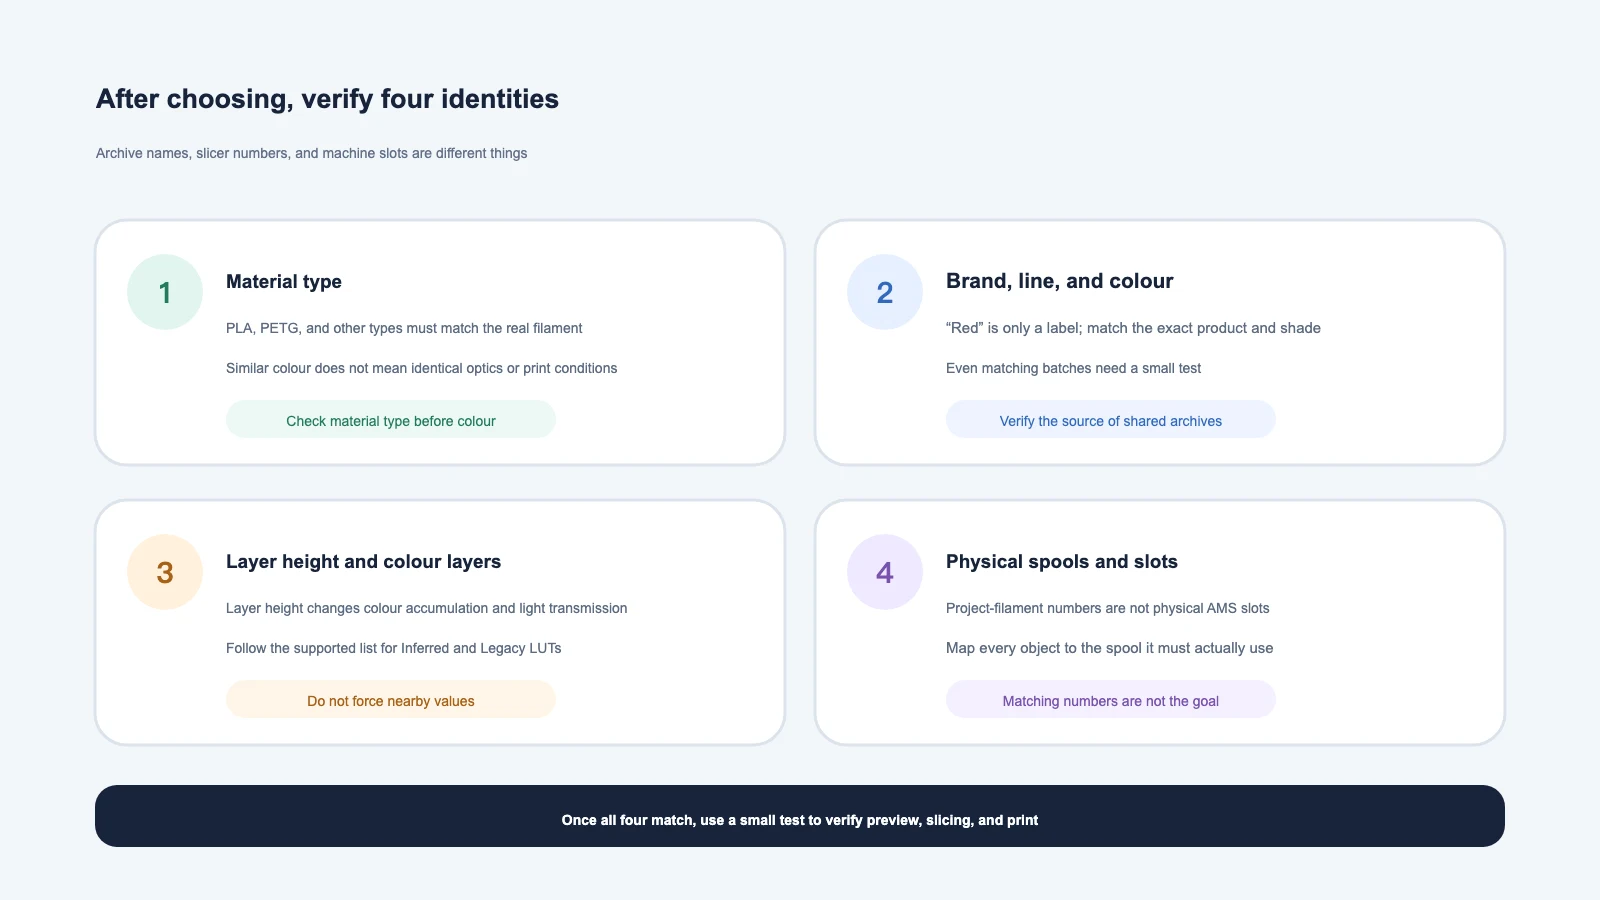
Verify four identities after choosing
1. Material type
PLA, PETG, and other materials differ not only in slicing temperature but also in light transmission and layered colour behaviour. A similar visible colour does not make archives interchangeable across materials.
2. Brand, product line, and colour
“Red” and “white” are product labels. Match the specific brand, product line, and shade whenever possible. For a shared archive, verify which physical product the contributor measured.
3. Layer Height and Color Layers
A Material Archive records the Layer Height used for measurement. The Converter also lets you choose the Color Layers and Layer Height for this work. Changing the layer height changes how much colour and light transmission accumulates in each layer. Inferred LUTs and Legacy LUTs may only support their listed fixed combinations.
4. Physical spool and slot
The archive name in Lumina, the project-filament number in the slicer, and the physical machine slot are separate identities. After generation, map every project filament to the real spool it should use. Do not rely on colour swatches alone. See Open a Lumina 3MF in Your Slicer for the complete check.
What happens when the wrong archive is used?
Common symptoms include:
- the Lumina preview is already too grey, green, dark, or clipped in highlights;
- the preview looks close but the whole physical print shifts noticeably in hue or brightness;
- target colours map to unexpected material combinations;
- the slicer's material type, project filament, or physical slot does not match the actual spool;
- the same settings produce different prints because the physical filament or batch changed.
Do not immediately hide the problem with image editing. First verify the Source Type, archive identity, Layer Height, physical spools, and slots. Then decide whether new calibration is needed. For the fixed diagnostic order across the three result stages, read Why Do Lumina Preview, Slicer Preview, and the Physical Print Look Different?.
What if an archive is missing, removed, or changed?
- Refresh the current source catalogue or Material Library to rule out a stale list.
- Confirm that the archive still exists and is not damaged.
- If you exported a Material Archive ZIP earlier, import it again using the Material Archive management guide.
- If the origin can no longer be verified, create a new archive from the physical filament.
- For an important project, retain the source image, Lumina settings, archive or LUT, generated 3MF, and sliced result together.
Do not preserve only an archive name shown in a screenshot. A name cannot reproduce the original data or identify the real spool later.
Common questions
An archive with the same brand and colour already exists. Must I calibrate my own?
Not necessarily. Generate a small test with the installed archive and compare the preview, sliced result, and physical print. If the material, product line, colour, or print conditions differ, or the test is visibly wrong, create an archive from your own filament.
No archive matches exactly. Can I choose the closest colour?
You can use it to learn the workflow, but do not treat it as reliable colour data. White, black, translucent, and highly filled materials can behave very differently when layered even if their surface colours look similar. Test before a finished work and calibrate when necessary.
Can one archive represent both PLA and PETG?
That is not a safe assumption. An archive describes one measured filament. Material changes can alter temperature, light transmission, and surface finish. Use an archive and slicer preset matching the physical material.
Can an old LUT be converted directly into Material Archives?
They store and combine different information. Renaming the file or changing its extension does not migrate it. Continue using Legacy LUT for an older project, or create single-spool archives with the gradient-card workflow when moving to Material Archives.
Why must I preview again after changing Source Type?
The available palette, layered recipes, and material order can all change. A new preview is the only preview of the currently selected source.
Content licence
Unless otherwise stated, the original text, tables, and diagrams on this page are covered by the Wiki’s CC BY-NC-SA 4.0 content licence. Third-party materials, brands, trademarks, and file formats remain the property of their respective rights holders.
The software and resource libraries continue to change. Use the names, installed archives, and supported modes shown in the current interface as the final reference.
Submit feedback
Your feedback is sent privately to the Wiki maintainers and is not displayed publicly on this page.