This article was prepared with AI assistance based on an analysis of the current Lumina Studio source code, existing Wiki content, and relevant workflows. It has been checked against the current version, but omissions or details that become outdated may remain as the software evolves. If you find an error or have a clearer explanation, example, or suggestion, please leave a comment on this page or propose an edit on GitHub.
Build Material Stacks, Predict Colour, and Print Validation Swatches
Material Recipe Query predicts the surface colour of a stack you choose from Material Archives. It is a forward model: you select the layers, substrate, and colour-layer height, then Lumina predicts their combined appearance.
It is not a target-colour search. Entering a desired Hex value does not automatically find the best stack on this page.
First understand the reading direction
Recipe order is always shown from viewing face → substrate:
- the first selected material is the outermost colour layer;
- every later selection is appended nearer the substrate;
- white or black substrate and colour-layer height participate in the prediction;
- reversing the same materials can produce a different colour.
The prediction is useful for comparing candidate recipes. It is not a promise of the exact physical result. Filament batch, real layer height, flow, surface, lighting, and the archive calibration all matter.
Step 1: choose substrate and layer height
Open Material Management → Recipe Query.
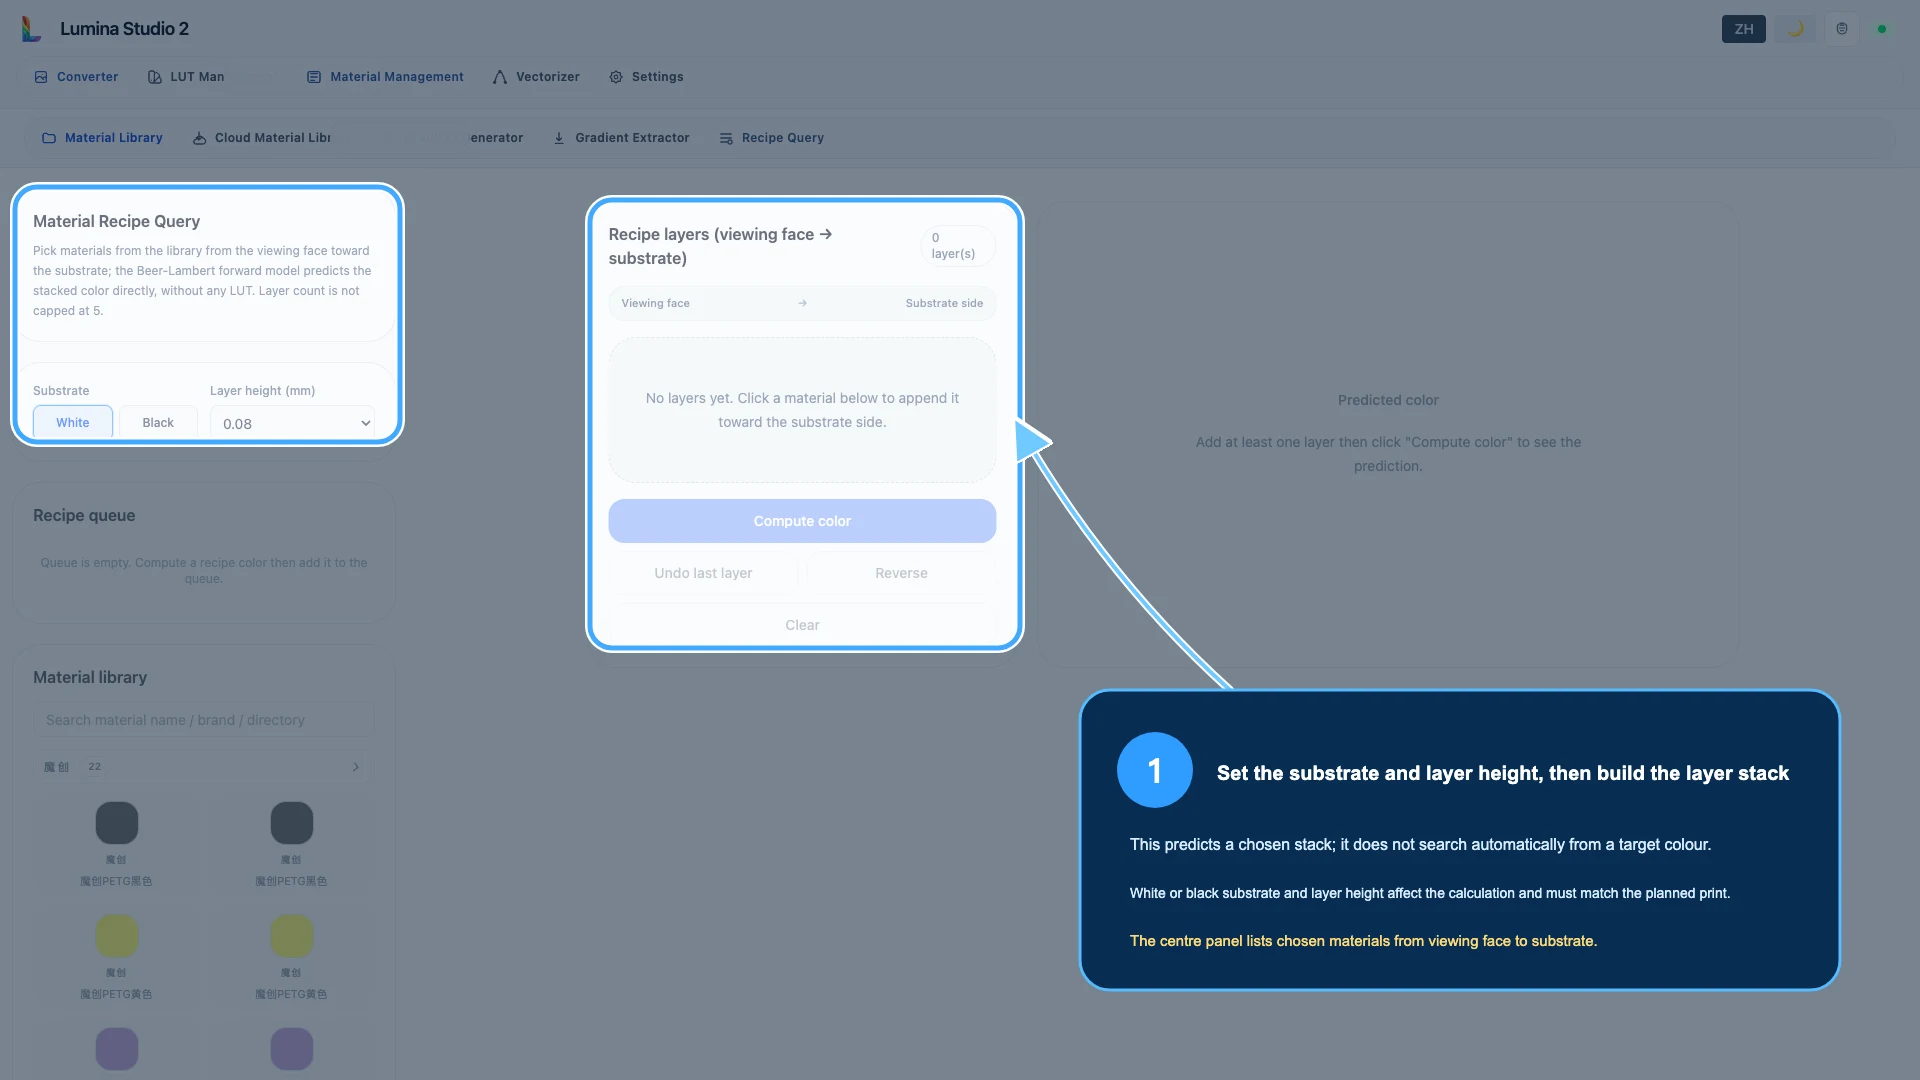
Choose:
- White or Black substrate to match the intended backing;
- the colour-layer height used by the selected Material Archives and planned print.
Do not choose the nearest-looking layer height casually. A material verified at one height may transmit and cover differently at another.
Step 2: find the exact archives
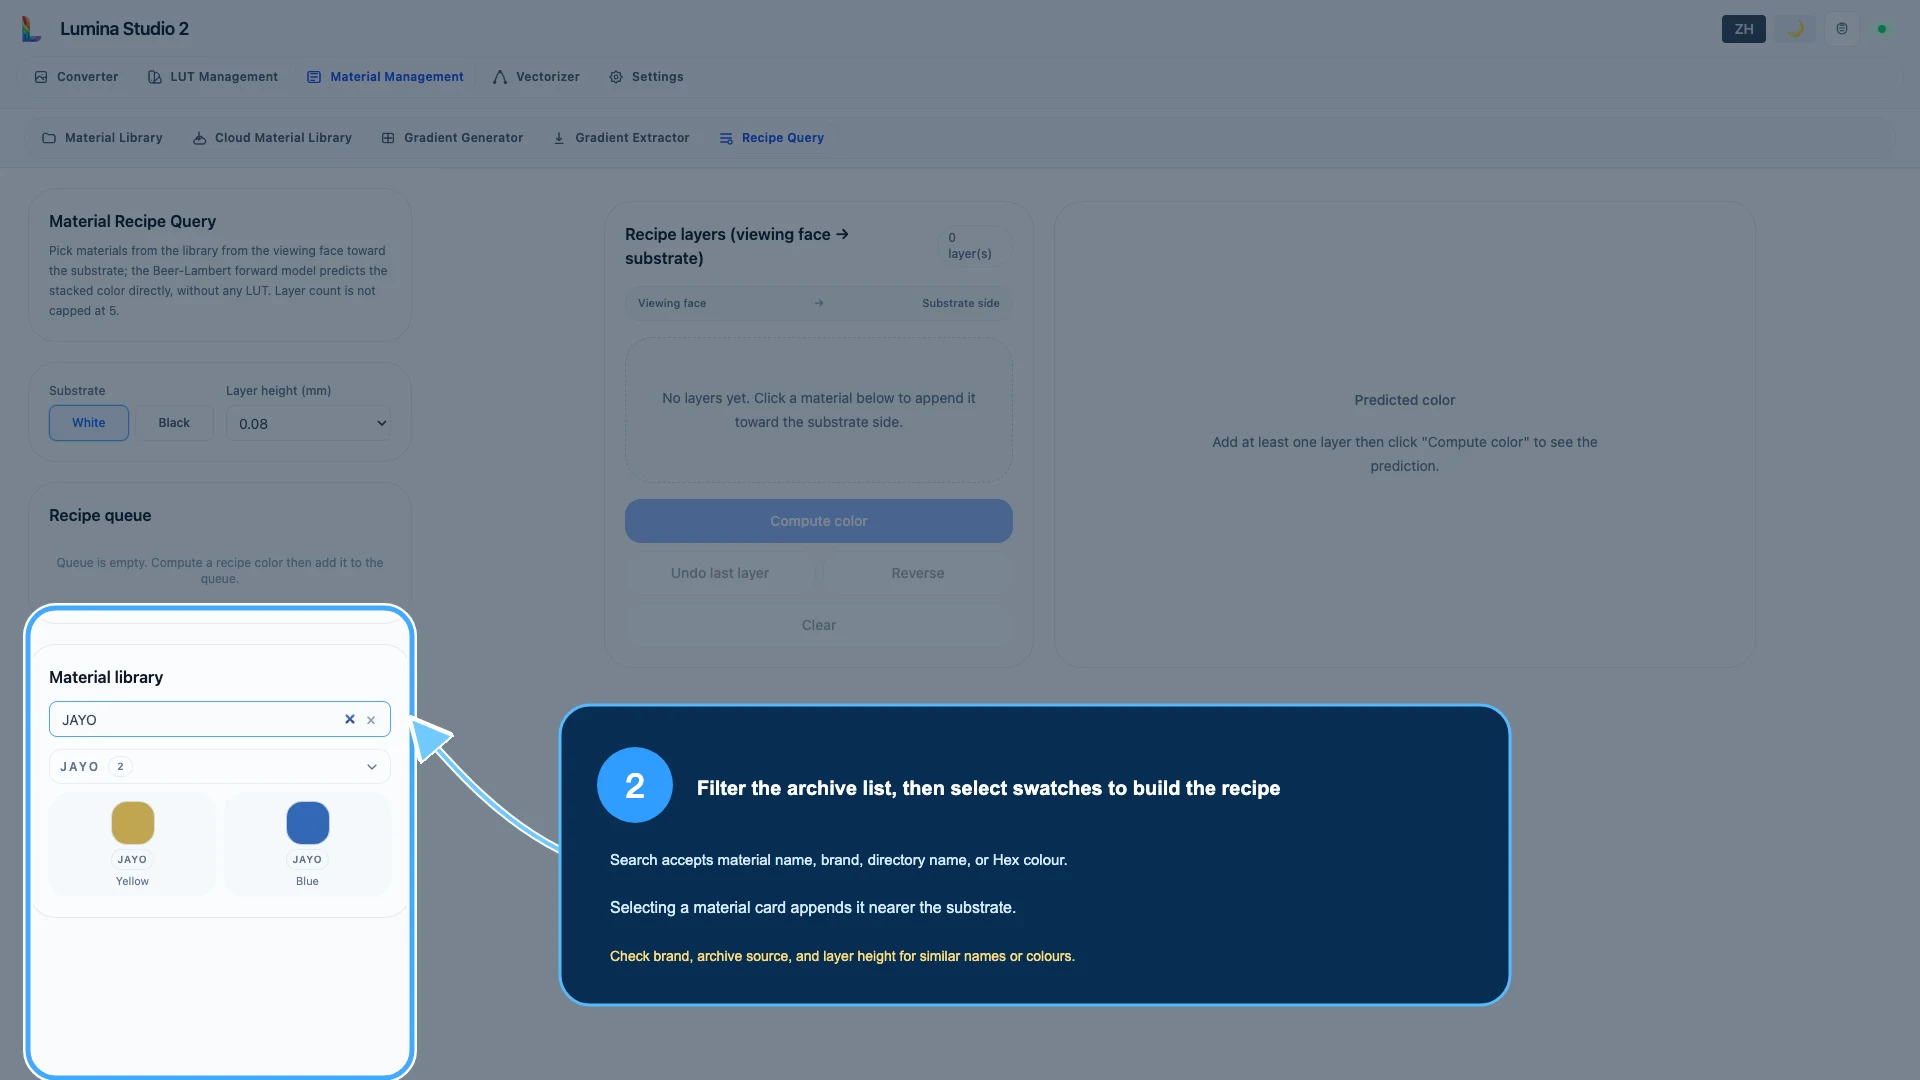
Search accepts material name, brand, directory name, or Hex colour. Before selecting a swatch, confirm:
- exact brand and physical filament;
- archive source and directory identity;
- layer-height compatibility;
- permission and provenance for a shared archive.
Similar names and similar display colours do not prove two archives are interchangeable. For archive selection, see Choose Installed or Custom Material Archives, Inferred LUTs, or Legacy LUTs.
Step 3: build the stack in order
Select material cards in the order they should appear from the viewing face to the substrate.
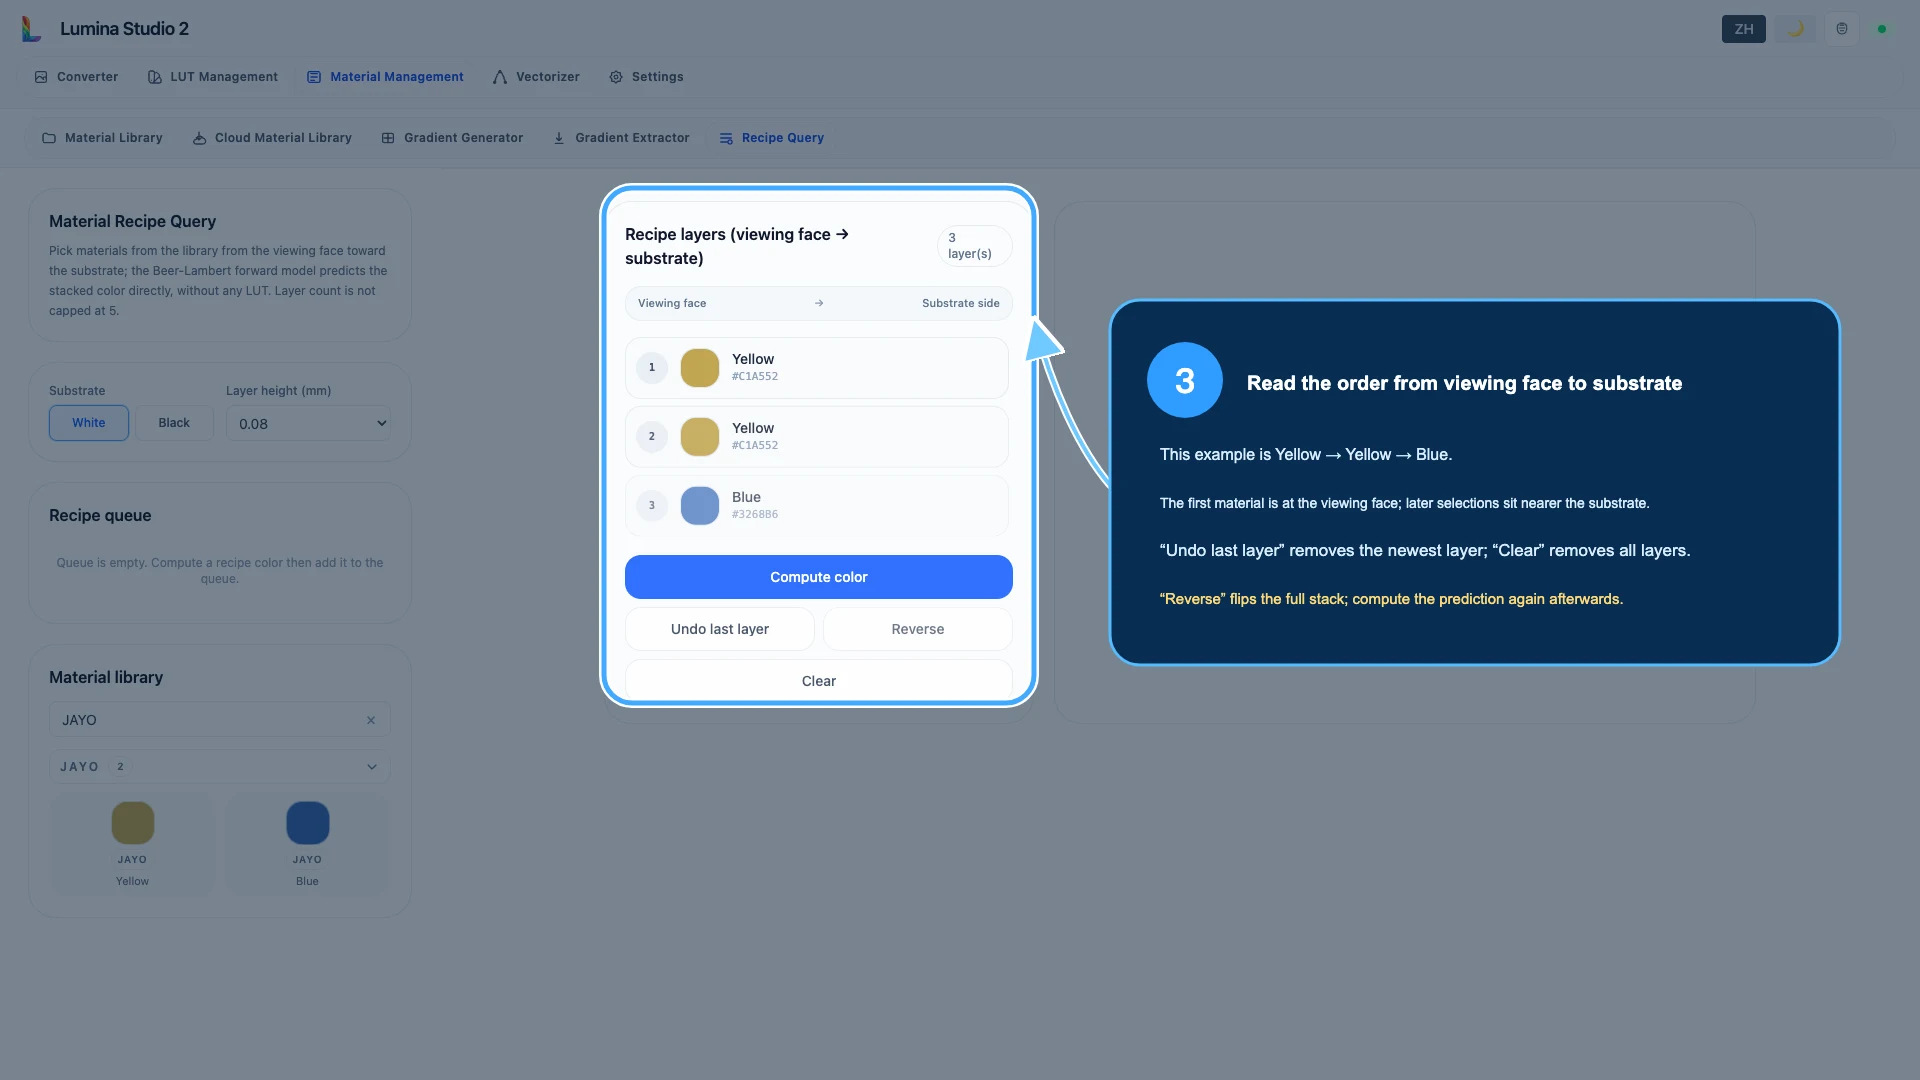
This example uses:
Viewing face → Yellow → Yellow → Blue → White substrate
Use:
- Undo last layer to remove only the newest layer;
- Clear to remove the entire stack;
- Reverse to flip the complete order.
After changing the order, select Compute color again. An old prediction does not describe the new stack.
Step 4: compare original and reversed predictions
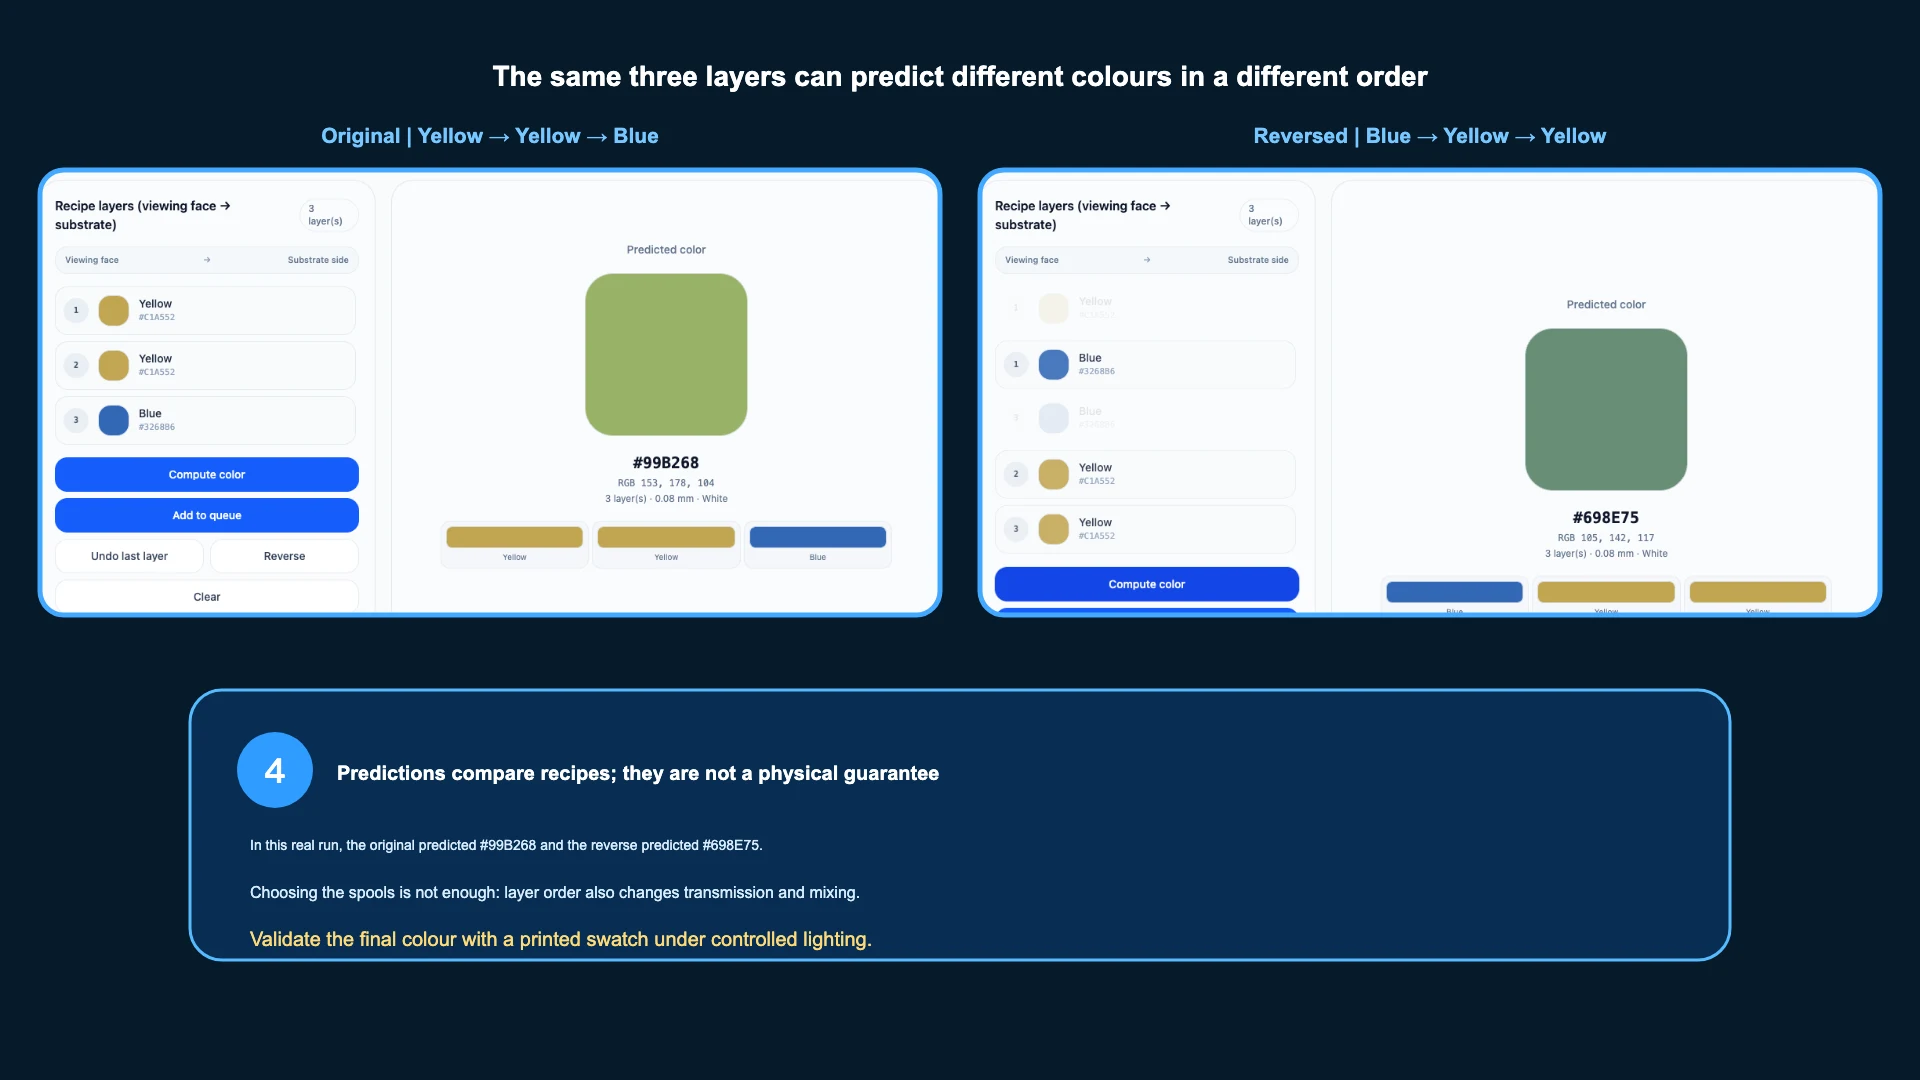
In the verified run:
| Stack from viewing face to substrate | Predicted colour |
|---|---|
| Yellow → Yellow → Blue | #99B268 |
| Blue → Yellow → Yellow | #698E75 |
The three material layers are the same, but the prediction changes because transmission, absorption, and coverage are order-dependent. Selecting the correct spools is not enough; their layer sequence is part of the recipe.
Use the result to compare candidate stacks. Print the validation swatch, map the correct physical spools in the slicer, and compare under controlled lighting before using a recipe for important work.
Step 5: add useful results to the queue
After computing a candidate, select Add to queue. Adjust or reverse the stack, compute again, and add another candidate if needed.
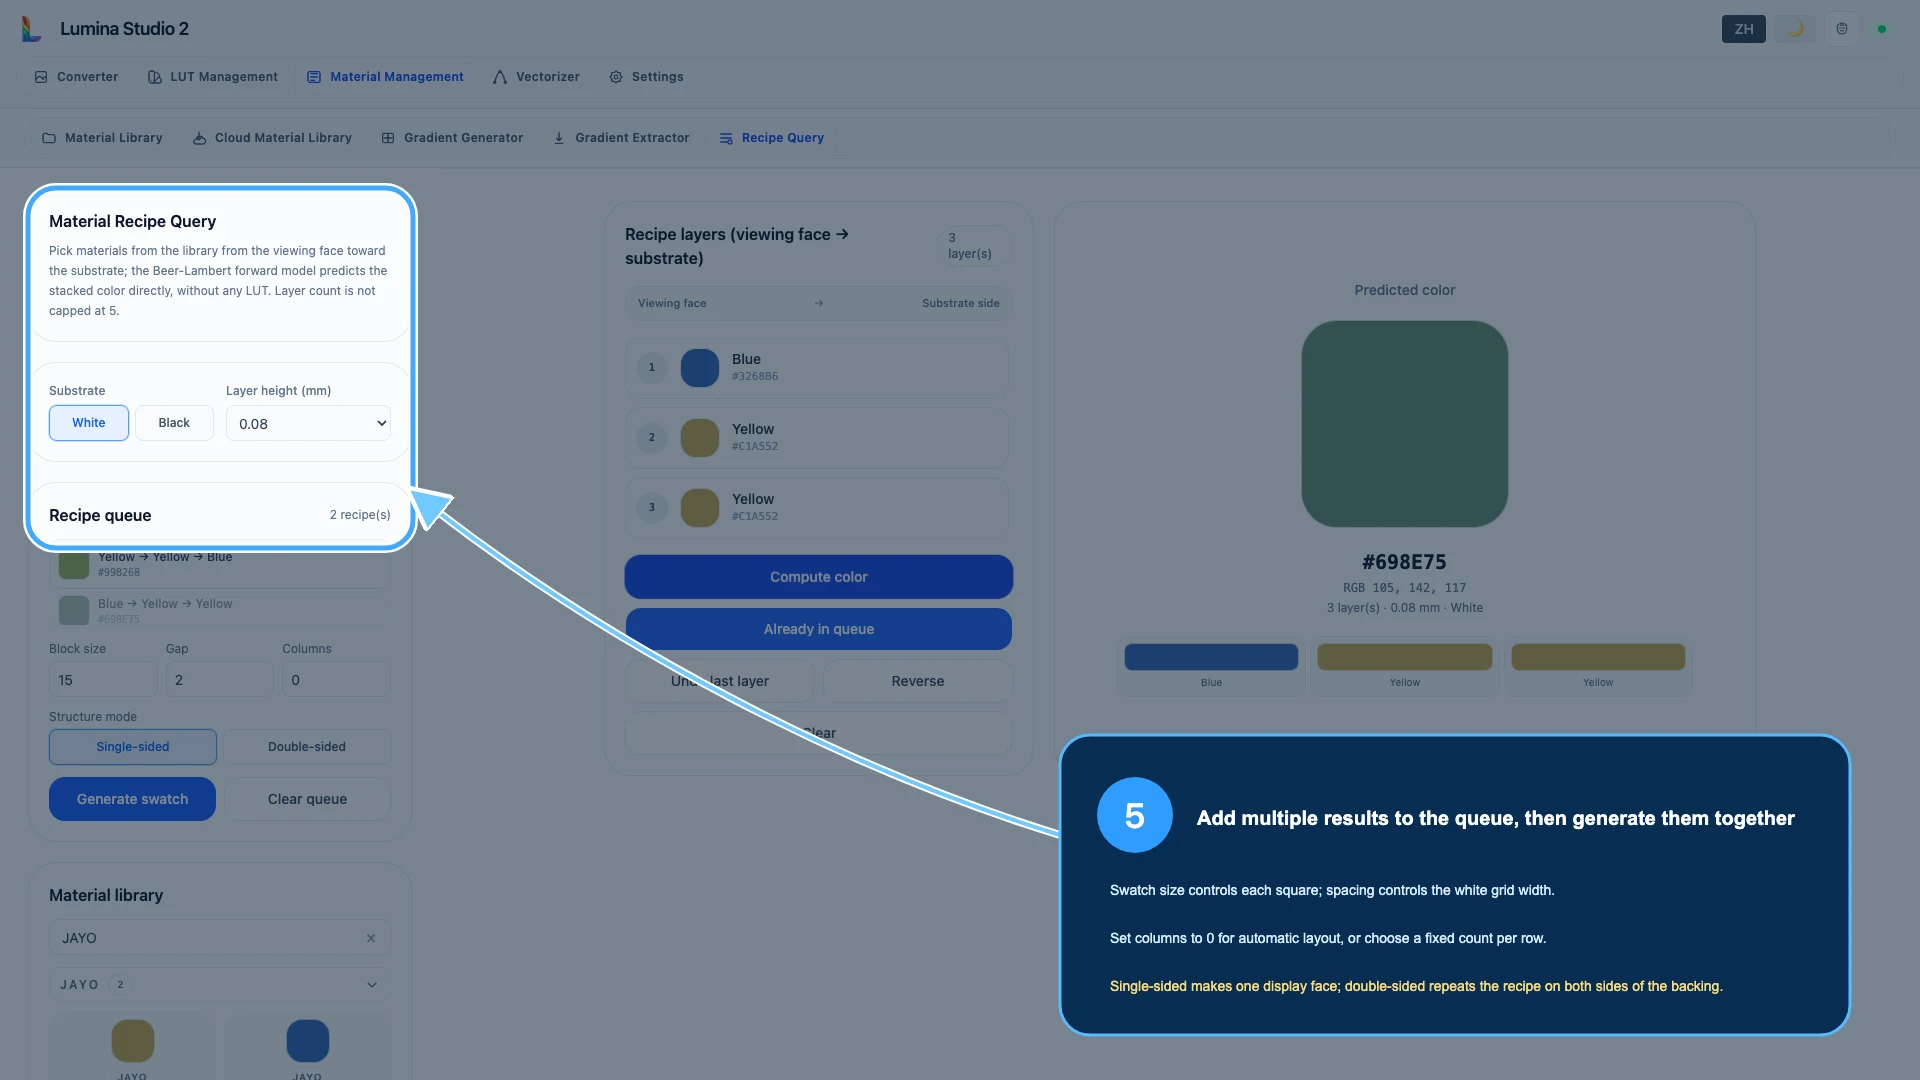
Before generation, set:
- Swatch Size: edge length of each printed square;
- Spacing: width of the white grid between squares;
- Columns:
0for automatic layout, or a fixed number per row; - Single-sided / Double-sided: one display face, or the same recipe on both sides of a central backing.
Give the swatches enough area to compare under real lighting. A tiny sample may not show the same coverage, surface texture, and visual integration as the intended artwork.
Step 6: Generate and use the legend
Select Generate swatch once. Wait for Download 3MF and the legend.
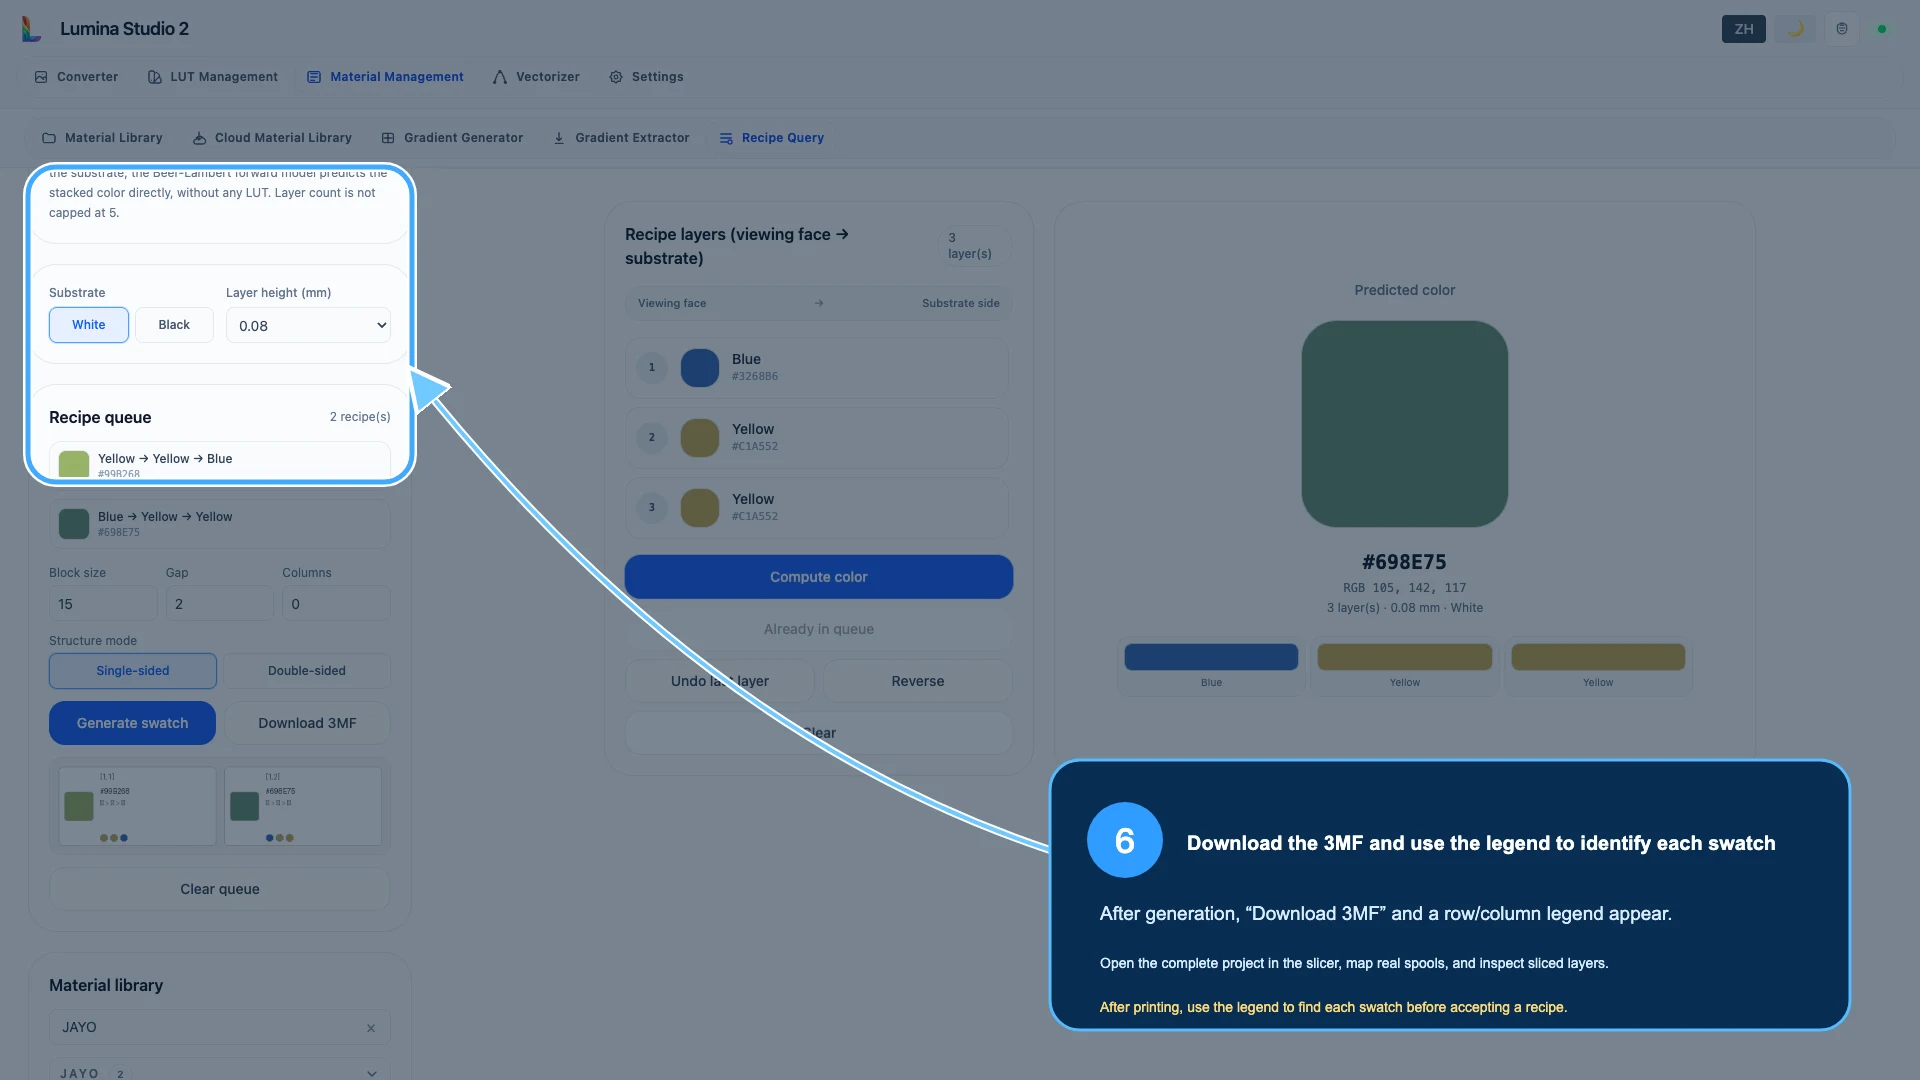
Then:
- download the 3MF;
- open it as a complete project in the slicer;
- map every project filament to the intended physical spool;
- inspect the sliced layers and display-face orientation;
- print with the intended nozzle and colour-layer height;
- use the row/column legend to identify each candidate;
- compare samples with the target under fixed lighting.
Record the chosen recipe, archive identities, substrate, layer height, printer/nozzle, filament batches, and viewing conditions. A Hex value alone is not enough to reproduce the physical sample.
How to judge a printed swatch
- let the part cool before comparing gloss and colour;
- use the same neutral light and viewing angle for all candidates;
- compare against the intended physical reference, not only a phone screenshot;
- check opacity, texture, and boundary quality as well as hue;
- repeat the test if a spool, layer height, nozzle, or backing changes.
The closest on-screen prediction is not always the best physical candidate if its printed coverage or surface quality is poor.
Common questions
Why can I not type a target colour and search automatically?
This panel evaluates a stack you build. A separate inverse-search workflow would solve a different problem and may have different constraints.
Why does Reverse change the result?
Each filament layer affects light before and after it reaches other layers. Transmission and coverage are not commutative, so order matters.
Can I add the same material more than once?
Yes. Repeated material layers are meaningful and can produce a different result from one thicker-looking swatch in a different order. Use the real colour-layer height.
What does substrate change?
It changes the backing behind the colour stack and therefore its apparent colour. Match it to the planned print instead of choosing whichever Preview looks better.
Can I use a predicted Hex directly in graphic software?
It is a useful screen reference, but not a colour-management guarantee. Display calibration, lighting, and physical materials differ. Preserve the printed swatch as the real reference.
Can I generate several recipes in one 3MF?
Yes. Add each computed result to the queue, configure layout, then Generate once.
Why does the slicer show the wrong colours?
Check project-object mapping, project filaments, physical spools, and hardware slots. See Import a Lumina 3MF into the Slicer Correctly.
Image notes and content licence
The screenshots are real captures of the current English Lumina Studio interface. Sample archive labels were localised in the documentation capture only; the underlying archive files were not edited or saved. The two prediction values come from the shown real run.
Unless otherwise noted, the original text, tables, and focus annotations are available under the Wiki’s CC BY-NC-SA 4.0 content licence. Material brands and archive data belong to their respective owners; do not redistribute third-party calibration files without permission.
Prediction models and controls can change. Treat the current interface, generated 3MF, slicer toolpaths, and printed validation swatch as the final authority.
Submit feedback
Your feedback is sent privately to the Wiki maintainers and is not displayed publicly on this page.