What Image Resolution Do 0.2 and 0.4 mm Nozzles Provide?
This article was prepared with AI assistance based on an analysis of the current Lumina Studio source code, existing Wiki content, and relevant workflows. It has been checked against the current version, but omissions or details that become outdated may remain as the software evolves. If you find an error or have a clearer explanation, example, or suggestion, please leave a comment on this page or propose an edit on GitHub.
If you only want the short answer: using common Bambu Studio default line widths, a 0.4 mm nozzle works out to about 60 PPI, while a 0.2 mm nozzle works out to about 115 PPI.
This is an “equivalent resolution.” It does not turn a 3D printer into a 60 or 115 PPI inkjet printer. A nozzle lays down plastic lines with real physical width, so the slicer's line-width setting is the useful value for estimating flat-detail resolution.
work of the same size. That gives small eyes, mouths, text, clothing details, and isolated color regions more room to remain separate.
Start with a real comparison at the same 60 mm size
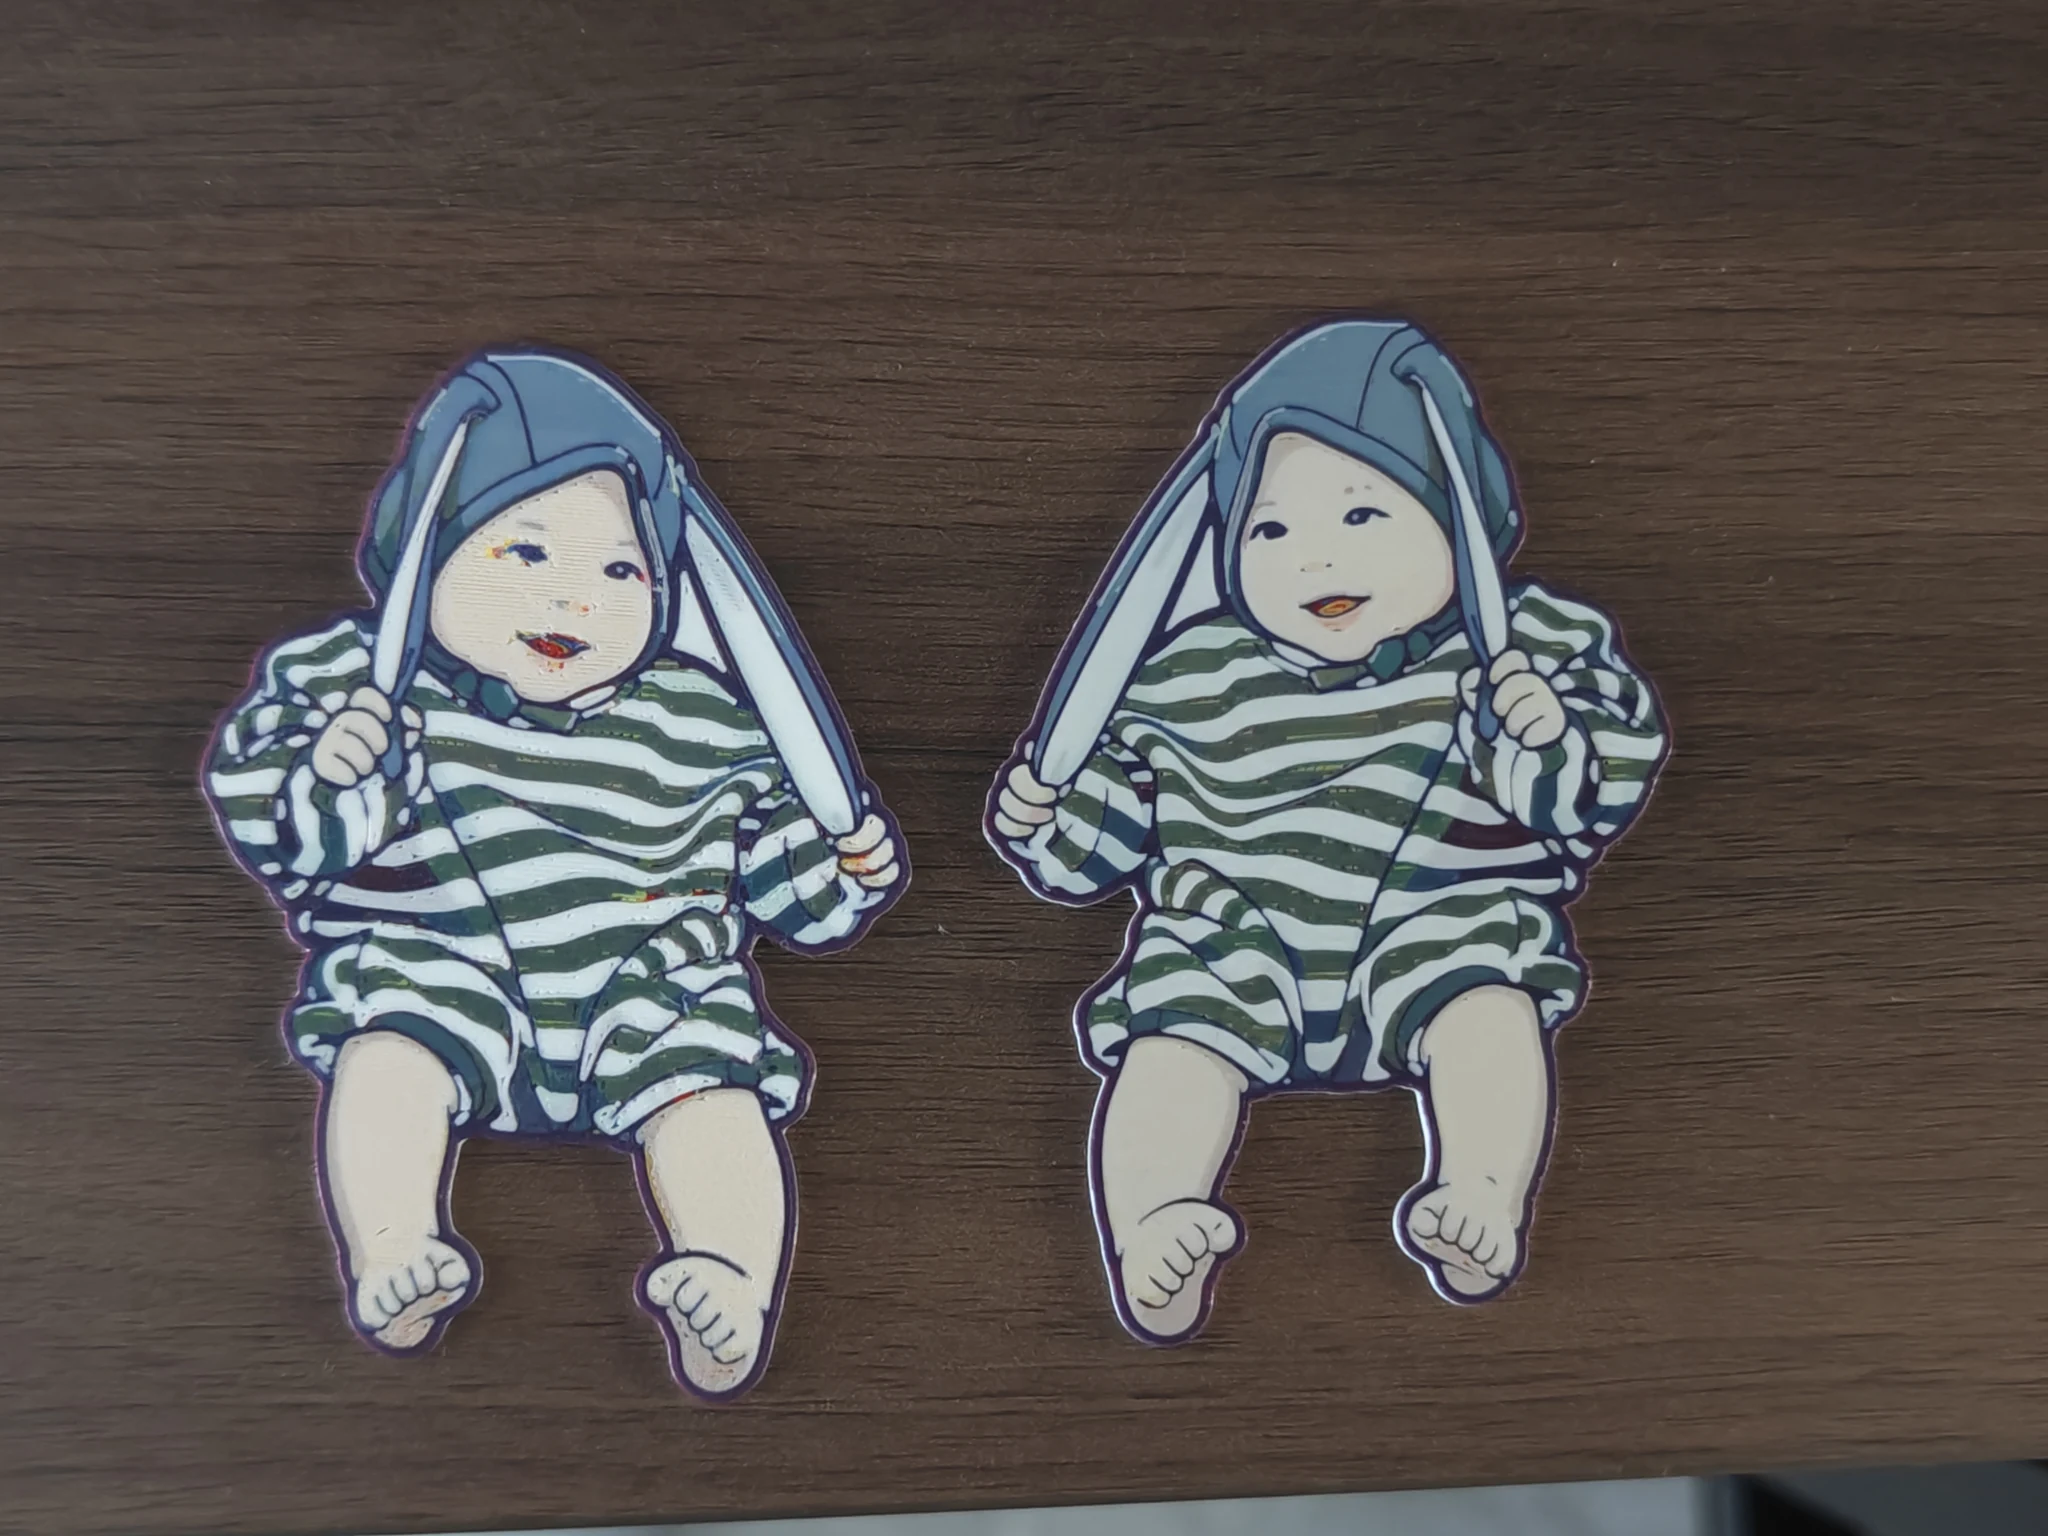
- Left: 0.4 mm nozzle.
- Right: 0.2 mm nozzle.
- Both prints use the same model, the same 60 mm size, and their default line widths.
Using reference line widths of 0.42 and 0.22 mm:
0.4 mm nozzle: 60 / 0.42 ≈ 143
0.2 mm nozzle: 60 / 0.22 ≈ 273
Across the same 60 mm distance, the 0.4 mm setup can therefore fit about 143 reference line widths, while the 0.2 mm setup can fit about 273.
When comparing the prints, look at the eyes and mouth, the thin stripes in the clothing, the outlines around the hands and feet, and the smallest independent color regions. The 0.2 mm print on the right preserves more thin lines and gives small color regions more space to stay separate. The 0.4 mm print on the left still shows the subject clearly, but some fine details merge or become thicker.
This photograph is a practical print example, not a laboratory test. Filament condition, flow, first-layer behavior, build-plate texture, and camera angle can also affect what you see. Do not attribute every visible difference to the nozzle alone.
Why not treat nozzle diameter as pixel size?
Nozzle diameter and line width are different values.
- Nozzle diameter: the physical orifice and the hardware reference used by the slicer profile, such as 0.2 or 0.4 mm.
- Line width: the reference width of the plastic after it is extruded and pressed onto the build plate or the layer below.
- Equivalent pixel: a convenient comparison that treats one reference line width as one sampling position.
In common Bambu Studio defaults, a 0.4 mm nozzle usually uses a 0.42 mm reference line width, and a 0.2 mm nozzle usually uses 0.22 mm. For this reason, the actual line-width setting is a better input for the calculation than the nozzle name.
Slicers may also use different widths for outer walls, inner walls, the first layer, top surfaces, and infill. With the Arachne variable-width wall generator, the slicer may adjust local widths to suit the geometry. The numbers in this article are comparison values, not precision measurements of every extruded line.
0.2 mm nozzle. Check the line width in your current process preset. If you have changed it, use your changed value in the calculation.
How to calculate your own print
You only need the finished size and the slicer's line width to estimate the number of reference sampling positions along one side:
Equivalent samples on one side ≈ side length (mm) / actual line width (mm)
For example, consider a print that is 100 mm tall:
0.4 mm nozzle: 100 / 0.42 ≈ 238
0.2 mm nozzle: 100 / 0.22 ≈ 455
The height contains about 238 or 455 reference sampling positions. If the model is 80 mm wide, divide 80 by the line width to estimate the number across its width as well.
Equivalent PPI is just as simple:
Equivalent PPI ≈ 25.4 / actual line width (mm)

0.4 mm nozzle: 25.4 / 0.42 ≈ 60 PPI
0.2 mm nozzle: 25.4 / 0.22 ≈ 115 PPI
Moving from a 0.4 to a 0.2 mm nozzle almost doubles the reference sampling count along one side. If both width and height are estimated in the same way, the theoretical number of two-dimensional sample positions is about 3.6 times as large. Real print clarity does not automatically improve by that factor because toolpaths, color boundaries, and material behavior still matter.
What do 60, 100, 150, and 200 mm mean in practice?
| Side length | 0.4 mm nozzle (0.42 mm width) | 0.2 mm nozzle (0.22 mm width) | Familiar comparison |
|---|---|---|---|
| 60 mm | about 143 | about 273 | Small fridge magnet: roughly 144p versus 270p |
| 100 mm | about 238 | about 455 | Palm-sized work: roughly 240p versus almost 480p |
| 150 mm | about 357 | about 682 | Postcard-sized work: roughly 360p versus almost 720p |
| 200 mm | about 476 | about 909 | Close to the short side of A4: roughly 480p versus 900p |
The familiar 144p, 240p, and 480p labels only help describe how many reference sampling positions fit along one side. They do not describe screen or video quality, and they are not the full width-by-height resolution of the image.
For example, a 200 mm-tall print with a 0.2 mm nozzle has about 909 reference sampling positions vertically. You can think of that as “roughly 900 samples high,” but a plastic line has physical width, neighboring colors touch, and the printed surface has texture. It is not equivalent to a 900p screenshot.
The physical sizes may be easier to picture:
- 60 mm: a small fridge magnet, keychain decoration, or palm-sized piece. This size makes differences in available line count especially visible.
- 100 mm: close to a coaster or the size of a palm. The 0.4 mm setup gives about 238 reference samples, while the 0.2 mm setup gives about 455. Choose according to the model's detail and your personal preference.
- 150 mm: close to the height of a postcard. Both nozzles are valid choices; the main trade-offs are fine-line retention, toolpath count, and print time.
- 200 mm: close to the short side of A4 paper. The reference counts are about 476 and 909. The suitable nozzle depends on the model's precision needs and the compromises you prefer.
What else affects the result?
Nozzle and line width are only two of the factors that affect flat detail.
The source image
A 0.2 mm nozzle cannot automatically repair compression blocks, noise, blurred edges, or extremely small text in the source image. Clean outlines, clear color regions, and useful contrast often matter more than simply adding source-image pixels.
How the model is generated
Pixel mode is closer to a regular grid. High-fidelity and vector modes generate geometry from color regions and paths. Those paths can form continuous curves, so an FDM picture is not literally assembled from square pixels.
Wall generator and line width
The classic wall generator stays closer to fixed reference widths. Arachne can change local widths to preserve some narrow areas, but it does not give a 0.4 mm nozzle the same fine-detail capability as a 0.2 mm nozzle in every case.
First layer, flow, and build plate
When the visible face prints against the build plate, first-layer width, flow, and plate texture directly affect the surface. Too much squish may make adjacent colors compete for space, while insufficient extrusion may leave gaps.
Filament and color boundaries
Filaments differ in flow behavior, transparency, and color contrast. A dark-to- light boundary makes fine detail easier to see, while small regions between two similar colors may appear to merge.
Viewing distance
Small works are usually inspected closely, so missing details are easy to see. Works at 200 mm or larger are often viewed from farther away, where the overall result can still look good even with a lower equivalent PPI.
How should you choose between 0.2 and 0.4 mm?
There is no single required choice. Both 0.2 and 0.4 mm nozzles can print flat Lumina color works. Choose according to your preference, the precision required by the model, and the print time you are willing to accept.
- 0.2 mm nozzle: the smaller reference width allows more toolpaths at the same finished size and gives small regions more room to survive. The number of paths and the print time will usually increase as well.
- 0.4 mm nozzle: the larger reference width produces fewer paths at the same size, so details are coarser. Slicing and printing are usually faster, and it is a familiar general-purpose setup for many users.
Start with the model itself. If the sliced preview already looks right, keep the current nozzle. If the model contains many eyes, small letters, thin lines, or isolated color regions, decide whether preserving more of them is worth the additional print time of a 0.2 mm nozzle. Neither option is inherently better; they make different trade-offs between precision, efficiency, and appearance.
color regions in the sliced preview. Then choose 0.2 or 0.4 mm according to your preference and the model's precision needs. If necessary, make a small test print before committing to the final piece.
Frequently asked questions
Is a 0.2 mm nozzle exactly equal to 127 PPI?
No. The 127 PPI figure comes from dividing 25.4 by the 0.2 mm nozzle diameter. The print calculation should use line width instead. With a 0.22 mm reference line width, the result is closer to 115 PPI. A different line-width setting will produce a different result.
Does a higher-resolution source image always print more clearly?
No. A larger source can provide more information, but the final geometry still has to fit within the available line width and finished size. Details beyond the physical sampling capacity merge during model generation or slicing, and extra source-image noise may be preserved as well.
Why does the 0.2 mm print not look exactly twice as clear?
“Almost twice” describes the reference sampling count along one side, not a guaranteed twofold improvement in perceived clarity. Extrusion behavior, color boundaries, first-layer squish, model generation, and viewing distance all affect the result. If the source image has little fine detail, the visible change may also be small.
Can a 0.4 mm nozzle print a detailed large picture?
Yes. A larger physical size fits more toolpaths along each side. A 200 mm-tall piece printed with a 0.4 mm nozzle still has about 476 reference sampling positions vertically. For large color regions, cartoon artwork, and decorations viewed from a distance, that can be entirely practical.
Does layer height change the XY equivalent resolution discussed here?
Layer height mainly affects the Z direction, color-layer thickness, and surface behavior. It does not enter the XY equivalent-pixel formula directly. However, first-layer height, first-layer flow, and squish can indirectly change the real width of plastic lines on the surface, so they still affect visible boundaries.
Can Arachne produce local lines narrower than the default width?
It can in some situations. Arachne adjusts local line widths to the geometry and may preserve narrow regions that are difficult with fixed-width walls. It is still limited by the nozzle, flow, and material, so this does not mean that the equivalent PPI of the entire print has increased.
Acknowledgements and media rights
Thank you to Lumina Studio beta user C SINGing for providing the real 60 mm comparison file used on this page.
The comparison photograph is used in this guide with the provider's permission. Its copyright remains with the provider and it is not included in the Lumina Studio Wiki CC BY-NC-SA 4.0 content license. Rights in any depicted character, model design, software interface, trademark, or other third-party material remain with their respective owners.
Unless otherwise noted, the original writing, calculations, tables, layout, and Lumina Studio annotations on this page are covered by the Wiki's CC BY-NC-SA 4.0 content license.
Sources and notes
- Bambu Studio default process profile for 0.4 mm
- Bambu Studio default process profile for 0.2 mm
- OrcaSlicer line-width documentation
- Prusa guidance on nozzle profiles and extrusion width
The equivalent sample counts and PPI values in this article are intended to help explain the relationship between nozzle, line width, finished size, and flat-image detail. Use your current slicer settings, sliced preview, and a real test print as the final checks.
Submit feedback
Your feedback is sent privately to the Wiki maintainers and is not displayed publicly on this page.