This article was prepared with AI assistance based on an analysis of the current Lumina Studio source code, existing Wiki content, and relevant workflows. It has been checked against the current version, but omissions or details that become outdated may remain as the software evolves. If you find an error or have a clearer explanation, example, or suggestion, please leave a comment on this page or propose an edit on GitHub.
Why Do Lumina Preview, Slicer Preview, and the Physical Print Look Different?
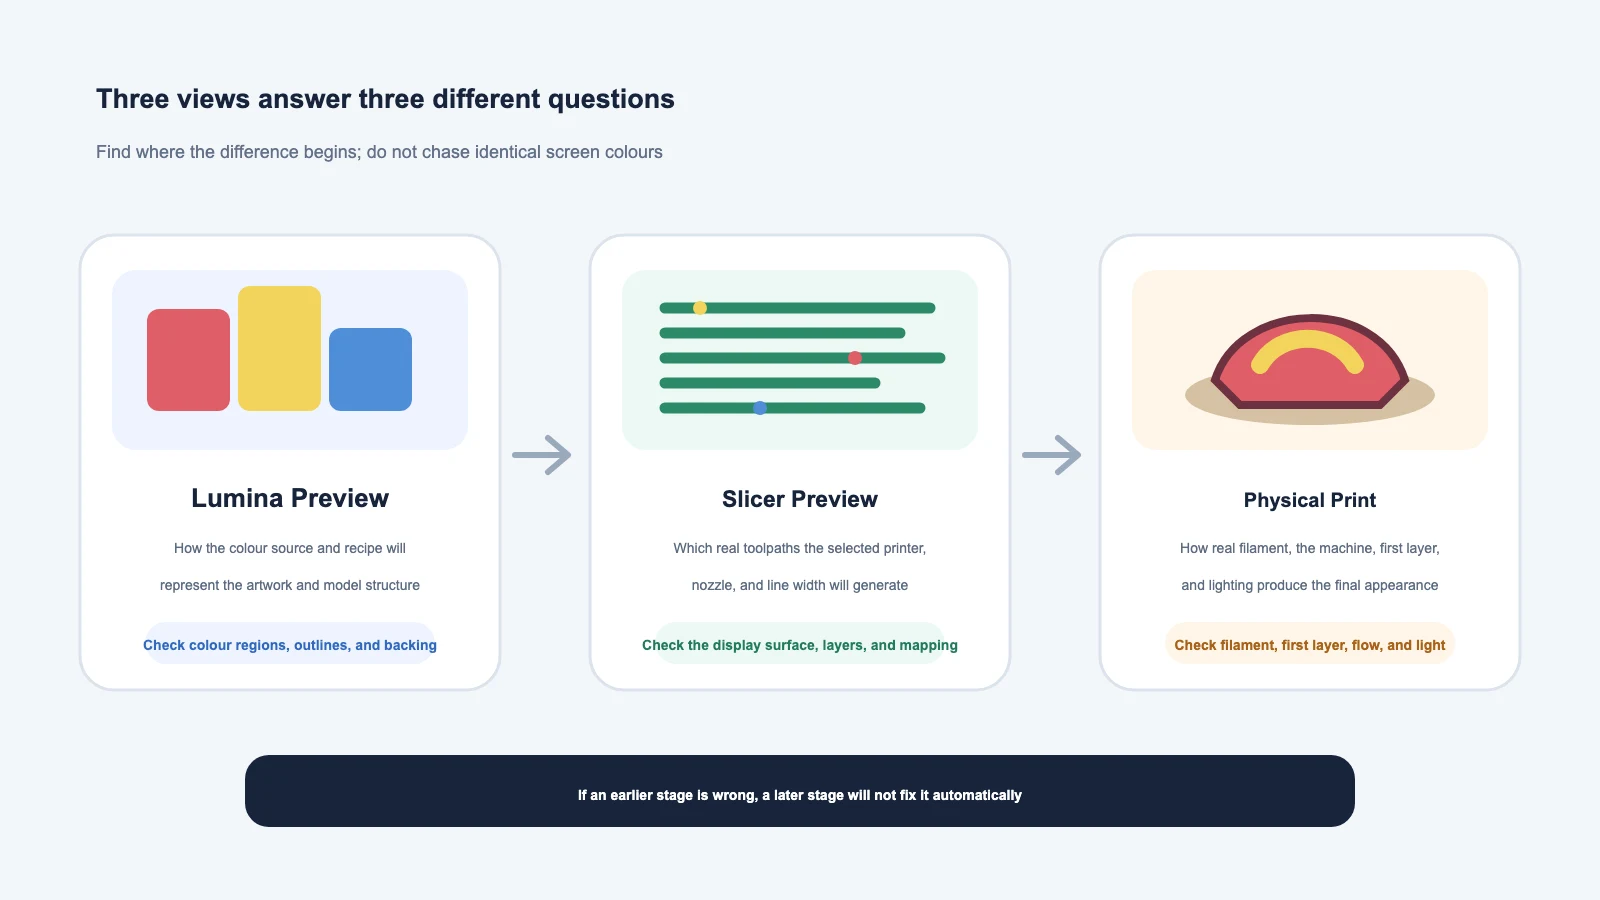
If the three results look different, do not repeatedly edit the source image and do not send the job to the printer yet. Lumina Preview, slicer preview, and the physical print answer three different questions:
- Lumina Preview: how the current colour source and settings intend to assign colour and model structure;
- slicer preview: which real toolpaths the selected printer, nozzle, line width, and filament mapping produced;
- physical print: the result created by real filament, machine condition, first layer, build plate, and viewing light.
They do not need to look like pixel-identical screenshots on a monitor. However, the important geometry, colour regions, and material mapping must correspond from one stage to the next.
If you are unsure what Lumina's “Layer 1,” predicted colour, and per-layer colours mean, first read How to Read Lumina Layer Preview.
First identify the kind of difference
| Symptom | Check first | Continue to print? |
|---|---|---|
| The slicer's colour swatch does not resemble the real filament, but the object and slot are correct | It may only be an inaccurate display colour | Continue with the remaining checks |
| An object, colour region, or backing is assigned to the wrong project filament or physical slot | The real mapping is wrong | Do not print; correct the mapping first |
| Lumina and the slicer look correct, but the physical print is globally green, grey, dark, or warm | Archive, real filament, print state, or lighting | Diagnose with a small test first |
| Small text, thin lines, or tiny colour patches disappear after slicing | Finished size, nozzle, line width, or toolpath generation | Do not rely on a full print to guess |
| Lumina Preview itself is black, green, perforated, or has abnormal boundaries | Source Type, input image, modelling mode, or preview processing | Do not generate the finished work |
The first two rows are easily confused. A red square in the slicer can be only an identification swatch; an inaccurate swatch does not necessarily change the physical spool. But an object pointing to the wrong project filament, or that project filament mapping to the wrong slot, will change the printed result.
Use a fixed diagnostic order
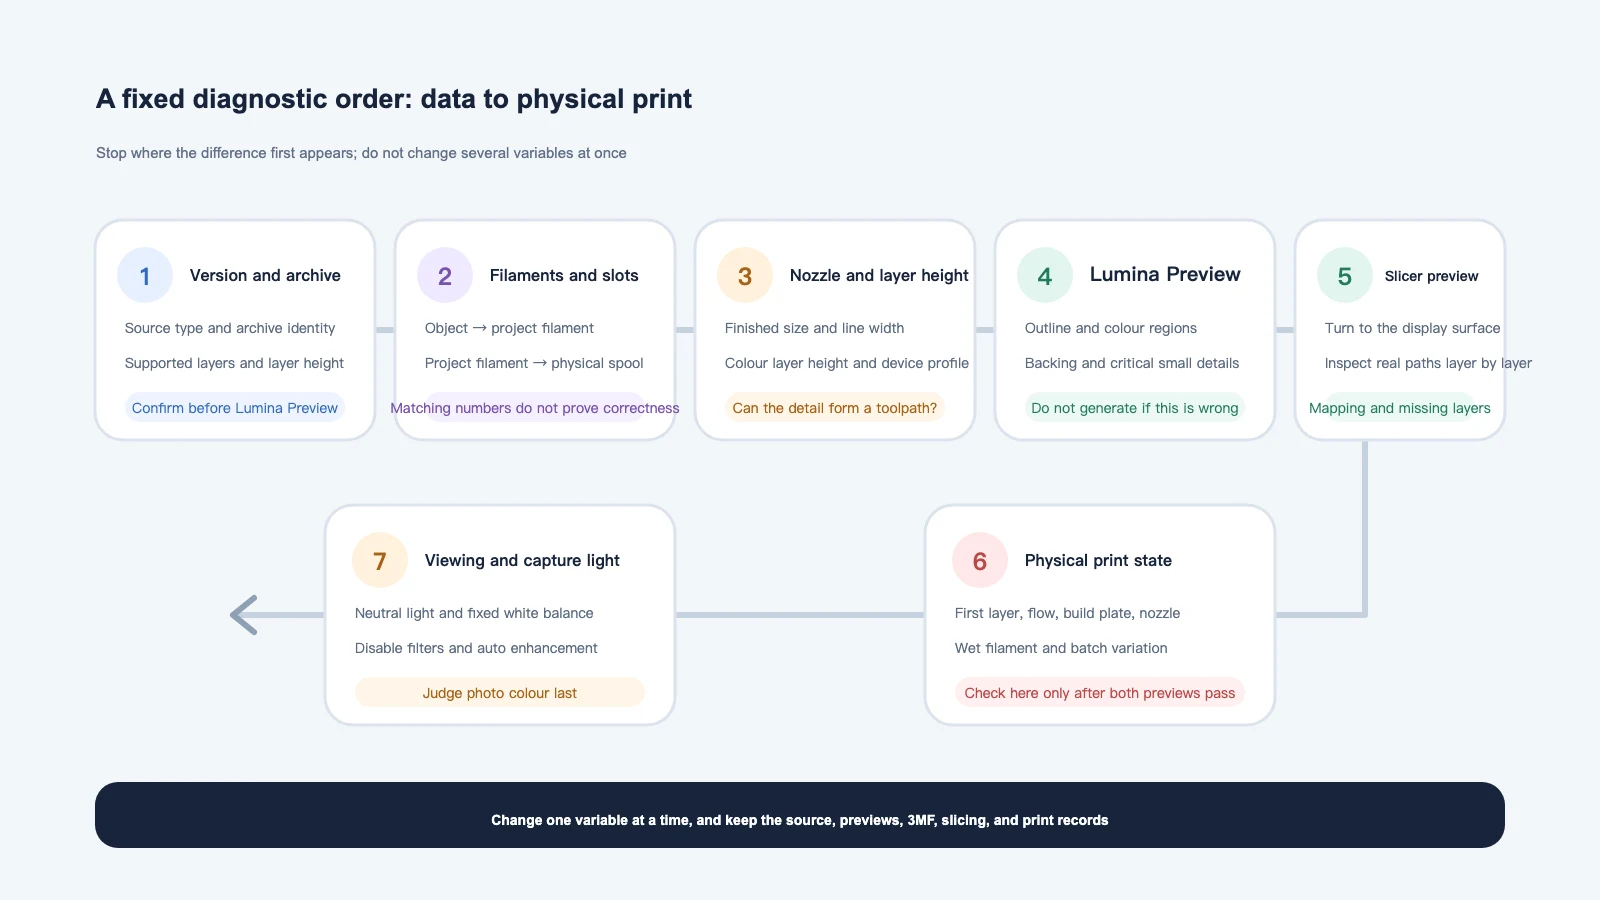
Work through the following steps in order. Until the previous step is confirmed, do not skip ahead and try to compensate with temperature, flow, or image editing.
Step 1: version, Source Type, and archive
Record the current Lumina Studio version. Confirm whether Source Type is set to Material Archive, Inferred LUT, or Legacy LUT.
Then verify:
- the selected archive or LUT still exists and can be read;
- its material, brand, product line, and colour match the physical filament;
- you generated a new preview after switching sources;
- the layer count, Layer Height, and colour order of an Inferred or Legacy LUT are in its supported range.
If Lumina Preview is already visibly wrong here, resolve the source or archive first. See Installed or Custom Material Archives, Inferred LUTs, or Legacy LUTs? for the selection rules.
Step 2: physical filaments and slots
Map these four levels one by one:
- the archives or palette selected in Lumina;
- the project filaments in the generated 3MF;
- the project-filament number assigned to each slicer object or part;
- the physical spools in the AMS, another material system, or an external-spool holder.
Matching numbers are not the goal. Correct physical material mapping is the goal. Synchronising a material system also cannot decide which artistic region should use which spool. Follow Open a Lumina 3MF in Your Slicer for the complete operation.
Step 3: nozzle, line width, Layer Height, and finished size
Geometry visible on the Prepare page does not necessarily become a printable toolpath. Check:
- the printer model and nozzle in the slicer match the physical machine;
- the current line width can form small text, thin lines, and isolated colour patches;
- the Layer Height for the colour layers matches the Lumina source and project;
- the finished size has not been reduced until important details fall below the nozzle's practical capability.
Layer Height mainly affects the Z-direction colour stack. Nozzle diameter and line width mainly limit XY detail. Do not use one as a substitute for the other. See What Image Resolution Is a 0.2 mm or 0.4 mm Nozzle Equivalent To? for the size relationship.
Step 4: Lumina Preview
Inspect the two-dimensional colour-matching preview first, then the three-dimensional preview before and after generation. Check that:
- the subject outline and transparent areas are correct;
- important colour regions were not merged or replaced incorrectly;
- the backing, outline, and optional structures match the current settings;
- small text, eyes, thin lines, and other critical regions still exist;
- the preview is not entirely black, abnormally shifted, perforated, or misaligned.
If Lumina Preview is wrong, the slicer cannot automatically repair the colour assignment. Return to the input image, modelling mode, archive, LUT, or recipe.
Step 5: perform a real slice and inspect the display surface
Run the actual slice in Bambu Studio, OrcaSlicer, or your normal slicer, then open its Preview view. Do not stop at rotating the model on Prepare.
If the display surface faces the build plate, turn to the bottom. Move the layer slider and check from the display surface inward:
- the first visible outlines and colour regions are complete;
- every layer uses the intended project filament;
- small lines and colour patches generate real paths;
- the backing, outline, keychain loop, and other structures use the intended material;
- there are no automatic substitutions, missing layers, floating regions, or out-of-bounds warnings.
If Lumina Preview is correct but the sliced layers are wrong, check how the 3MF was opened, object mapping, nozzle, line width, and slicer settings. Do not blame the camera or monitor first.
Step 6: first layer, flow, build plate, and machine state
When both software previews are correct but a physical region is blurred, wiped away, broken, or uneven, inspect the real print:
- is the first layer too compressed or too high?
- is the build surface clean, flat, and suitable for the material?
- are flow and temperature appropriate for the physical filament?
- does the nozzle carry residue, have a partial blockage, or drag abnormally?
- is the filament wet, loaded in the wrong slot, or noticeably different by batch?
Change one variable at a time and print a small test first. If flow, temperature, first layer, and image are changed together, the real cause becomes difficult to identify.
Step 7: compare viewing and capture light last
A monitor emits light. A print reflects and transmits ambient light. Warm lamps, coloured walls, phone auto white balance, exposure, and camera enhancement all alter the colour recorded in a photograph.
Compare physical prints under stable, neutral light and place them in the same location. Do not use a phone photo and an uncalibrated screenshot to judge a small colour difference. A colour changing under a different light also does not by itself mean that the archive must be rebuilt.
Five frequent symptoms
Only the slicer's display colour differs
Select the object, read its project-filament number, and confirm which real spool that project filament maps to. If the object, material type, and physical slot are correct, changing the slicer's display swatch only makes identification easier; it does not change the spool.
The object or physical slot is genuinely mapped incorrectly
Stop. Correct both mappings—object to project filament, then project filament to physical slot. Slice again and inspect every layer. Do not change only the object name, and do not move spools simply to make the numbers identical.
The physical print has a global colour shift
First confirm the archive and physical filament, then inspect batch variation, material condition, print temperature, Layer Height, first layer, and viewing light. If the same archive continues to deviate under stable conditions, print new gradient cards and create an archive for that spool.
A small region is blurred, wiped away, or missing
Return to the sliced layer preview:
- No path exists: increase the finished size, adjust the source detail, or choose a different nozzle according to your own needs.
- A path exists but the print is missing: inspect first layer, flow, build plate, nozzle dragging, and material condition.
- The path uses the wrong material: correct the object and slot mapping.
Lumina Preview is black, green, or has abnormal boundaries
Do not continue to a finished print. Try these checks in order:
- Confirm that Source Type, archive or LUT, and Base Plate Material are correct.
- Generate a new preview after switching sources.
- Inspect the source image's transparency, colour, and dimensions.
- For SVG, inspect paths, fills, canvas bounds, and complex effects.
- Test a small simple image or minimal SVG to learn whether the problem is specific to the current file.
For SVG-specific steps, read Troubleshooting SVG Uploads, White Backgrounds, Holes, and Missing Detail.
Reproduction material worth keeping
If the cause is still unclear, preserve:
- the original input image or SVG;
- the current Source Type, archive or LUT name, and material order;
- screenshots of Lumina's 2D and 3D previews;
- the original generated 3MF;
- screenshots of the slicer's display surface and critical layers;
- the physical printer, nozzle, Layer Height, line width, and slot mapping;
- a photo of the print under neutral light.
Do not submit only one final photo and ask why the colour is wrong. Evidence from all three stages reveals where the difference first appeared.
Common questions
Lumina Preview and slicer preview differ. Can I print directly?
First determine whether the difference is only a display swatch. If colour regions, objects, material mapping, or sliced paths differ, do not print. Correct the problem and slice again. Continue to machine checks only when mapping and paths are correct.
Lumina Preview is correct, but thin lines vanish after slicing. Should I adjust colour?
Not first. This is usually a size, nozzle, line-width, or toolpath-generation problem. Confirm whether the sliced preview contains a real path, then decide whether to enlarge the work, simplify the source, or use a different nozzle for your goal.
Both previews look right. Why is the physical print too dark?
Verify the real filament, archive, and slot, then inspect first layer, flow, material condition, and viewing light. A monitor emits light, so a physical print will not have identical brightness. A consistent, substantial shift still deserves a small test and new calibration.
A phone photo looks green, but the print looks normal to my eyes. Rebuild the archive?
Not yet. Disable filters and automatic enhancement, use neutral light and fixed white balance, and include a neutral object in the same scene. Continue to the archive and print conditions only if both your eyes and a stable capture show the same persistent shift.
If a small line was “wiped away,” is retraction definitely the cause?
No. Check whether a sliced path exists first. If there was no path, the issue is resolution or line width. If the path exists but the print loses it, then inspect first layer, flow, nozzle dragging, build plate, and material state.
Content licence
Unless otherwise stated, the original text, tables, and diagrams on this page are covered by the Wiki’s CC BY-NC-SA 4.0 content licence. Third-party software names, interfaces, trademarks, and printing equipment remain the property of their respective rights holders.
This page provides a diagnostic order; it does not replace the printer manufacturer's safety instructions. Follow the official device and material requirements when working with temperature, hardware maintenance, and material compatibility.
Submit feedback
Your feedback is sent privately to the Wiki maintainers and is not displayed publicly on this page.