This article was prepared with AI assistance based on an analysis of the current Lumina Studio source code, existing Wiki content, and relevant workflows. It has been checked against the current version, but omissions or details that become outdated may remain as the software evolves. If you find an error or have a clearer explanation, example, or suggestion, please leave a comment on this page or propose an edit on GitHub.
How Do I Fix SVG Upload Failures, White Backgrounds, Holes, or Missing Detail?
If you only want the short answer: keep an untouched copy, then reduce the SVG to a valid canvas, one closed path, and one flat fill. If that minimal file works, add text, gradients, masks, and other structures back one type at a time. If the minimal file still fails, keep it as a reproducible example for Lumina Studio support.
SVG is a container. It can hold paths, text, bitmaps, filters, masks, and external
resources. A .svg extension does not guarantee printable closed geometry, and a
browser rendering the file does not prove that every visual effect can be converted
into a model.
What makes a useful SVG baseline?
For diagnosis, start from a file with:
- a valid
viewBoxthat contains the complete artwork; - final text converted to paths;
- closed paths with explicit flat fills for every region that must become solid;
- important strokes expanded into filled paths;
- correct compound paths and fill rules for holes;
- no unnecessary filters, masks, clipping paths, remote images, or external fonts;
- a node count appropriate for the visible detail, without near-duplicate fragments.
Lumina can process more than this baseline, including several SVG structures and some gradients. The baseline is useful because advanced features increase the chance of a difference between the design application, browser, SVG parser, and final geometry.
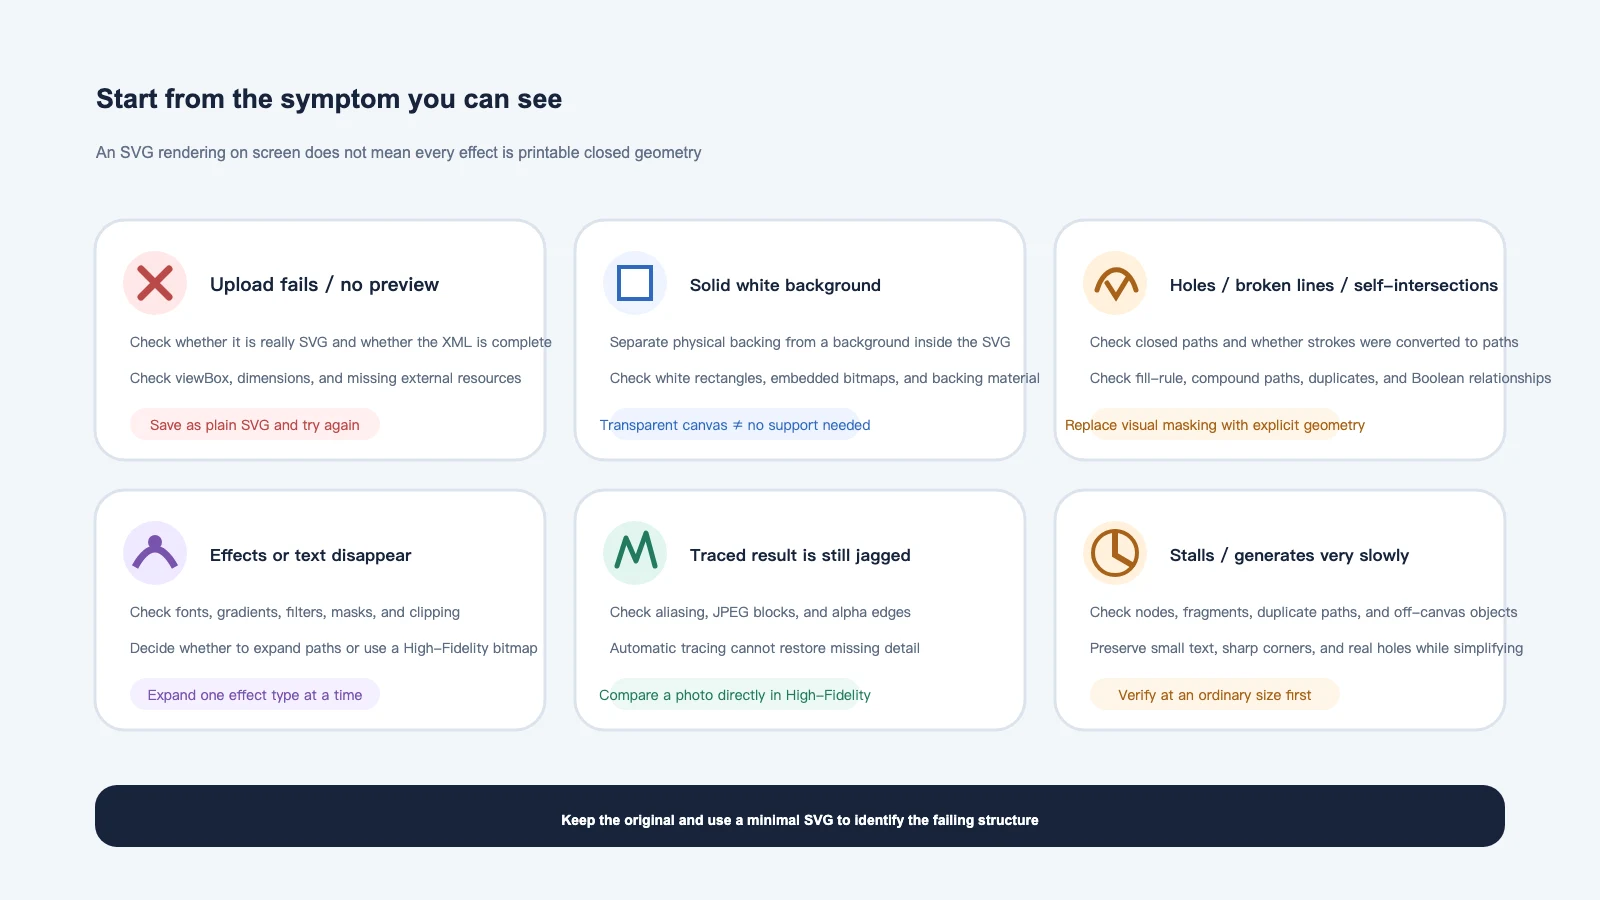
Symptom 1: the SVG will not upload or has no preview
Check in this order:
- Verify that the file is really SVG. Renaming a PNG or JPG to
.svgdoes not convert it. A text editor should show an<svg ...>root element. - Open it in both a browser and a vector editor. If neither can open it, repair or export the source again before testing Lumina.
- Save as plain SVG. Export from the design application instead of using a damaged temporary file, partial web fragment, or incomplete XML copy.
- Check the canvas. Provide a valid
viewBox; width and height cannot both be zero, and the artwork must not sit entirely outside the canvas. - Remove external dependencies. Embed linked images and convert external fonts or remote resources into local geometry where practical.
- Run a minimal test. Upload a new SVG containing one coloured rectangle to confirm that the import path itself works.
The converter commonly accepts JPG, PNG, SVG, WebP, and HEIC. A correct extension cannot make damaged or mismatched file content readable.
Symptom 2: a transparent background becomes a white rectangle
First separate two different kinds of “white background.”
It is the physical backing required by the print
A transparent SVG canvas only means that the canvas has no display colour. It does not mean that disconnected printed regions can float in space. Lumina can still generate a solid backing that holds the artwork together.
Check Base Plate Material and Separate Backing in the converter. Select the backing material you actually want, or separate it when your slicer workflow requires an independent backing object. Do not remove all support geometry merely to imitate screen transparency.
The SVG itself contains a white rectangle or bitmap
If white covers the entire canvas unexpectedly, inspect the layer or object panel in your vector editor for:
- a white rectangle the same size as the canvas;
- an embedded bitmap with a white background;
- a mask or clipping result baked into white during export;
- a preview-only background layer included in the exported SVG.
Remove the unwanted object. You can also export a transparent PNG and compare it in High-Fidelity mode. A transparent canvas and physical backing are separate design decisions.
Symptom 3: holes, broken lines, overlaps, or self-intersections
These symptoms often mean the artwork looks connected on screen but does not form stable closed geometry.
Missing regions or broken lines
- Close every open outline that must become solid.
- Convert stroke-only artwork with Stroke to Path or Expand Stroke.
- Make critical lines wide enough for the intended finished size and nozzle line width.
- Check whether a shape is outside the
viewBoxor removed by a clipping path.
Holes are filled or appear in the wrong place
- Check compound-path direction and
fill-rule. - Use an explicit Boolean difference operation for real holes.
- Do not cover a dark region with a white shape to imitate transparency unless that shape is meant to become white material.
- Expand groups and confirm that the hole belongs to the intended compound path.
Overlaps and self-intersections
- Unite regions that should be one solid area.
- Repair, simplify, or redraw self-intersecting paths.
- Remove duplicated paths and invisible overlapping copies.
- Keep an untouched source before applying destructive Boolean operations.
Lumina attempts to repair some invalid geometry. Automatic repair can split a self-intersection into several polygons or discard a section that contains only open segments. A clear source produces the most predictable model.
Symptom 4: gradients, filters, masks, or text are missing
Gradients
Vector mode must convert a continuous gradient into a finite set of colour regions and material recipes. It cannot preserve an infinitely continuous monitor gradient. Current versions can process some linear and radial gradients, but complex gradients, opacity stacks, and blend effects still require a real preview check.
If the visual gradient matters most, export a high-resolution transparent PNG and compare High-Fidelity mode. If clean geometry matters most, divide the gradient into explicit colour bands or flat shapes in the vector editor.
Filters, masks, and clipping paths
Blur, glow, shadows, pattern fills, complex masks, and clipping can differ between renderers. You can:
- expand an important appearance into ordinary paths and flat fills;
- rasterise a purely visual effect into a transparent bitmap, then use High-Fidelity;
- remove hidden editor objects and filters that do not belong in the print.
Large Format Mode has stricter limits for vector tiling when a source contains text, embedded images, patterns, clipping paths, masks, or filters. Test the source at an ordinary size first; some structures may require a raster fallback.
Text
Live text depends on the receiving system having the same font, and it may remain a text object instead of closed geometry. Convert final text to paths before export, then inspect counters, compound paths, stroke thickness, and the intended print size.
Symptom 5: a traced bitmap is still jagged
Automatic tracing estimates boundaries from existing pixels. It cannot restore detail that was already lost.
- A low-resolution logo can turn pixel steps into wavy paths.
- JPEG blocks can become many small colour regions.
- Photo noise can become thousands of nodes.
- Semi-transparent edges can become several grey fringe paths.
Simple logos can be cleaned and redrawn. Photos and detailed illustrations are often better kept as bitmaps and processed in High-Fidelity. For mode selection, see How Do I Choose High-Fidelity, Pixel Art, or Vector Mode?. For the tracing workflow, see Convert a Bitmap to SVG, Then Send It to the Converter.
Symptom 6: too many nodes make preview or generation very slow
Complexity matters more than file size. A small SVG can still contain hundreds of thousands of nodes, duplicated paths, and tiny fragments.
Try the following in order:
- remove off-canvas, hidden, and duplicated objects;
- unite same-colour regions that truly touch;
- simplify nodes without damaging the outline;
- remove fragments that cannot print at the target size;
- rasterise photo or filter-heavy sections;
- verify at an ordinary size before Large Format or Batch generation.
Do not apply maximum simplification in one step. It can remove eyes, small text, sharp corners, and real holes together with unwanted nodes.
Use a minimal file to locate the failing structure
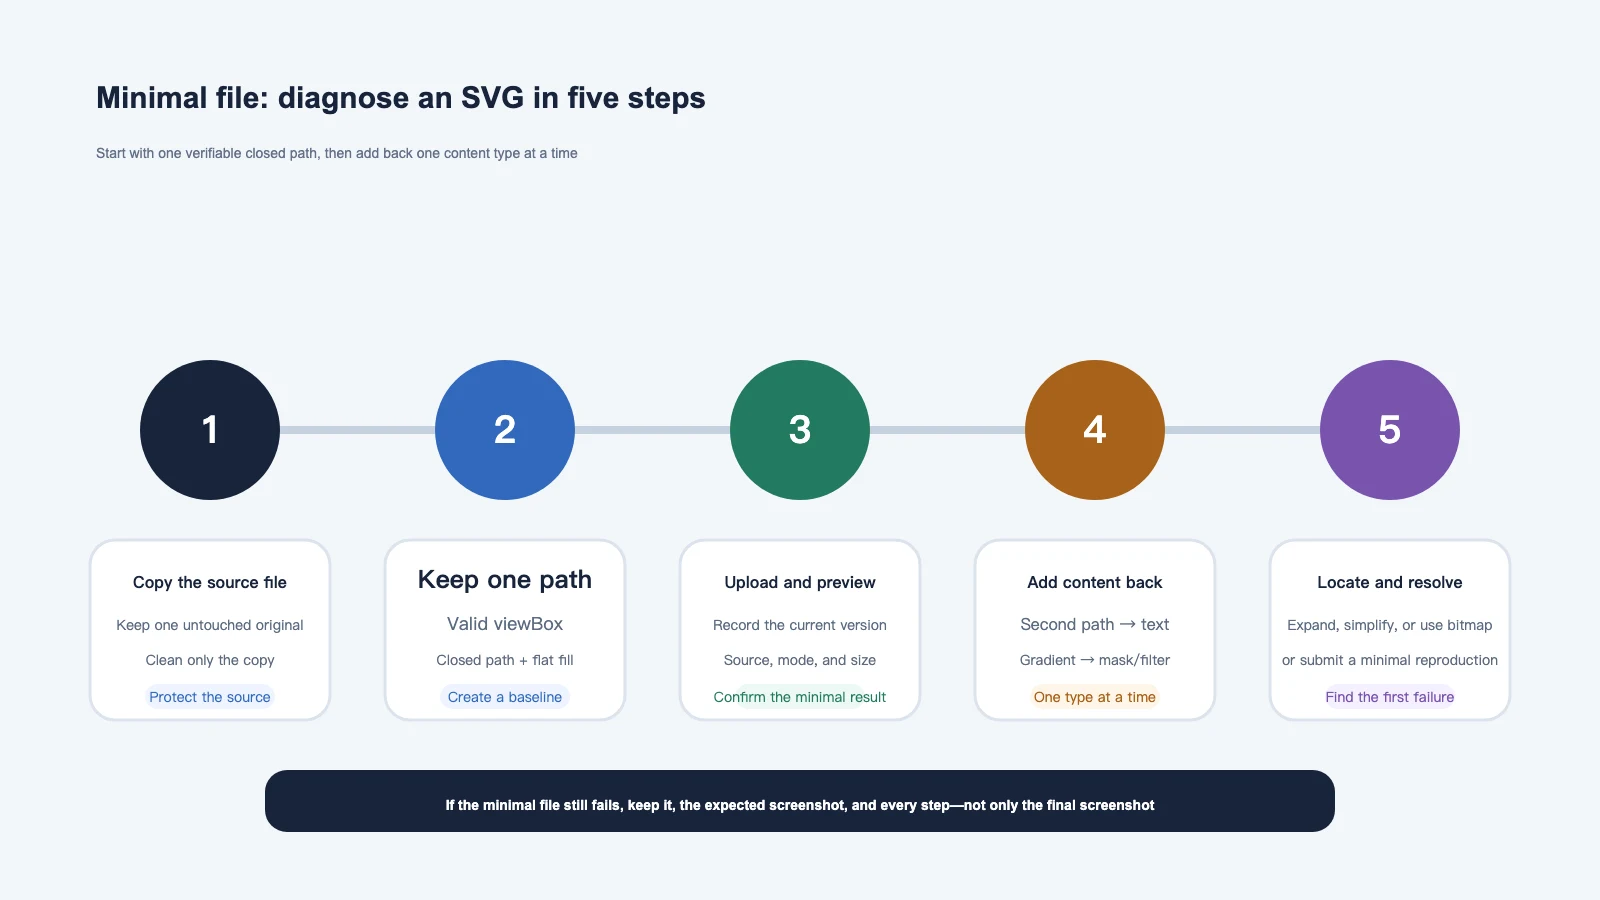
This is the most reliable way to separate a source-file issue from a Lumina issue:
- Copy the original. Never perform destructive cleanup on the only source file.
- Remove everything except a valid
viewBoxand one closed, flat-filled path. - Upload it and create a preview.
- If it works, add one content type at a time: another path, text, gradient, mask, and so on.
- Record the first change that reproduces the failure.
- If the minimal file still fails, keep it as the reproduction file.
Interpret the result as follows:
- Minimal file works, but one added feature fails: repair that SVG structure or use a High-Fidelity bitmap for the affected appearance.
- The original is also broken in browsers and editors: repair the source first.
- The minimal file works elsewhere but fails consistently in Lumina: keep the file and exact steps for a bug report.
- The issue appears only after slicing: inspect objects, nozzle, line width, and layer toolpaths in the slicer instead of continuing to edit the SVG import.
What should I include in a report?
Provide:
- the smallest SVG that still reproduces the issue, not only a screenshot;
- a screenshot of the expected appearance;
- Lumina Studio version, Source Type, and Modeling Mode;
- intended finished size;
- exact steps from upload to the first abnormal result;
- the earliest screenshot where Lumina Preview and slicer preview diverge.
Remove names, order information, private links, and unwanted metadata before sharing. If the artwork cannot be disclosed, redraw a simple example that preserves the same SVG structure and failure without using the protected artwork.
Common questions
Why does a transparent SVG still have backing?
Transparency does not remove the need for physical support. Determine whether the white area is Lumina's generated backing or a white object inside the SVG. Configure the first with Base Plate Material and Separate Backing; remove the second in the source file if it is unwanted.
Why is part of the artwork visible in a browser but missing in Lumina?
Browsers can render live text, filters, masks, embedded bitmaps, and other display effects. Modelling needs usable geometry. Check whether the missing part is still a font, stroke, clipping path, or external resource, then convert it to explicit paths and fills where appropriate.
Does converting text to paths guarantee success?
No, but it removes the font dependency. You must still inspect counters, compound path direction, line thickness, and printability at the target size.
Should I thicken every path when Vector mode shows white seams?
First determine whether the seam is a real source gap, only anti-aliasing in a preview, or a missing sliced toolpath. Global thickening can close holes and small text. Repair actual path joins and use stroke expansion selectively.
Should I keep simplifying a complex SVG or switch to High-Fidelity?
For logos, text, and clean boundaries, preserve paths and simplify selectively. For photos, texture, shadows, and complex gradients, a high-resolution transparent PNG in High-Fidelity is often more direct. Compare both at the intended finished size.
Content licence
The original text, tables, and diagrams on this page are covered by the Wiki's CC BY-NC-SA 4.0 content licence, unless otherwise stated. Rights in SVG artwork, fonts, trademarks, characters, and other third-party material remain with their respective owners.
SVG software and Lumina Studio continue to evolve. Confirm compatibility with the current import, preview, generation, and slicer result.
Submit feedback
Your feedback is sent privately to the Wiki maintainers and is not displayed publicly on this page.