This article was prepared with AI assistance based on an analysis of the current Lumina Studio source code, existing Wiki content, and relevant workflows. It has been checked against the current version, but omissions or details that become outdated may remain as the software evolves. If you find an error or have a clearer explanation, example, or suggestion, please leave a comment on this page or propose an edit on GitHub.
Gradient Groups and Region Processing
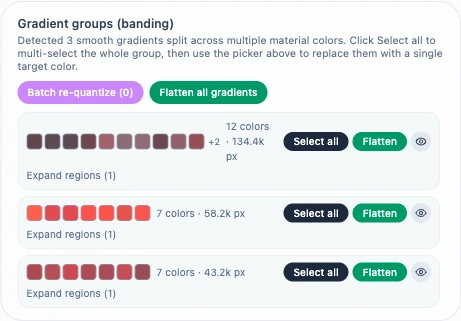
A smooth source gradient can turn into visible bands after it is matched to a finite set of material colours. Gradient Groups identifies those bands and exposes whole-group and spatial-region tools for replacement, flattening, and local re-quantisation.
The panel appears only when all three conditions are met:
- the colour source is a Material Archive;
- the current image has completed a successful preview;
- the analyser has found at least one qualifying gradient group.
The panel is hidden when no group is detected. Legacy LUT and Inferred LUT previews do not run this analysis.
How Lumina identifies a smooth gradient
The analyser compares the quantised source image with the material-matched result. A boundary can join a gradient group only when the source is still smooth at that location but the material-matched image changes colour there.
The current implementation uses these fixed conditions. They are not user-adjustable controls:
| Condition | Current value | Purpose |
|---|---|---|
| Median source colour difference along a boundary | ΔE no greater than 8 | Excludes edges already present in the artwork |
| Shared boundary between two material colours | At least 15 pixels | Filters incidental contact and isolated noise |
| Contribution from each material colour | At least 30 pixels | Removes colours with negligible coverage |
| Maximum colour difference within one group | ΔE no greater than 30 | Prevents a chain of nearby colours from crossing into a different hue |
| Expandable connected region | At least 500 pixels, four-way connectivity | Filters very small spatial components |
Groups are ordered by pixel coverage. The material colour with the largest contribution becomes the group's representative colour; Flatten uses that colour. The colour and pixel counts shown in each row report the number of matched material colours and their combined coverage.
Select all and select region
Select all places every material colour in the group into All mode and highlights those colours in the 2D preview. Choosing a target colour afterwards replaces every occurrence of the selected material colours in the current image. If the same matched colour also appears outside this gradient, those pixels change as well.
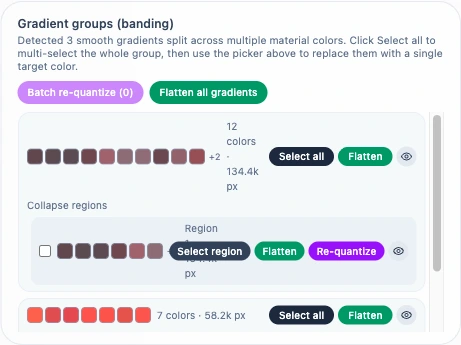
Expand regions lists the separate connected areas that belong to the group. Select region still exposes the material colours used by that area, but its highlight and subsequent replacement use the exact region mask rather than a bounding box or a whole-image colour match.
Flattening
| Action | Scope | Replacement colour |
|---|---|---|
| Flatten all gradients | Matching colours from every detected group | Each group's own representative colour |
| Flatten on a group row | The exact spatial extent of that group | The group's representative colour |
| Flatten on a region row | The exact pixels of that region | The parent group's representative colour |
| Merge flatten | Two or more checked regions in one group | The colour with the highest combined pixel count inside the checked regions |
Flatten all gradients and Auto-replace Gradient Banding use whole-image colour remaps. They retain existing manual remaps, then map every non-representative group colour to the representative colour. An identical matched colour outside a detected region is therefore replaced too.
Group, region, and Merge flatten actions use spatial masks. Region checkboxes only build the batch list; checking one does not highlight the canvas. The list is limited to one gradient group at a time. Checking a region in another group clears the previous list.
After a spatial operation succeeds, Lumina refreshes the 2D and 3D previews and invalidates old layer images, 3MF output, and download links. Spatial operations are not added to the ordinary colour-remap undo history; run Preview again to restore the original matched result.
Region re-quantisation
Re-quantise does not collapse a region to one colour. It quantises the selected area again and sends the local result through the active material solver. This preserves gradual low-frequency changes while reducing dense material bands.
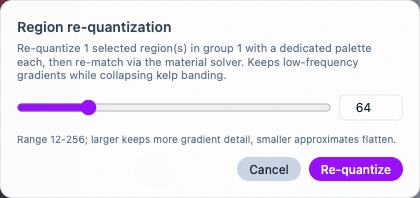
- The accepted range is 12–256; the dialog opens at 64.
- A larger value preserves more local steps. A smaller value moves closer to a flat result.
- A region-row action affects only that region and preserves any batch checklist already in progress.
- Batch re-quantise processes the checked regions and clears the checklist after a successful submission.
- Each region receives its own local palette before being matched by the material solver.
- The backend re-runs gradient-group analysis afterwards, so the panel reflects the new matched result.
View highlight
The eye button opens a separate cyan mask for checking what the analyser actually selected. A whole-group highlight searches for the group's matched colours across the complete canvas. A region highlight uses the exact region identifier saved during analysis. This dialog is read-only and does not change the current selection, main preview, or replacement history.
Relationship to automatic processing
Auto-replace Gradient Banding is off by default. When enabled, Lumina applies the same representative-colour remap as Flatten all gradients whenever a Material Archive preview returns gradient groups. The panel remains available and shows an automatic-processing notice so the detected groups can still be reviewed.
Turning the setting off does not hide the panel or disable its manual actions.
Related pages:
Submit feedback
Your feedback is sent privately to the Wiki maintainers and is not displayed publicly on this page.