Photograph and Extract Gradient Cards
AI translation notice: This English tutorial was translated from the original Chinese tutorial with AI assistance. The screenshots come from the original hand-authored guide. If any wording is unclear, please refer to the Chinese tutorial or leave a comment.
In the previous tutorial, you printed a white-base card and a black-base card with the same test filament, then kept the complete ZIP package generated by Lumina Studio.
This tutorial continues with photography, file import, corner marking, data extraction, and material-profile saving. When you finish, the filament will appear in Lumina Studio's Material Library and can be selected during image conversion.
If the cards are not ready yet, start with Generate and Print Gradient Calibration Cards.
This article reuses the real photographs and interface captures from the original hand-authored guide. The current interface may arrange some controls differently, so follow the current button labels. The workflow and click order remain the same.
Before you begin
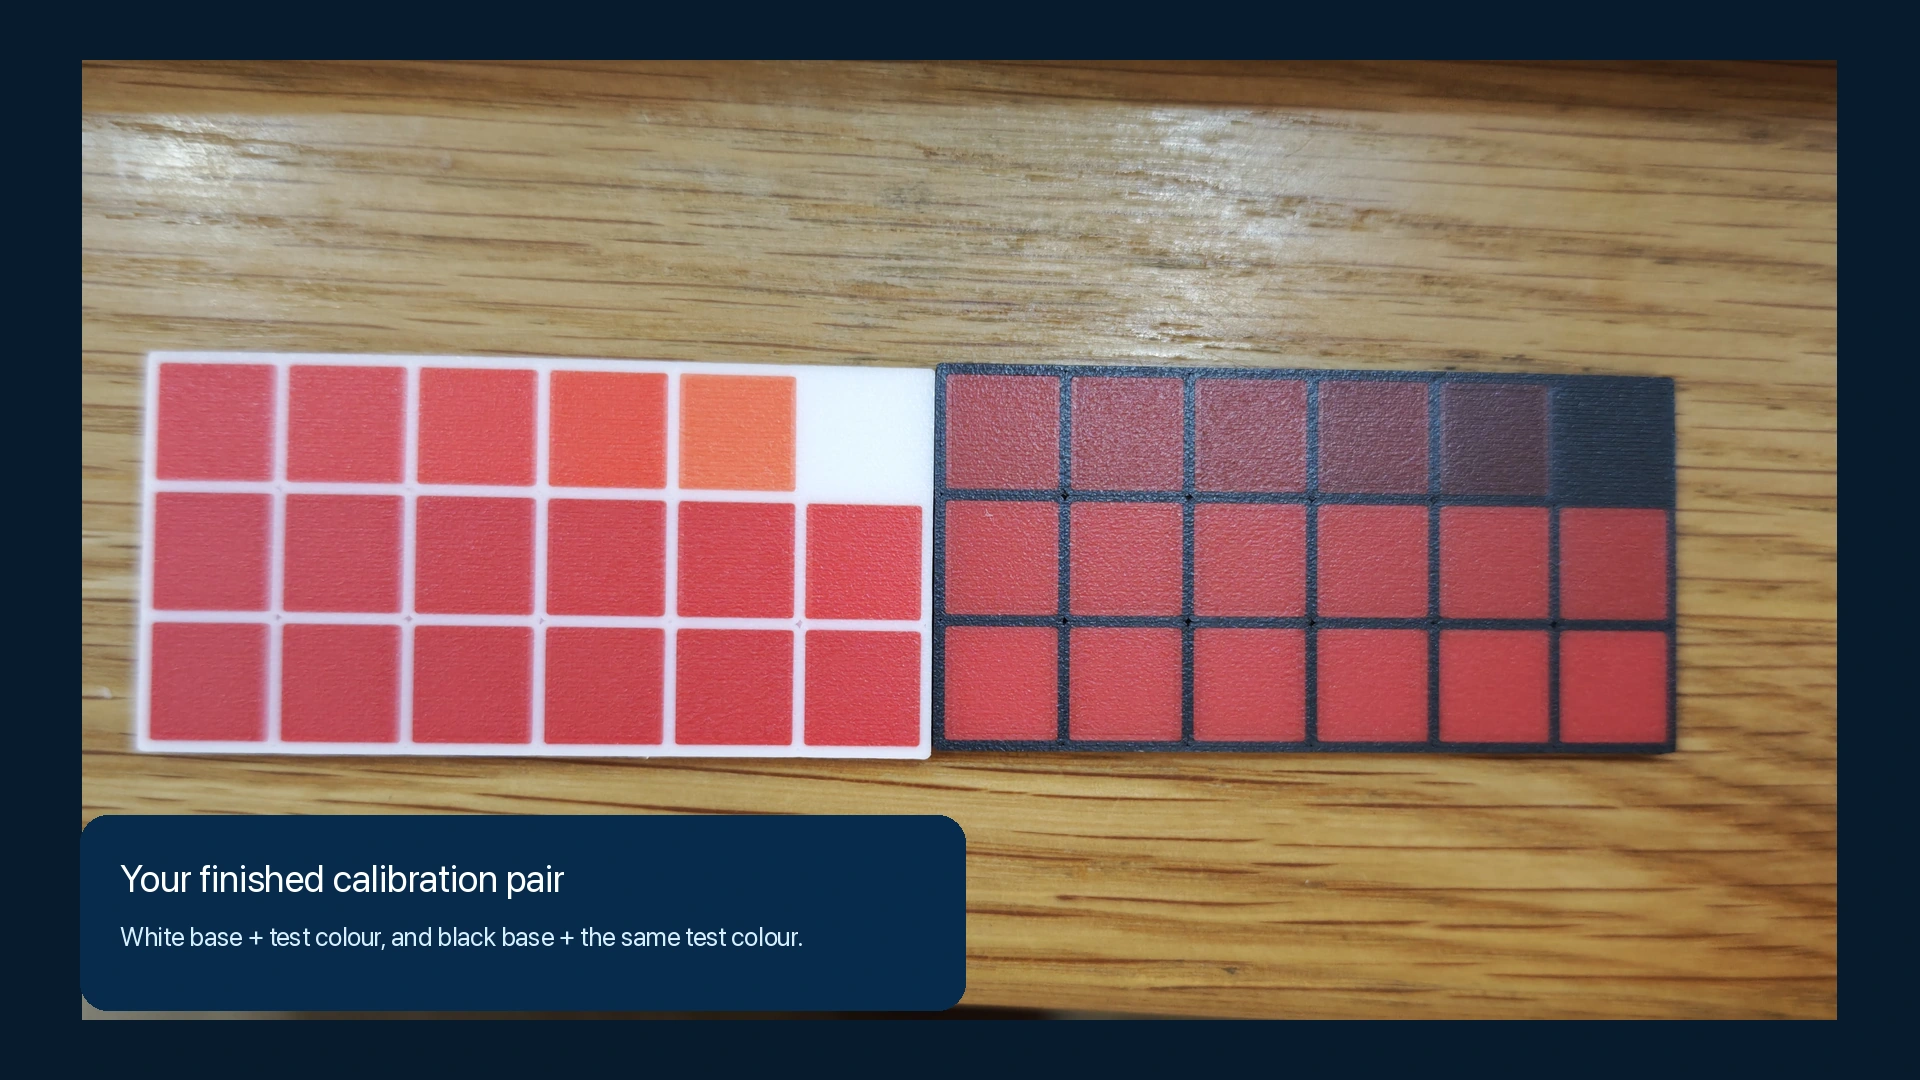
Prepare these three items:
- The white-base gradient card.
- The black-base gradient card.
- The complete Kit ZIP generated for that exact card pair.
All three items must belong to the same test-filament spool and the same generation run. Do not pair photographs from another filament with this ZIP, and do not upload only the 3MF extracted from the package.
A phone, camera, or scanner is sufficient for the basic workflow. A standard 24-patch ColorChecker is optional. Use the optional calibration controls only if you already have a ColorChecker and understand the colour-calibration process.
Step 1: Photograph both cards
Use stable, even lighting. Prefer one neutral light source, and avoid direct sunlight, coloured ambient light, strong reflections, or a scene that is bright on one side and dark on the other.
Keep the phone or camera fixed and point the lens as squarely at the card as possible. The entire gradient area and all four outer corners must be visible. Do not cover the card with a ColorChecker, ruler, or another object.
Photograph the white-base card first, then place the black-base card in the same position. Use the same device, lens, distance, exposure, white balance, and calibration settings for both images. Do not switch filters, beauty modes, AI enhancement, or any other feature that changes colour between shots.
Zoom in and inspect both photographs before continuing:
- Patch boundaries should be clear.
- Highlights must not be clipped to solid white.
- Shadows must not be crushed to solid black.
- Strong glare, shadows, blur, and severe perspective distortion should be avoided.
PNG and JPG are the safest formats. If the software cannot read a HEIC or HEIF photograph in your environment, convert it to PNG or JPG first.
Step 2: Open Gradient Card Extraction
In Lumina Studio, select Material Management in the top navigation bar, then select Gradient Card Extraction in the second row.
You are on the correct page when you can see areas for the generated ZIP, material name, white-base image, and black-base image.
Step 3: Import the ZIP and both photographs
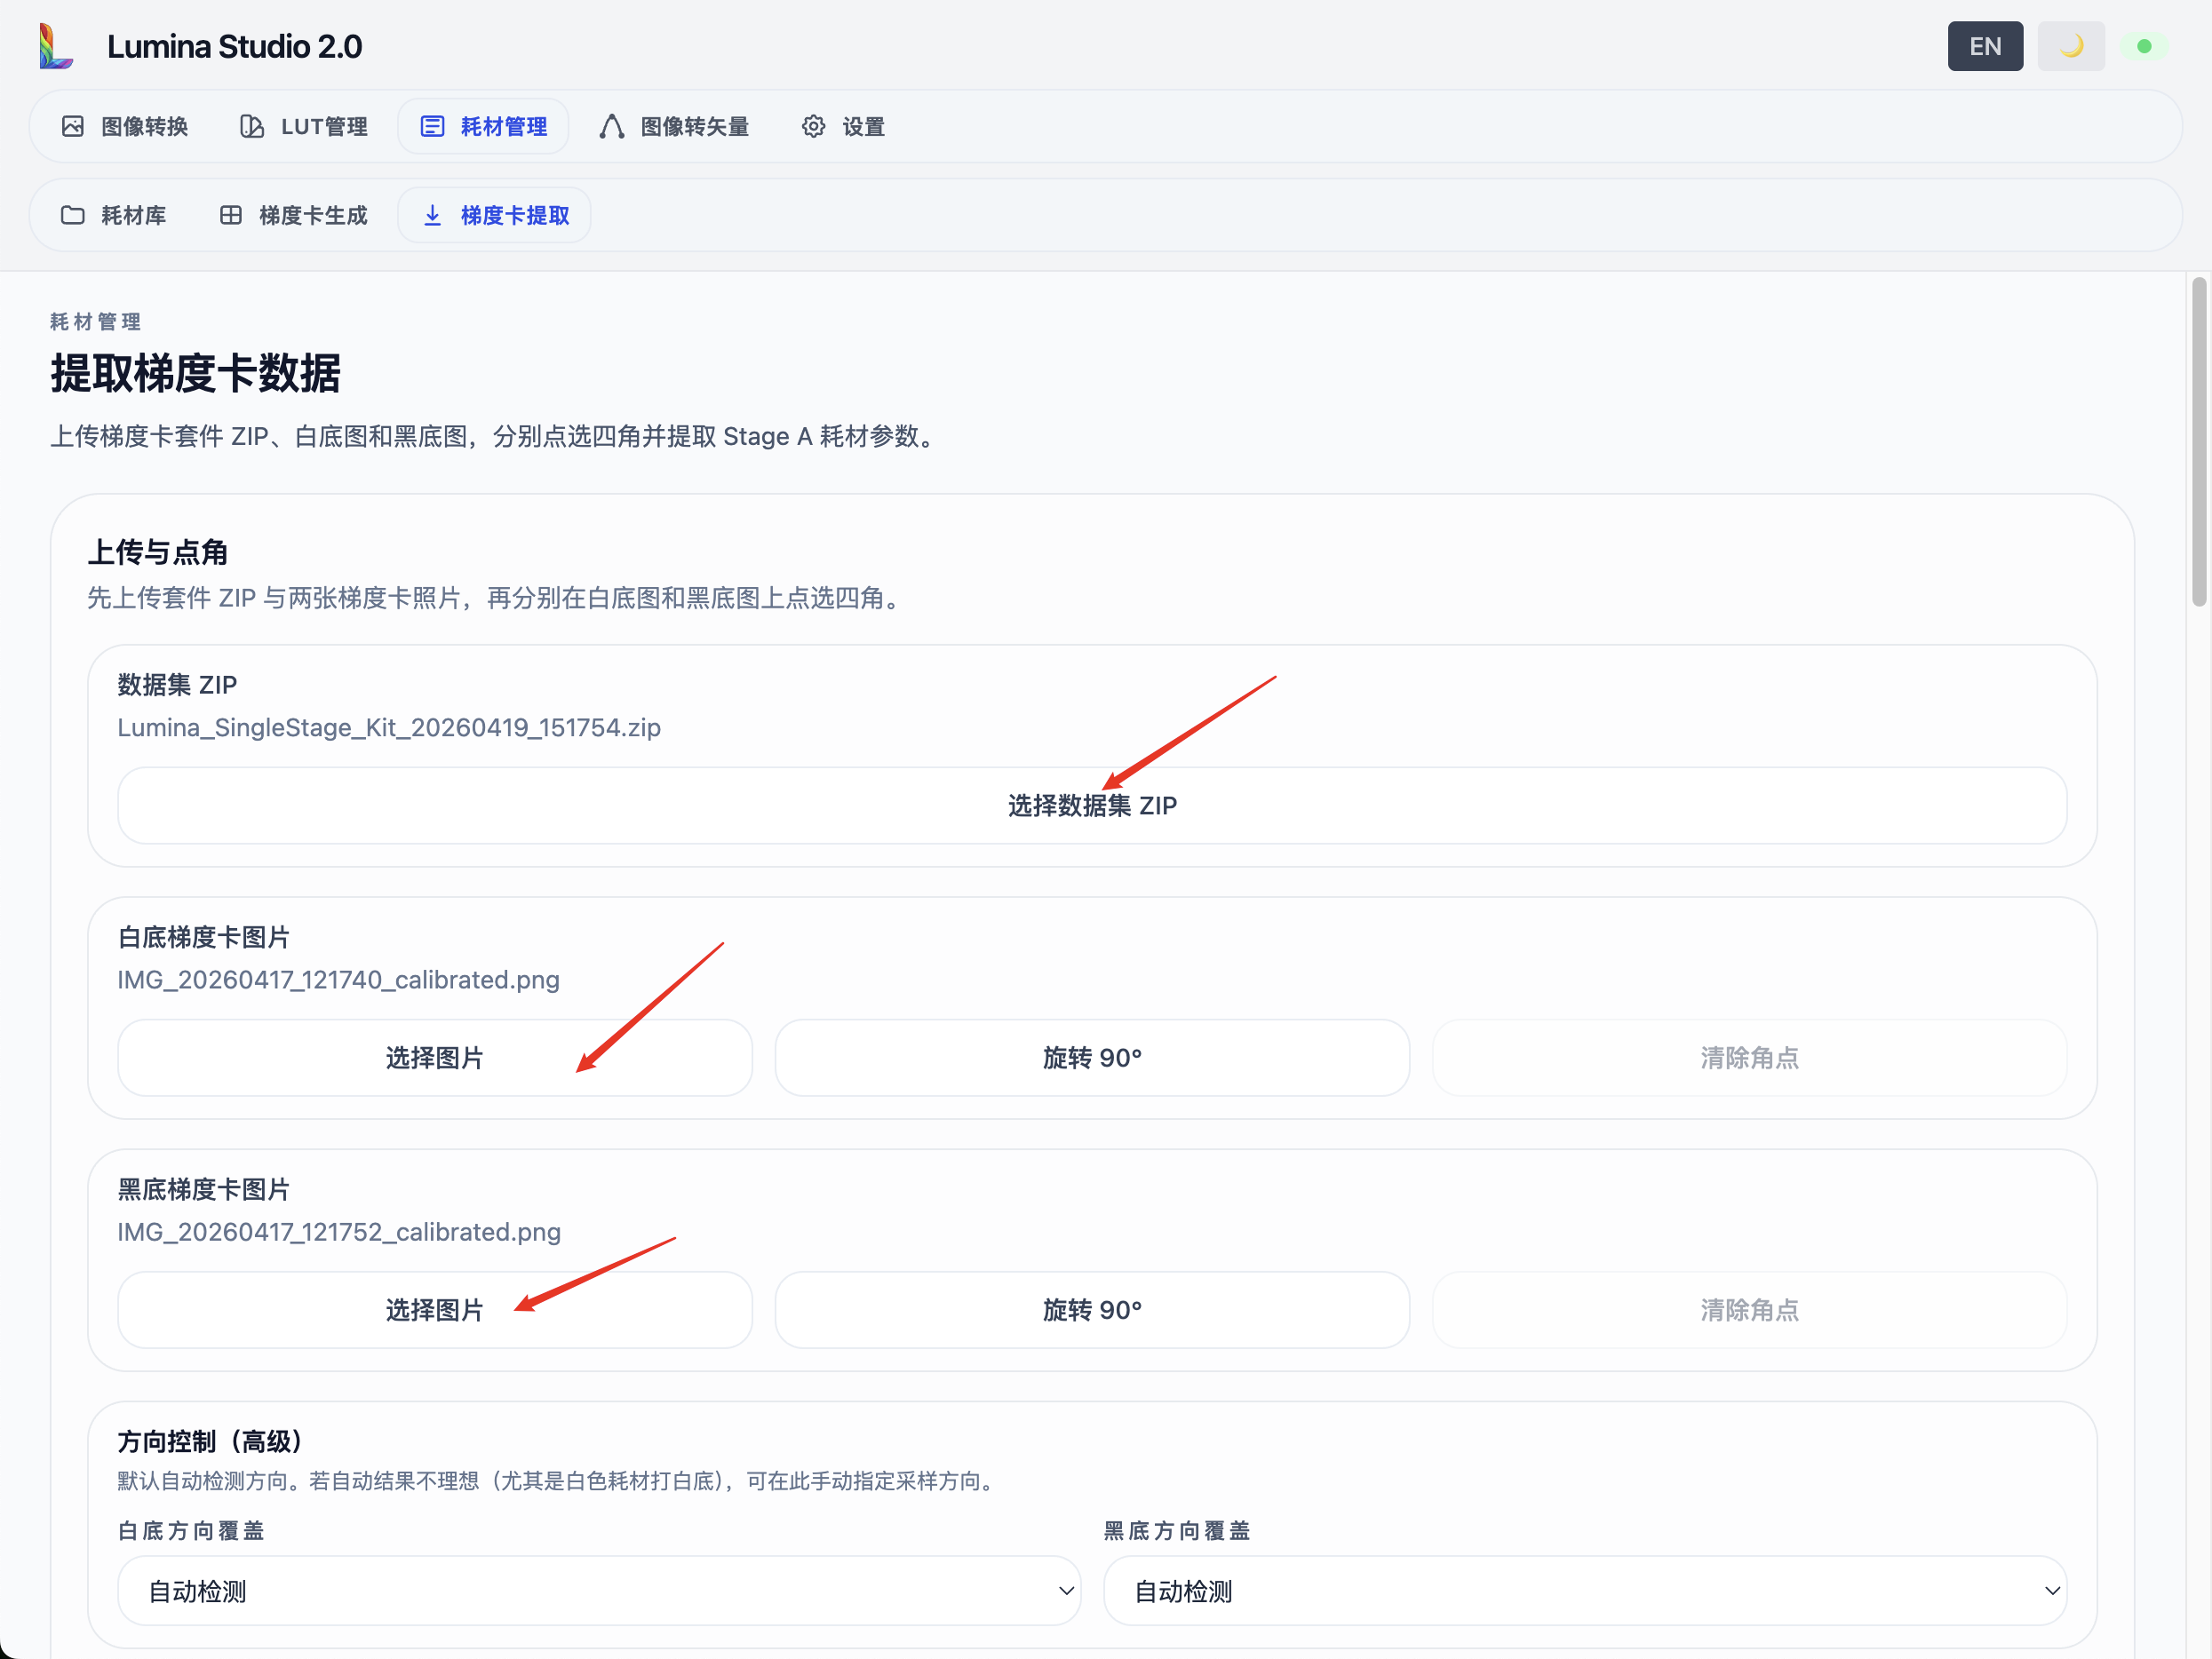
Under Import Generated Gradient Card ZIP, select Choose Dataset ZIP, then choose the complete Kit ZIP saved when this card pair was printed.
Upload the white-base photograph and the black-base photograph in their matching sections. If a photograph is inconveniently oriented, rotate it 90 degrees clockwise or counterclockwise before marking the corners.
Leave the pure-white and pure-black patch positions on Auto Detect (Recommended) for the first attempt. These settings refer to the uncovered white or black base patch in the original photograph. Specify a corner manually only when orientation detection is unreliable or the extracted result is clearly wrong.
The photographs in the original screenshot include a ColorChecker, but the basic extraction workflow does not require one. If you do not have a standard chart, leave ColorChecker calibration off and use the original camera or scanner images.
Step 4: Mark the four corners in order
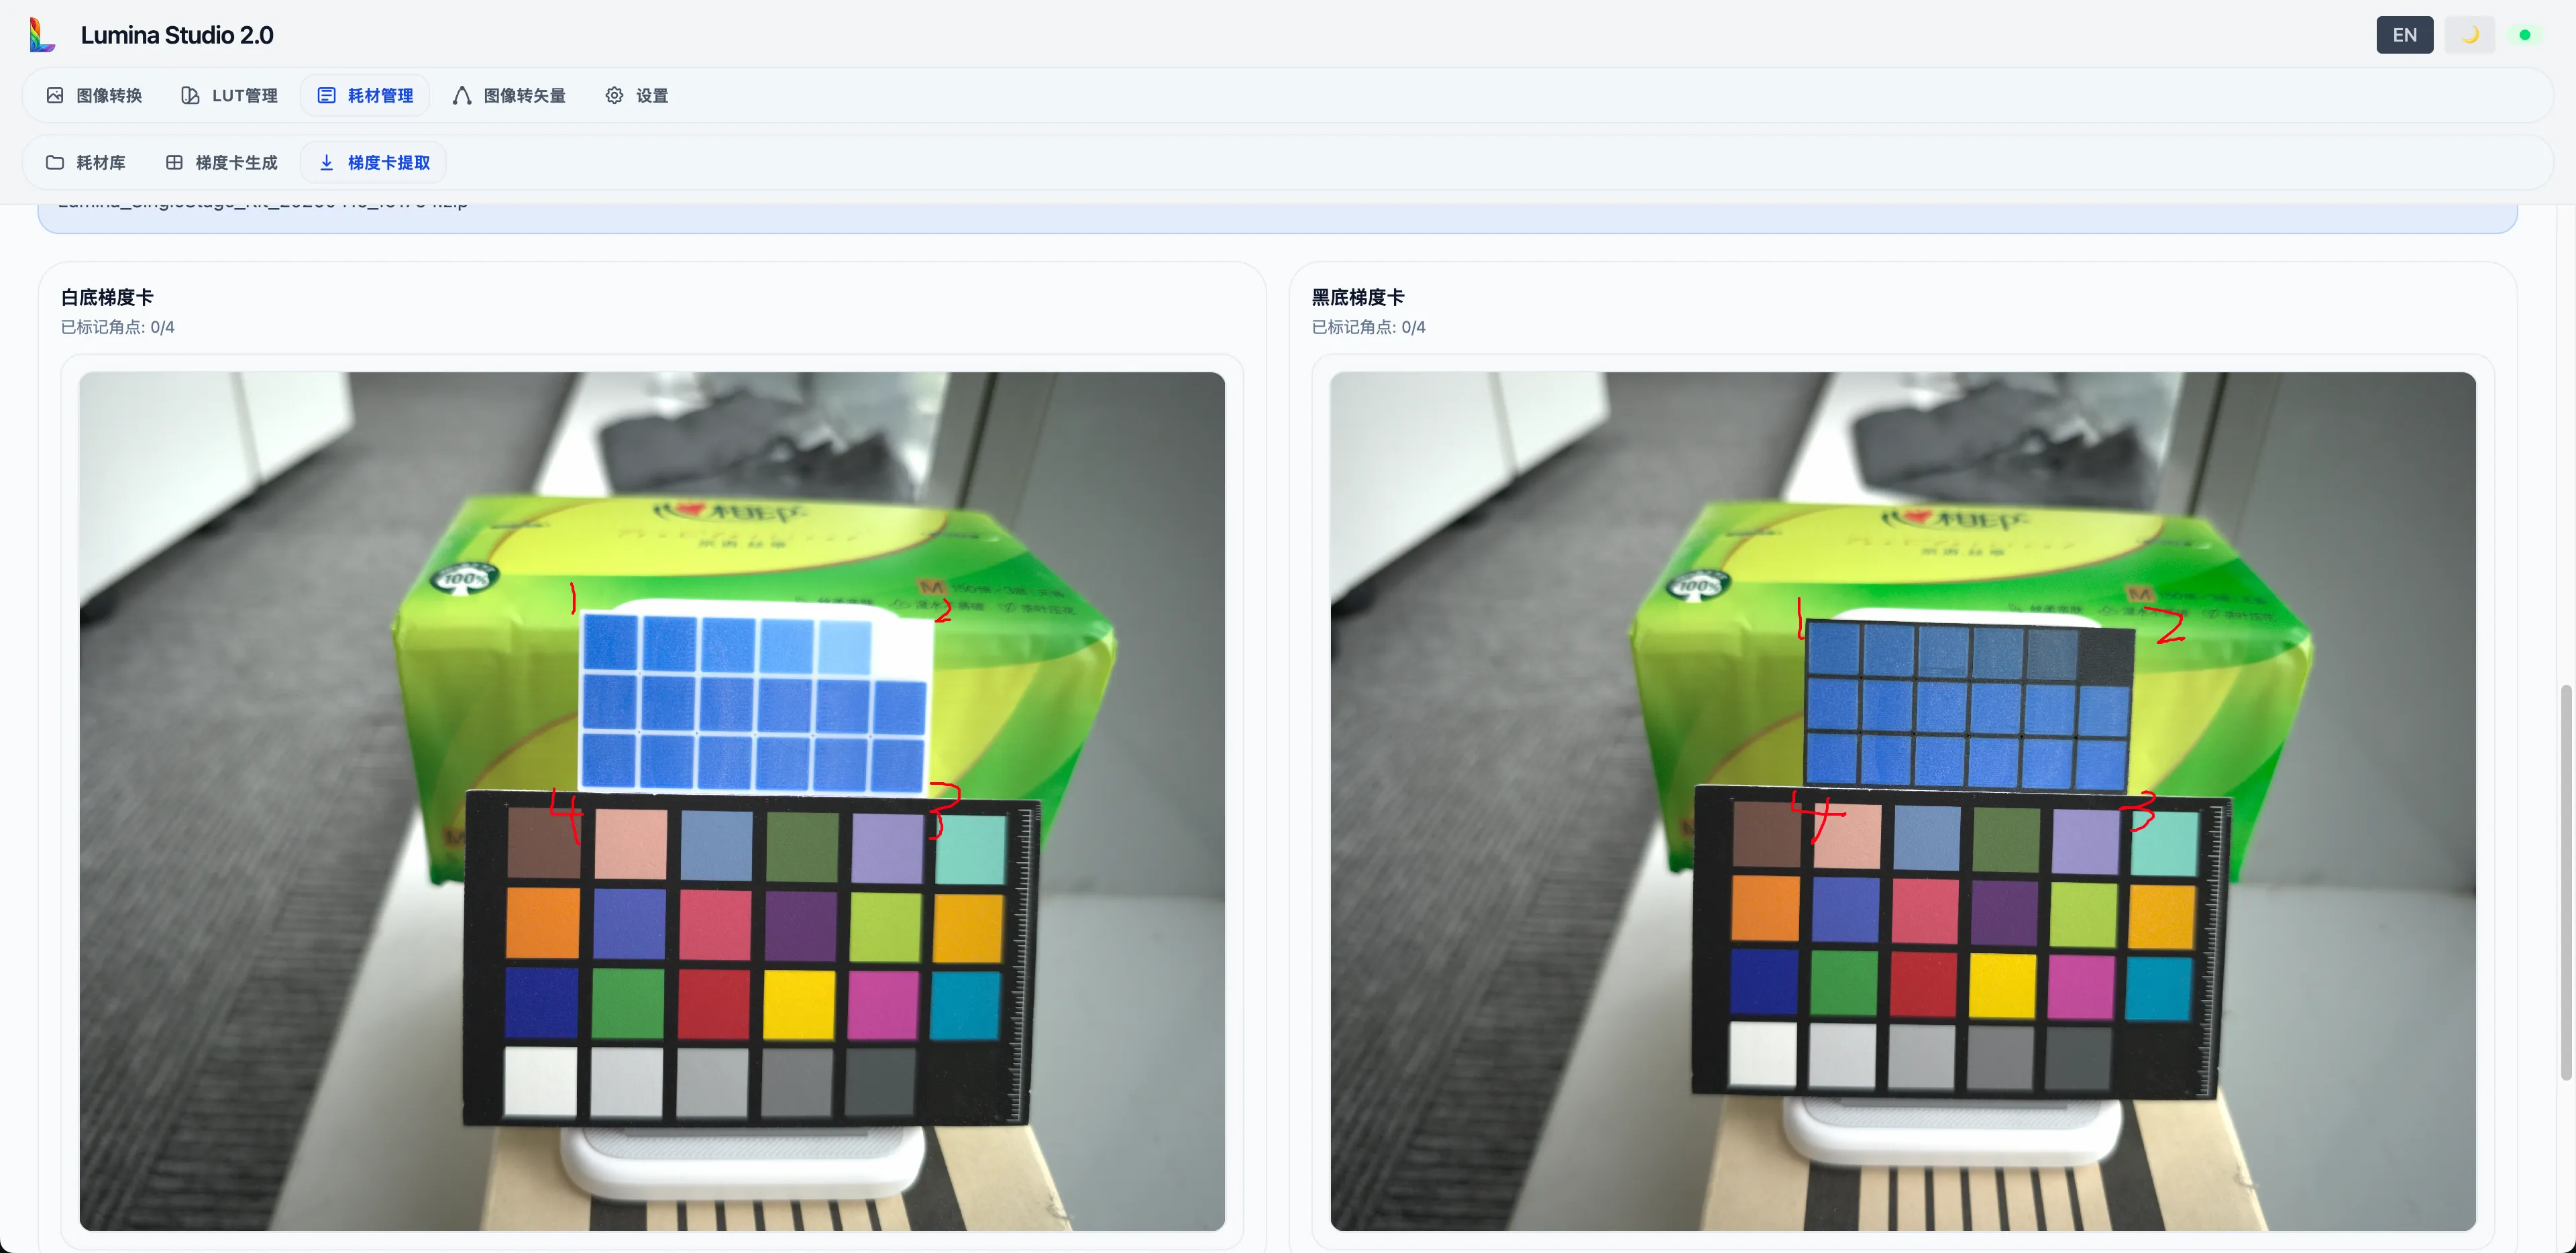
On the white-base preview, select the four outer corners of the complete gradient area in this exact order:
- Top left.
- Top right.
- Bottom right.
- Bottom left.
Repeat the same order on the black-base image. You will place eight points in total.
Mark the outer boundary of the complete gradient area, not an individual patch, the photograph edge, or the ColorChecker corners.
If a point is slightly misplaced, select it under Corner Fine Adjustment and use the direction controls or keyboard arrow keys. If the order is wrong, clear the corners and mark them again instead of continuing with a bad quadrilateral.
The extraction control becomes available only after both images report that all four corners are complete.
Step 5: Extract and verify orientation
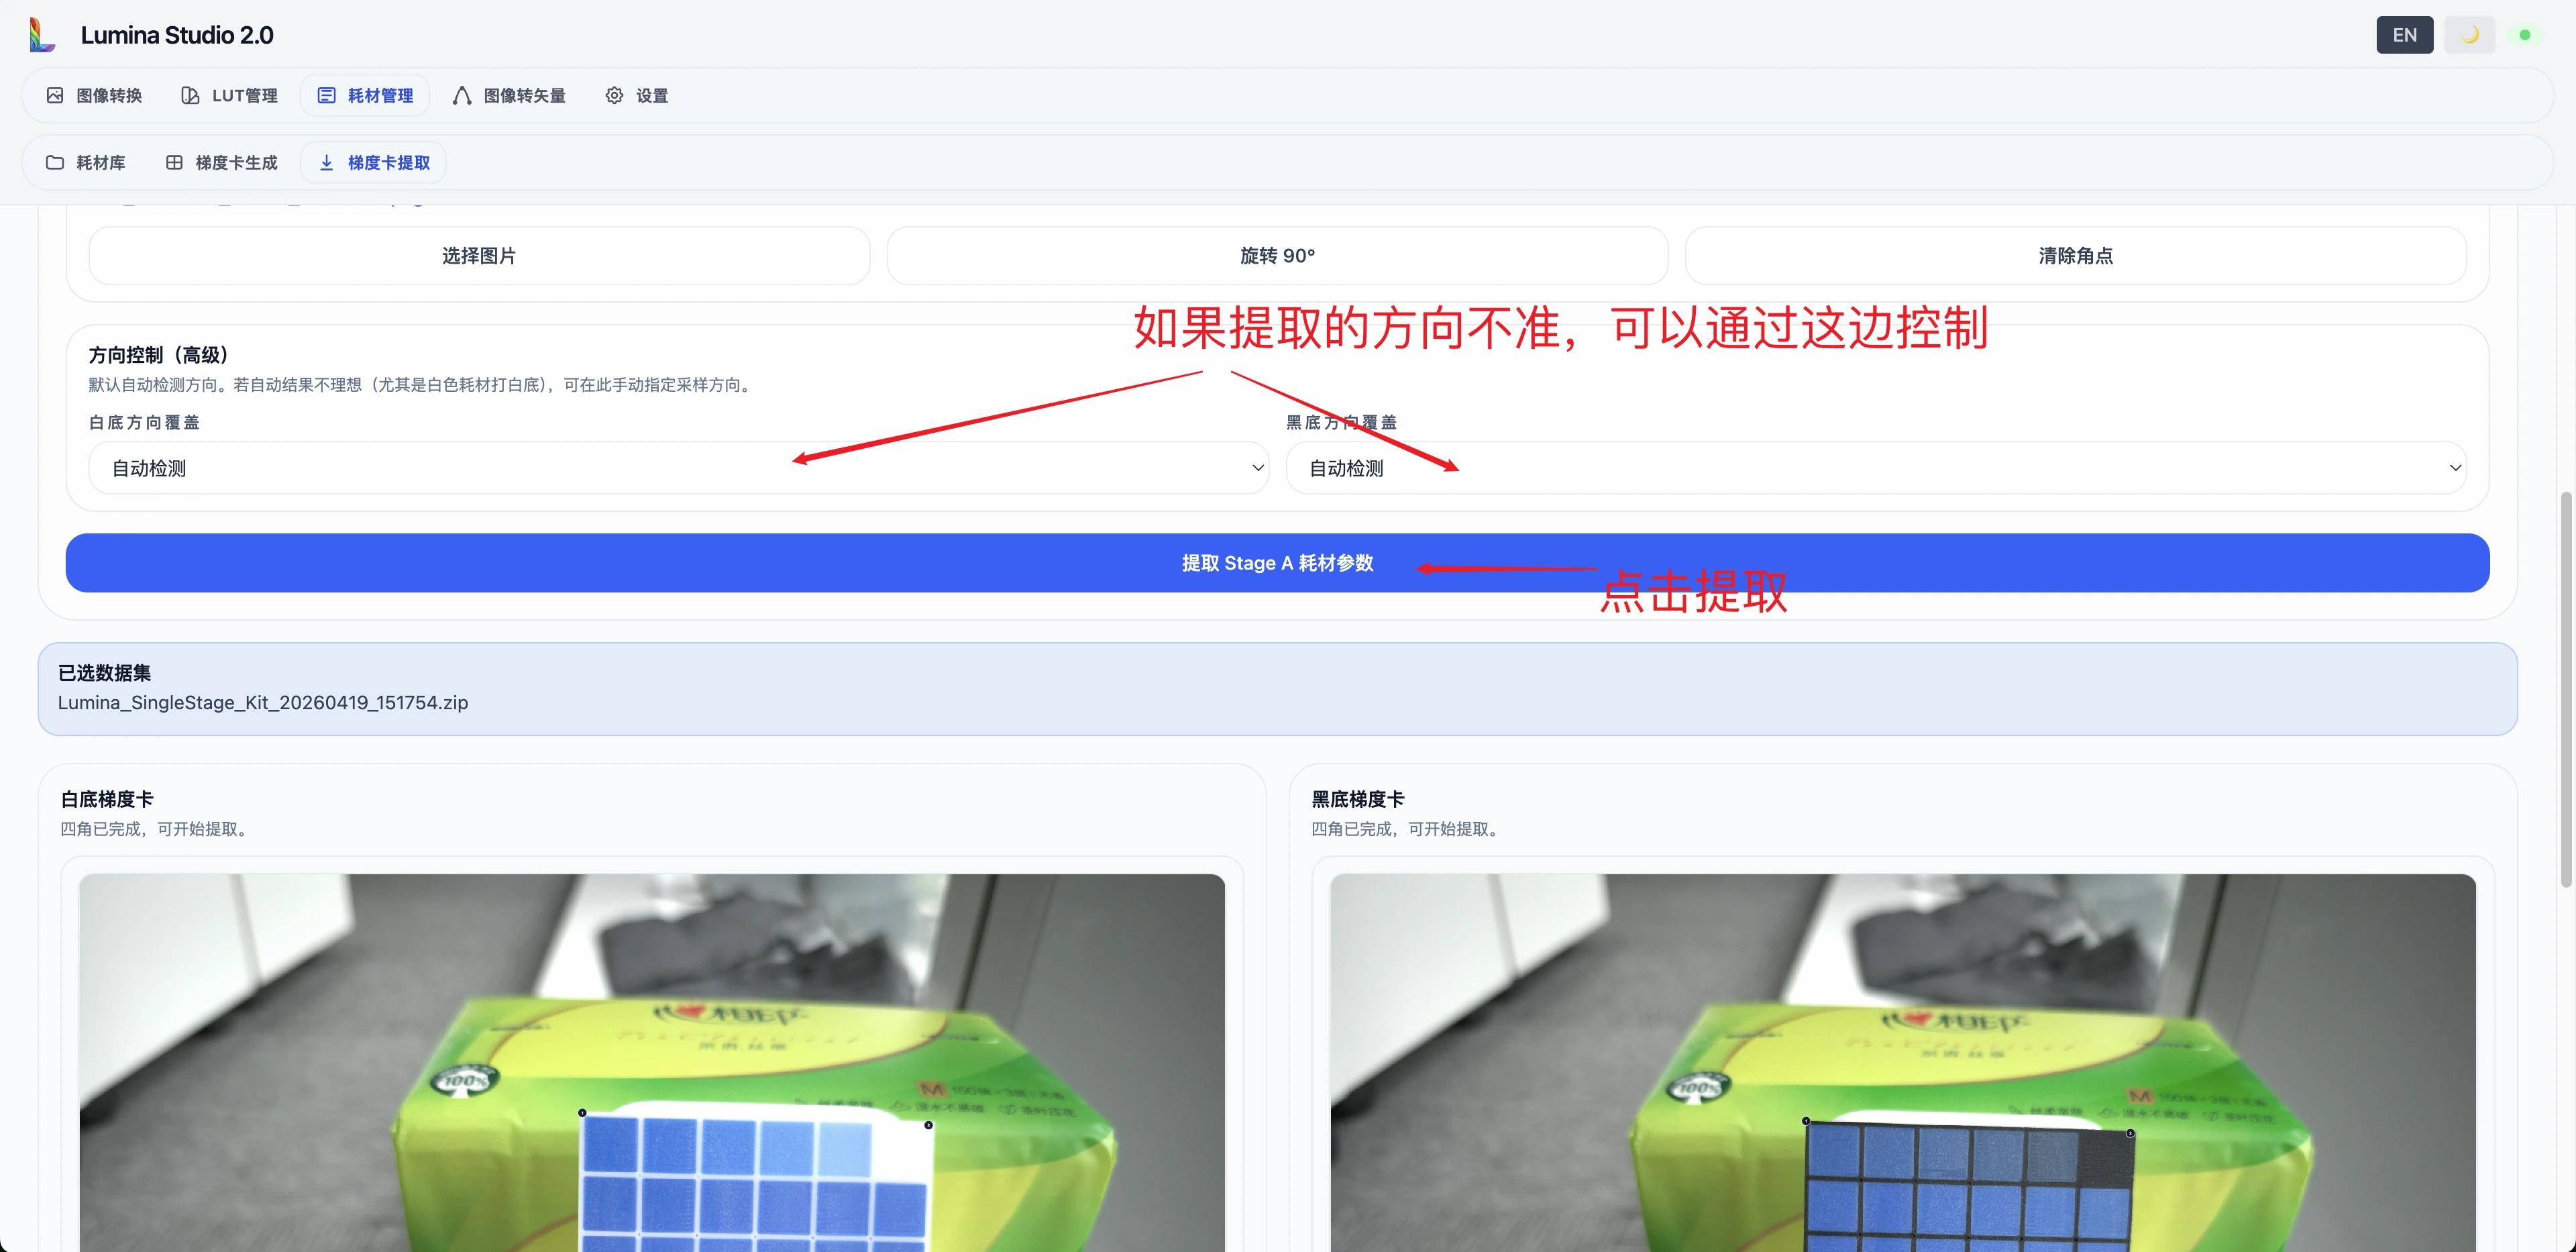
Select Extract Material, then wait while Lumina performs perspective correction, patch sampling, and fitting. Do not click repeatedly or replace the input files while processing is in progress.
If orientation detection is unreliable, first check the photograph orientation and corner order. If the result is still wrong, manually select the corner containing the pure-white or pure-black patch in the original photograph, then extract again.
The manual setting describes where the pure patch appears in the original photograph, not where you want it to appear after correction.
Step 6: Inspect the perspective-corrected previews
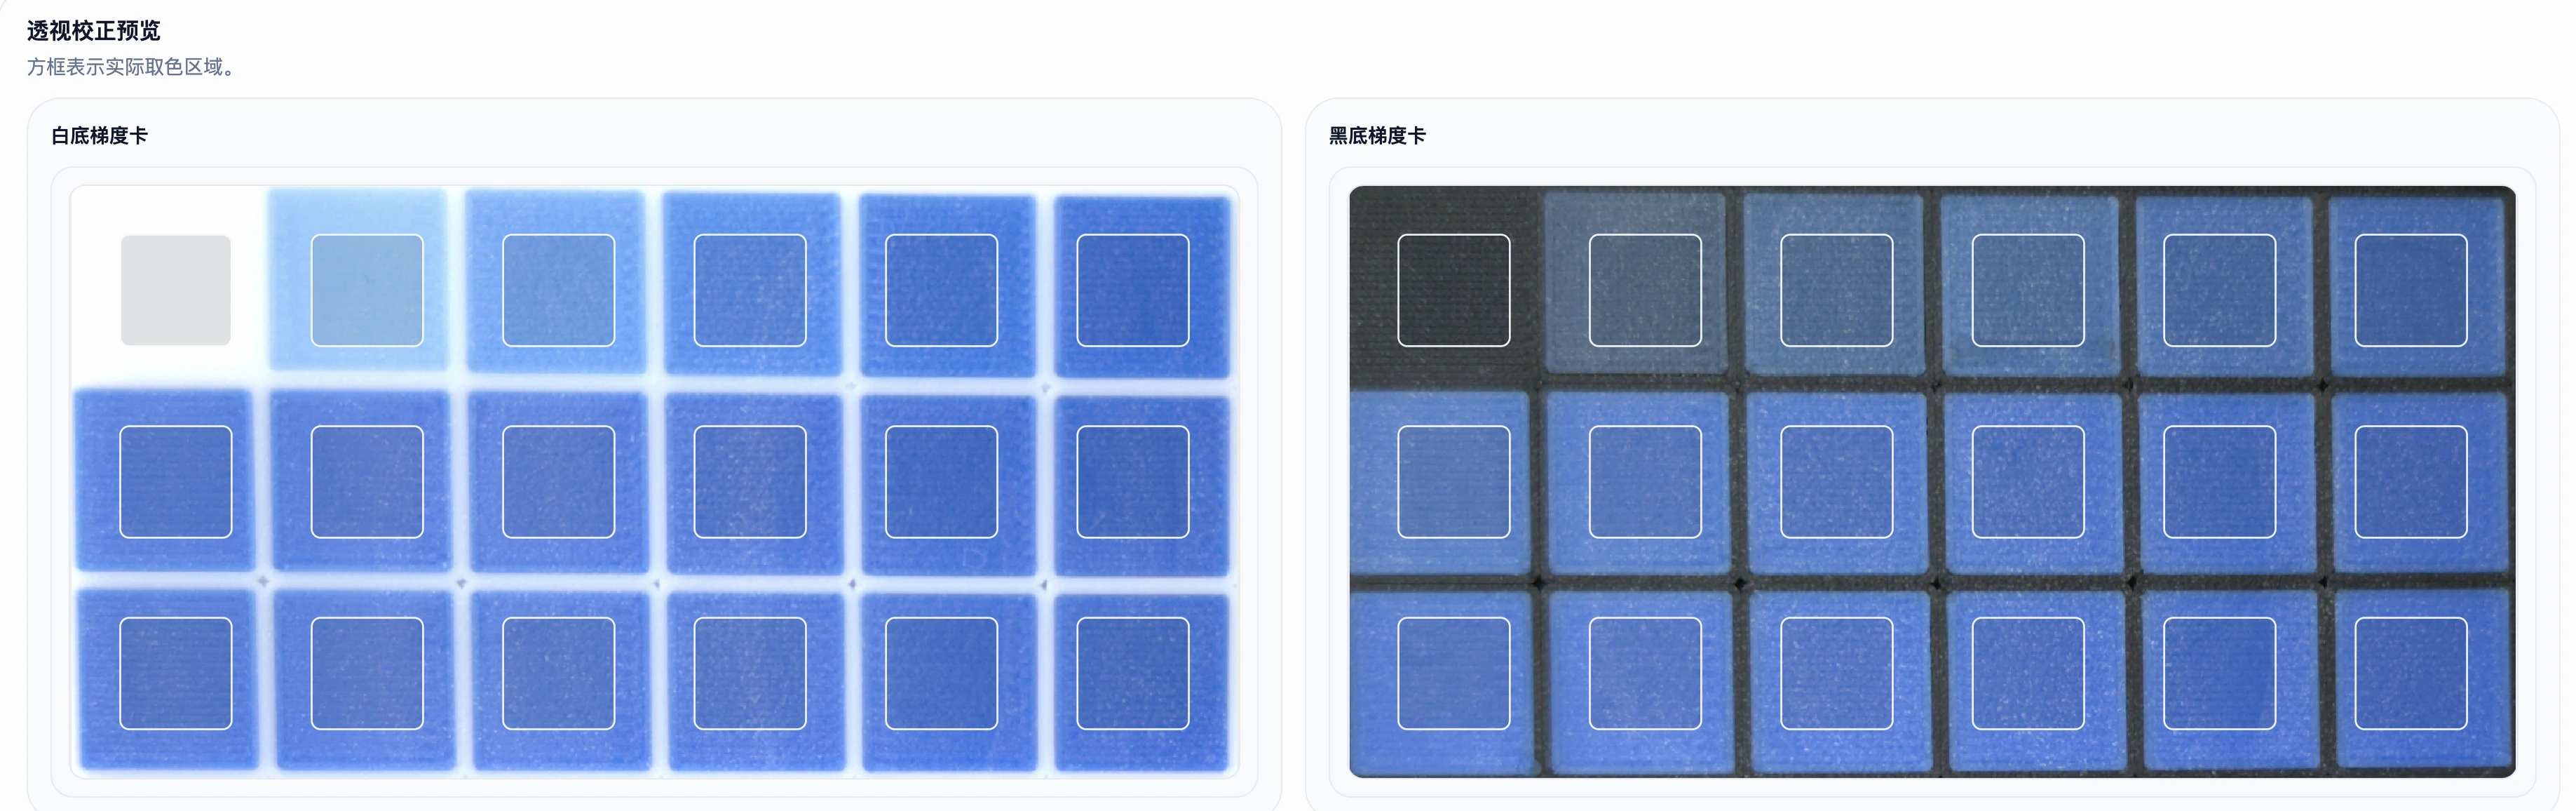
Both cards should be straightened in the corrected preview. Every sampling box should sit completely inside its matching patch, without crossing a gap, border, or image edge.
If the boxes are visibly misplaced, correct the four corners and their order, then extract again. Do not save a profile from a visibly incorrect sample layout.
Step 7: Decide whether the result is trustworthy
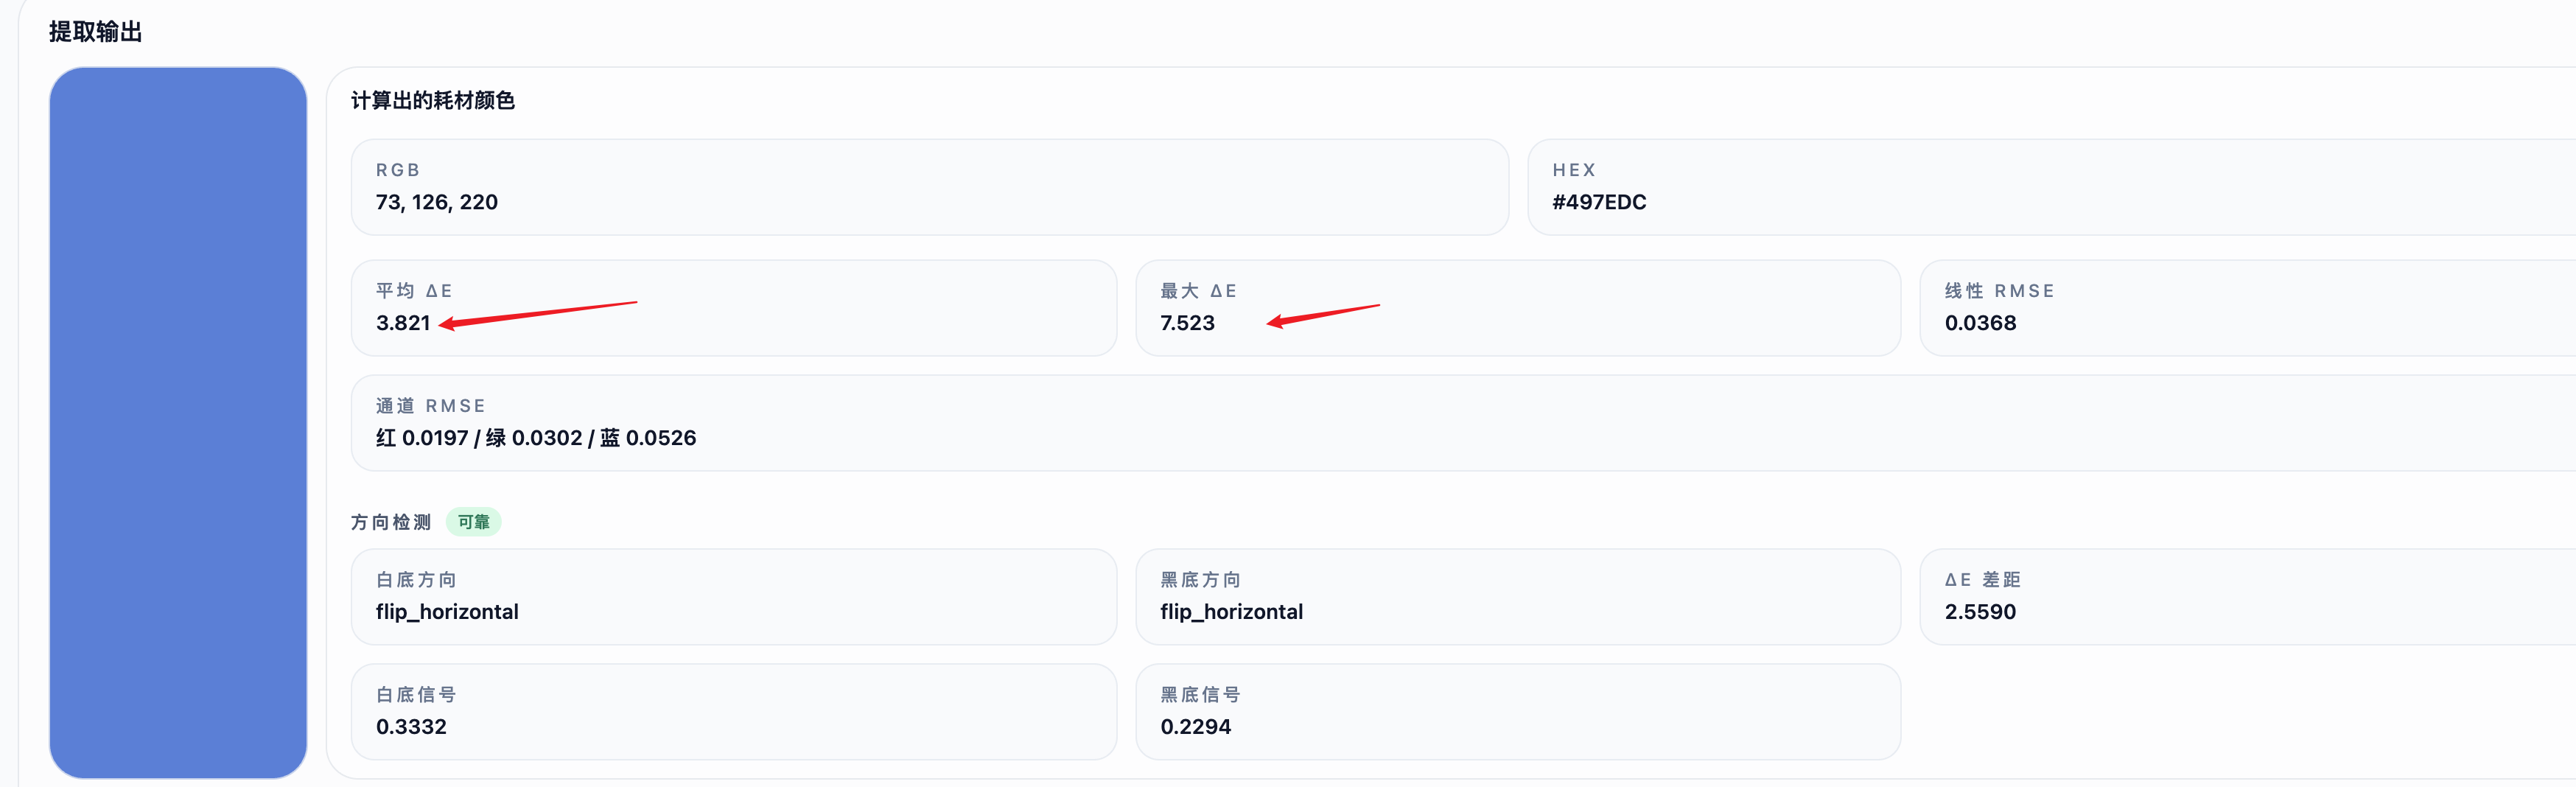
The calculated material colour helps identify the profile and should broadly resemble the test filament. A monitor preview is not a substitute for validating the final printed result.
Mean Delta E is the average fitting error. Lower is generally better, but do not judge the extraction from one fixed number alone. The old statement that a value below 2 is always accurate is no longer used as a universal rule.
Check these three signals together:
- Sampling boxes are correctly positioned in the corrected previews.
- Orientation detection is reported as reliable.
- No extraction warning requires action.
If Lumina warns that mean Delta E is above 3, the white base is too bright or too dark, the base signal is weak, or orientation confidence is low, do not save yet. Check the lighting, exposure, image direction, corner positions, and pure-patch positions. Retake the photographs when necessary, then extract again.
Maximum Delta E, linear RMSE, and per-channel RMSE are mainly useful for deeper troubleshooting. On a first run, prioritise correct sampling, reliable orientation, and the absence of unresolved warnings.
Step 8: Name and save the material profile
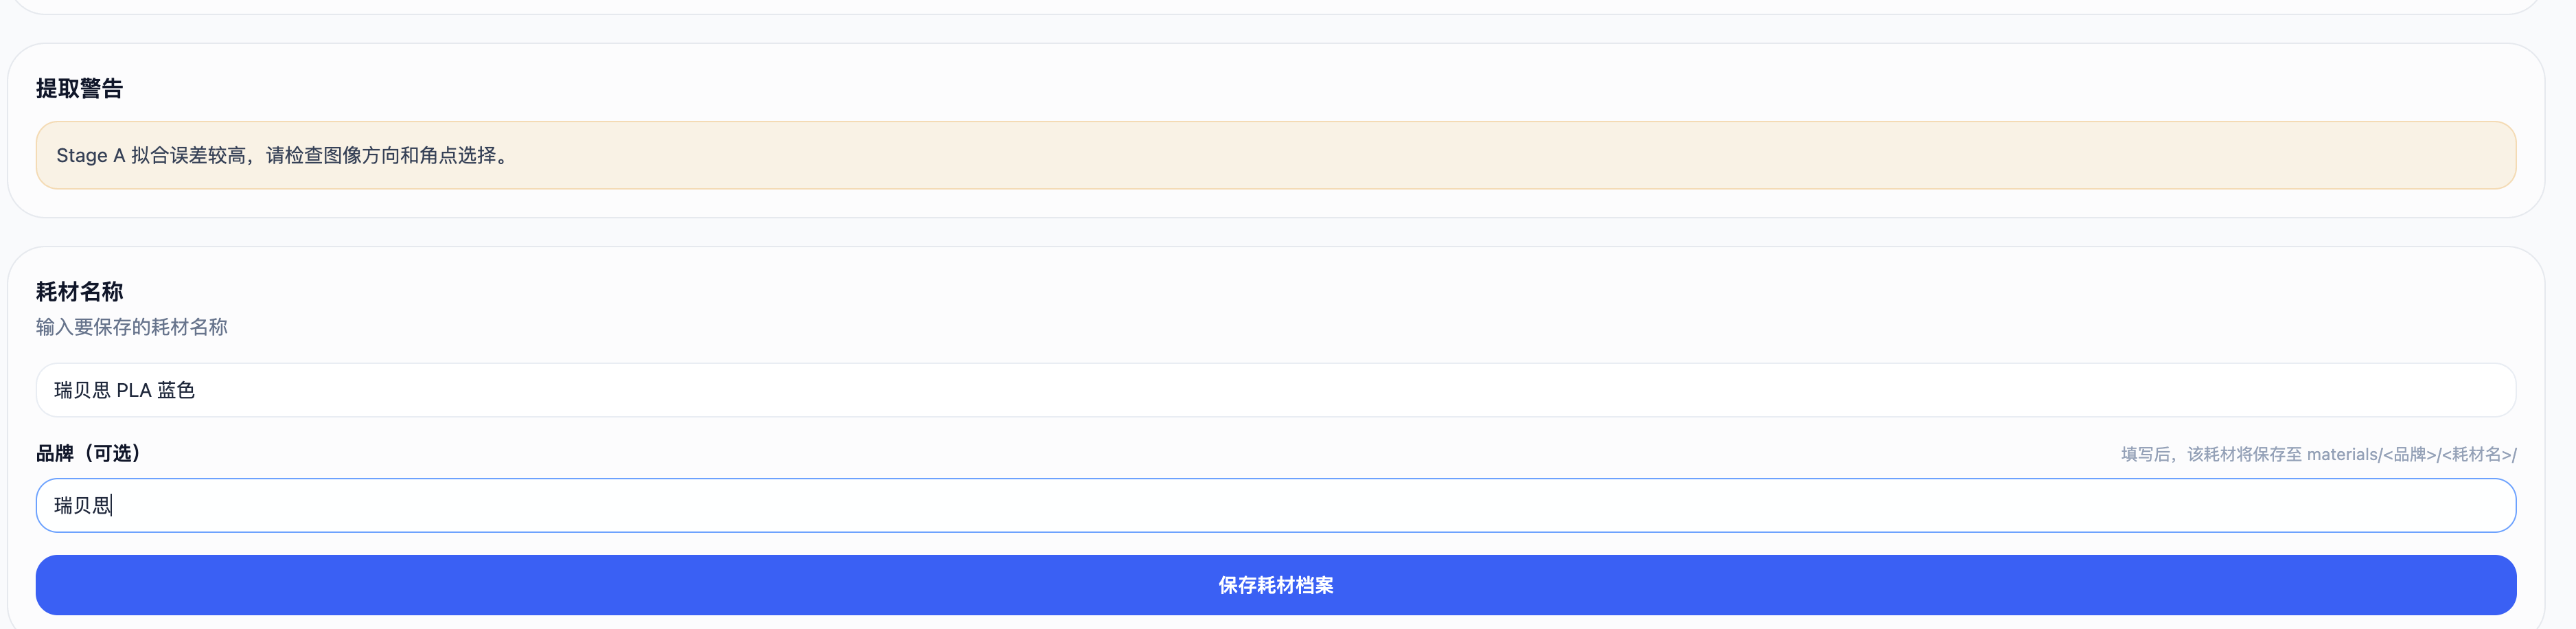
After confirming the result, enter a clear material name that includes enough identifying information, such as material type, product line, and colour.
The brand is optional. When supplied, Lumina groups the material under that brand. Leave it blank when the filament is unbranded or when grouping is not useful.
Select Save Material Profile. A success message confirms that the profile has been saved locally in Lumina Studio. Normal users do not need to download material.json or other low-level parameter files.
Open Material Library and locate the saved material name. Seeing the profile there confirms that the workflow is complete. Use the library's export feature later only when you need a cross-device backup.
What to do next
Do not begin with a large final print immediately after creating a profile. First convert a small test image whose colours and details are easy to judge. Compare the Lumina preview, the slicer's bottom-view preview, and the real print before committing to a larger project.
Using a saved material profile for image conversion will be covered in a separate tutorial. This article ends after the profile has been saved and confirmed in the library.
Frequently asked questions
Can I use only a phone?
Yes. Consistency matters more than the price of the camera. Use the same device and lens, keep exposure and white balance consistent, and photograph the complete cards under even lighting.
Do I have to buy a standard 24-patch chart?
No. The basic extraction workflow accepts original camera or scanner images. If you use optional ColorChecker calibration, process both photographs with the same calibration workflow.
Can I photograph only one card?
No. The white-base card, black-base card, and matching complete Kit ZIP are one set and must be used together.
Why is Extract Material disabled?
The ZIP or one of the two images may be missing, or one image may not have all four corners marked yet.
Why is Save Material Profile disabled?
Complete a valid extraction and enter a material name first. If the extraction state became invalid, run extraction again before saving.
What should I do when automatic orientation has low confidence?
Confirm the corner order and image direction first. If detection remains unreliable, manually choose the corner containing the pure-white or pure-black patch in the original photograph, then extract again.
What mean Delta E value is acceptable?
Do not rely on one fixed threshold. Verify the sampling boxes, orientation status, and warnings together. If Lumina reports that mean Delta E is above 3, correct the photographs or corner markings and extract again.
Do I need to download parameter files after saving?
No. The profile is stored locally and appears in Material Library. Low-level files are only needed for cross-device backup or advanced troubleshooting.
Submit feedback
Your feedback is sent privately to the Wiki maintainers and is not displayed publicly on this page.